
Setting up single sign-on (SSO) for organizations
Setting up SSO allows users to access multiple applications with a single set of credentials, simplifying access control and ensuring consistent authentication policies for everyone in your organization.
This guide explains how to set up and enable single sign-on (SSO) for an organization when using an identity provider (IdP) for authentication.
SSO allows users to access multiple applications with a single set of credentials. An IdP manages authentication requests, enforces security policies, and reduces the need for separate passwords across different systems. By centralizing identity management, you can simplify access control and ensure consistent authentication policies for everyone in your organization.
Prerequisites
To enable SSO or require that it be applied to all of your organization's users when they log in to the Fastly control panel, you must:
- be assigned the role of Organization Admin for your organization
- have access to your IdP's administration console
In addition, your IdP must support:
- Security Assertion Markup Language 2.0 (SAML 2.0)
- Service Provider (SP) or IdP-initiated SSO for login purposes
You should also review this feature's limitations before enabling SSO.
Enabling SSO
Start by selecting an IdP and configuring that provider’s settings keeping in mind the prerequisites.
- Log in to the Fastly control panel.
- Go to Organization > Organization security.
Click Add SAML Configuration.
From the Identity provider menu, select your organization's IdP.
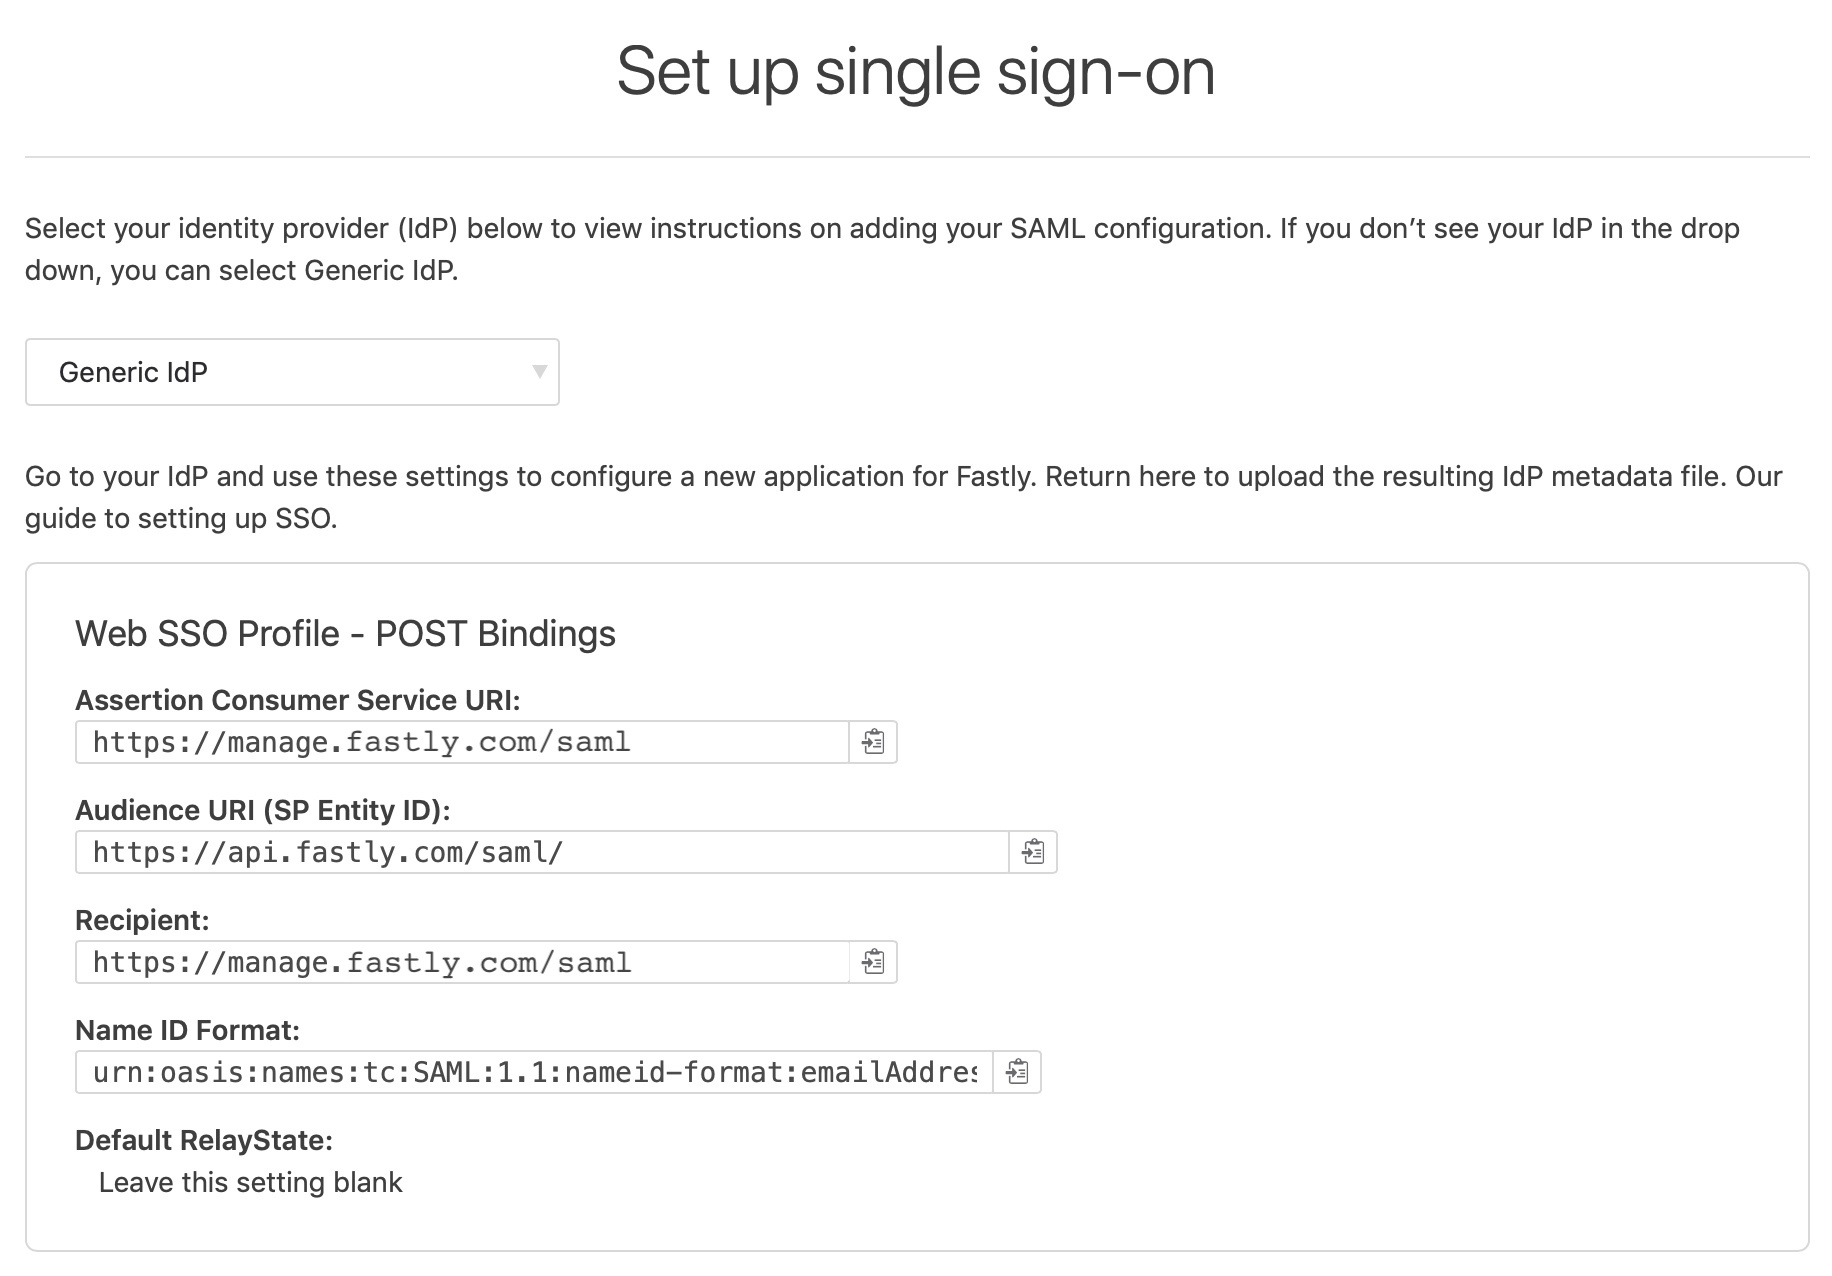
Using the configuration details that appear in the Fastly control panel, create a new SAML 2.0 application in your IdP's administration console and assign the application to new and existing users. Refer to your IdP's documentation for more information.
After creating the SAML 2.0 application in your IdP, download the XML metadata file with your application’s SAML configuration. The XML file includes a public certificate used to verify the signature of SAML assertions.
Upload your IdP metadata file. You can do this by dragging and dropping the file into the area provided or by browsing for the file and uploading it.

Click Save and Enable SSO.
In the confirmation window, click Save and Enable SSO. Your metadata will be saved and the SSO controls will indicate that SSO is enabled.
IMPORTANT: If you have SSO configured but don't currently enforce it, users will need to click Try another way on the login screen to sign in via username (email) and password.
Requiring SSO for your organization
To require SSO for everyone in your organization except administrators, follow these instructions.
- Log in to the Fastly control panel.
- Go to Organization > Organization security.
- Select the Immediately enforce SSO checkbox that appears below the SAML configuration switch.
- In the confirmation window, click Start enforcing SSO. Currently open non-SSO sessions for users with the Organization Viewer role will be logged out and they will need to re-authenticate using SSO via your IdP.
HINT: Users who have been assigned the role of Organization Admin can always log in with their email address and password, whether or not Single sign-on is enabled.
Performing organization tasks differently with SSO enabled
If your organization has enabled SSO, you may notice different feature availability in the Fastly control panel. This section describes the differences.
- Changing your email address and password. Because SSO requires user email addresses in Fastly to match those in the IdP, you won't be able to change your email address while logged in using SSO. You also won't be able to modify your password or enable two-factor authentication.
- Managing sessions. Sessions created by logging in to the Fastly control panel using SSO or with a username and password can remain active for up to 12 hours. If you close your browser, your session will automatically expire after 30 minutes.
Changing SSO providers
To change SSO providers, follow these instructions.
WARNING: Disabling the SSO feature for your organization will expire all active SSO sessions, including your own. Users will automatically be logged out of the Fastly control panel.
- Log in to the Fastly control panel.
- Go to Organization > Organization security.
- From the Options menu, select Upload new SAML configuration.
- In the confirmation window, click Continue to delete your existing SAML confirmation.
- Follow the instructions in the enabling SSO section.
Updating SAML certificates without changing SSO providers
When your SAML certificate is expiring or needs to be updated, you can replace it by uploading a new SAML configuration to replace your old one, all without changing your SSO provider.
- Log in to the Fastly control panel.
- Go to Organization > Organization security.
- From the Options menu, select Upload new SAML configuration.
- In the confirmation window, click Continue to delete your existing SAML confirmation.
Disabling SSO
To disable SSO for your organization, either permanently or temporarily (e.g., your SSO provider is experiencing an outage), follow these instructions. Disabling SSO won't delete your SSO settings and you can re-enable SSO at any point using the same IdP configuration metadata you uploaded when you first enabled SSO.
WARNING: Disabling the SSO feature for your organization, even temporarily, will expire all active SSO sessions, including your own, and will automatically log users out of the Fastly control panel.
- Log in to the Fastly control panel.
- Go to Organization > Organization security.
- Click the Single sign-on switch to disable SSO for your organization.
- In the confirmation window, click Disable SSO. SSO will be disabled and will not be required for your organization's users. All active SSO sessions will expire, including your own, and users will automatically be logged out of the Fastly control panel.
Limitations and considerations
The SHA-1 cryptographic algorithm has been retired by the National Institute of Standards and Technology (NIST) and they recommend upgrading to more advanced and secure replacements such as those from the SHA-2 family of hash functions, like SHA-256. Consider using or upgrading to these more advanced algorithms for SAML certificate signing for SSO setup in advance of the NIST recommended phase out deadline.
