

Depuis le 4 août 2025, le serveur Fastly MCP officiel est désormais disponible. Retrouvez l’annonce ici et n’hésitez pas à vous rendre sur le forum pour nous faire part de vos projets.
Nous savons tous que les LLM peuvent accomplir des choses incroyables à présent, mais les déployer dans le monde réel peut entraîner des problèmes concrets. Par exemple, le MCP (Model Context Protocol) suscite à juste titre beaucoup d'attention actuellement pour les scénarios incroyablement créatifs qu'il peut rendre possibles. Mais les vulnérabilités de sécurité que MCP peut exposer devraient être un véritable cauchemar pour toute organisation, sans parler d'autres préoccupations majeures telles que la mise à l'échelle ou la gestion d'un point de terminaison MCP au fil du temps. Mais bon, bonne nouvelle : la sécurité, l'évolutivité, la résilience et la facilité de gestion, c'est notre spécialité ! Nous allons donc vous montrer comment utiliser Fastly Compute pour créer un serveur MCP prêt pour le monde réel — sécurisé, évolutif et fiable.
Qu’est-ce que MCP ?
Le Model Context Protocol (MCP) est un protocole ouvert conçu pour standardiser la manière dont les applications fournissent un contexte essentiel aux grands modèles de langage (LLM). MCP agit comme une interface universelle, permettant aux applications d'IA de se connecter de manière transparente à diverses sources de données.
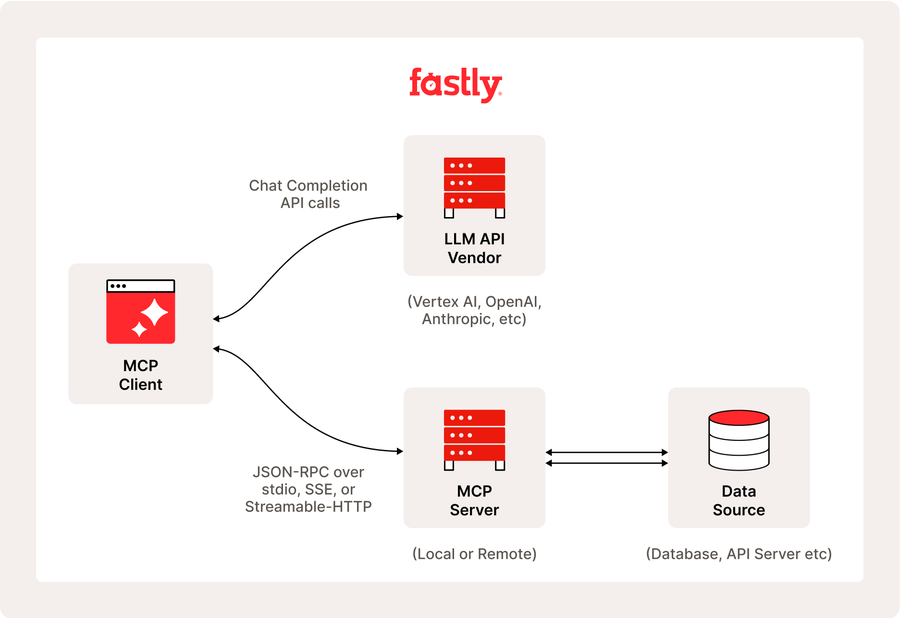
MCP offre également la flexibilité de passer d'un fournisseur LLM à un autre et met l'accent sur la sécurité des données au sein de l'infrastructure de l'utilisateur en utilisant une architecture client-serveur où les applications (hôtes MCP) se connectent à des sources de données (sources de données locales et services distants) via des serveurs et clients MCP légers. Cette approche unifiée propose des intégrations préconçues, permettant aux développeurs de tirer parti rapidement de diverses sources de données.
Nous expliquerons comment créer un serveur MCP en utilisant Fastly Compute, mais si vous êtes intéressé par l'accès à l'API de la plateforme Fastly via MCP, le package fastly-mcp-server peut vous être utile, et nous en parlerons davantage à l'avenir.
Pourquoi la plateforme de Fastly améliore-t-elle le fonctionnement de MCP
En tant qu’architecte Enterprise Serverless, je conseille souvent les clients sur la meilleure approche pour leurs charges de travail, notamment s’ils pourraient bénéficier de l’edge computing. Je prends en compte plusieurs facteurs, tels que le niveau de simultanéité attendu et les pics potentiels de la charge de travail, ainsi que la nécessité d'une faible latence dans les applications destinées aux utilisateurs. Et, comme vous l'avez peut-être deviné, MCP, que nous allons approfondir dans cet article, est un très bon exemple de charge de travail qui bénéficie considérablement de la conception unique de la plateforme Fastly et de Fastly Compute. Voici une démonstration du client MCP en action.
Vous remarquerez que l'agent LLM effectue plusieurs appels simultanés aux outils MCP, tels que « GetHistoricalStats » et « GetServiceDetail ». Si vous étiez responsable de l'exploitation de ce serveur MCP, quelle charge estimeriez-vous et comment approvisionneriez-vous l'infrastructure du serveur ? Pour un environnement relativement nouveau tel que MCP, avoir une infrastructure massive et complexe n'est pas idéal. Bien que le serverless soit pratique pour démarrer petit, vous devez naturellement éviter les problèmes courants tels que les démarrages à froid (sans trop de tracas, bien sûr). Étant donné la possibilité de pics, où plusieurs utilisateurs peuvent simultanément appeler les outils MCP, il est crucial de choisir un environnement évolutif. De plus, comme la communication se fait souvent par chat, il est crucial de maintenir la latence de réponse aussi faible que possible.
Un avantage notable de l’utilisation de Fastly Compute pour des cas comme celui-ci est que son runtime basé sur WebAssembly utilise la technologie de bac à sable d’isolation, permettant une exécution plus sûre du code à la fois localement et à distance. Cela signifie que votre serveur MCP est plus sûr lorsqu'il fonctionne sur Fastly. Comme nous l’avons vu, la conception de Fastly Compute répond à de nombreuses faiblesses architecturales inhérentes à MCP. Dans les sections suivantes, je vais vous guider à travers le processus spécifique de déploiement d’un serveur MCP distant en utilisant cette plateforme.
Comment créer un serveur MCP distant avec Fastly Compute
Nous commencerons par déployer un point de terminaison HTTP Streamable qui n'inclut pas les points de terminaison SSE obsolètes. Cela peut être facilement accompli en suivant les étapes suivantes. Veuillez noter que vous devez remplacer le jeton API à deux endroits dans le fichier main.go avant de le publier. (Pour obtenir des informations sur l'obtention de votre jeton API, veuillez consulter ce document guide.)
$ git clone https://gist.github.com/d829a6a58ce359b1aa99ecae12ba79f1.git fastly-compute-mcp-server
$ cd fastly-compute-mcp-server
$ vi main.go # Replace __PUT_YOUR_FASTLY_API_TOKEN__ with your own TOKEN
$ fastly compute publish
...
✓ Activating service (version 1)

Manage this service at:
	https://manage.fastly.com/configure/services/mMnYw4qeGq81xga89Mq8O0

View this service at:
	https://highly-proper-orange.edgecompute.app
Au cours du processus de publication, plusieurs questions vous seront posées. Répondez « oui » à n'importe quelle invite y/n, et pour tous les autres éléments, vous pouvez simplement appuyer sur la touche « Entrée » pour accepter les valeurs par défaut (vides). Après quelques instants, vous verrez un message indiquant que votre service est désormais disponible, comme indiqué ci-dessus.
Ensuite, utilisons la commande npx pour lancer l'outil de vérification MCP Inspector et vérifier si notre serveur déployé fonctionne correctement. Une fois que la commande npx @modelcontextprotocol/inspector est exécutée avec succès, accédez à http://127.0.0.1:6274 pour ouvrir l'interface officielle du testeur. Dans la barre latérale gauche, sélectionnez « streamable http » comme type de connexion et saisissez l'adresse du service (https://*.edgecompute.app) affiché comme résultat de la commande de publication.

Lorsque vous voyez « Connecté » sous le bouton Connecter dans la barre latérale gauche, cela signifie que la connexion a été établie avec succès. Dans le volet de contrôle à droite, cliquez sur l'onglet Outils et essayez des actions telles que lister les outils pour tester la fonctionnalité. Cela signifie que vous avez réussi à exploiter un serveur MCP distant qui communique en utilisant Streamable-HTTP non-SSE.
Ajout de la prise en charge des clients obsolètes avec SSE
Au moment d'écrire ces lignes en mai 2025, de nombreux clients MCP ne prennent toujours pas en charge le Streamable HTTP, et certains serveurs distants proposent uniquement le transport SSE. Pour garantir la compatibilité descendante avec ces clients, nous allons faire évoluer le serveur MCP que nous avons créé en ajoutant la prise en charge de SSE. (Notez que dans cet exemple, nous utiliserons Fanout pour établir des connexions SSE. Il s'agit d'un service de messagerie push Fastly qui nécessite sa propre inscription. )
Tout d’abord, créez un nouveau service en suivant les mêmes étapes qu'auparavant. Cependant, cette fois-ci, lors de la publication, créez deux back-ends à l’étape suivante de l’écran. Pour le premier back-end, indiquez l'adresse de *.edgecompute.app dans le champ Domaine et nommez-le « self ». Pour le deuxième back-end, enregistrez API.Fastly.com avec le nom « Fastly» comme indiqué ci-dessous.
✓ Creating service

Domain: [put-your-favorite-name-here.edgecompute.app]

Backend (hostname or IP address, or leave blank to stop adding backends): put-your-favorite-name-here.edgecompute.app
Backend port number: [443]
Backend name: [backend_1] self

Backend (hostname or IP address, or leave blank to stop adding backends): api.fastly.com
Backend port number: [443]
Backend name: [backend_2] fastly
Une fois que vous avez publié avec succès, exécutez la commande ci-dessous comme étape supplémentaire pour activer Fanout. Lorsque vous voyez la notification de SUCCÈS, votre configuration est prête à être utilisée.
$ fastly products --enable=fanout
SUCCESS: Successfully enabled product 'fanout'
Enfin, configurez votre client MCP (comme Claude Desktop ou Cursor) pour vérifier la fonctionnalité. Pour les clients qui prennent en charge SSE en mode natif, il n’y a que peu de difficulté : il suffit de suivre les instructions de configuration de l’application. Dans ce cas, nous allons configurer LibreChat, un client MCP qui ne prend en charge que STDIO, à titre d’exemple. (Ce qui suit est un exemple de configuration YAML pour LibreChat, mais la méthode d'exécution de la commande npx est cohérente pour n'importe quel client. N'oubliez pas d'utiliser l'URL de votre service edgecompute.app lorsque vous configurez la commande « mcp-remote ».
mcpServers:
  fastly-mcp-server:
    command: npx
    args:
      - -y
      - "mcp-remote"
      - https://highly-adequate-adder.edgecompute.app/sse
      - --transport
      - sse-only
À partir de mai 2025, le package mcp-remote utilise par défaut les connexions HTTP streamables, sauf si vous utilisez l'option --transport sse-only. Pour garantir une connexion via SSE, vous devez inclure cette option.
Lorsque vous lancez LibreChat avec cette configuration, vous verrez un écran comme celui ci-dessous. Cela complète la configuration.
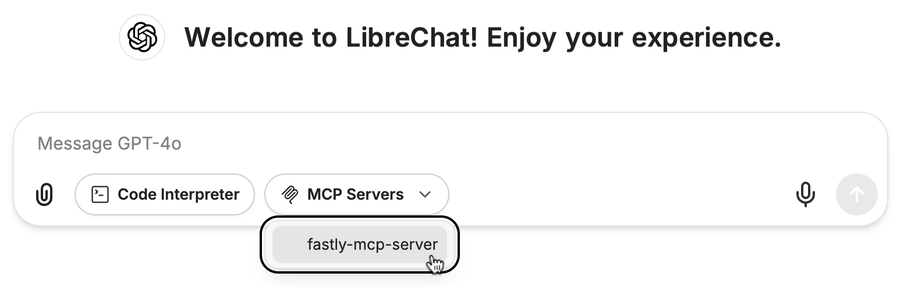
Cet exemple présente un outil MCP qui télécharge le VCL à partir d’un service Fastly VCL, mais vous pouvez facilement l’étendre avec des fonctionnalités supplémentaires. Il est important de noter que Fanout limite la taille des messages à environ 64 Ko. Par conséquent, lorsque vous travaillez avec un ancien SSE, assurez-vous que les messages de résultat des appels de l’outil MCP ne deviennent pas trop volumineux.
Conclusion : Quelle est la prochaine étape ?
Dans cet article, nous avons présenté comment l'environnement de développement flexible et efficace de Fastly Compute simplifie le processus de mise en place rapide d'un serveur MCP haute performance. À l'étape suivante, j'envisage d'explorer la construction d'un serveur plus avancé basé sur la spécification OAuth. Restez à l'affût !
Nous aimerions également savoir comment votre organisation utilise les LLM et l'IA, et comment vous abordez les défis qui y sont associés. Veuillez partager vos réflexions et rejoindre les discussions de la communauté. Nous accueillons toutes sortes de retours.