
Automating WAF Tests with Fastly’s WAF Simulator
Do you find yourself wondering if the Web Application Firewall (WAF) rule you just created is going to work as expected? How do you test? After you create a rule do you set it and forget it? How do you ensure the rule is still working as intended over time? Consider a scenario where a team member alters a rule - did those changes adversely impact your detection capabilities? How do you know?
Enter Fastly's WAF Simulator, an innovative feature that allows you to validate rules in a safe and controlled simulation environment. After creating a WAF rule you can use the simulator to ensure your rule works as intended. There is no need to switch between different systems. You simply provide a sample request/response and the simulator will output the expected WAF response and signals.
In this blog, we’ll discuss how to test rules using the WAF simulator, the benefits of continuous testing, demonstrate how to integrate the WAF simulator into a CI/CD pipeline for automated continuous tests, and present an illustrative example of using tests to identify changes made to WAF.
How to Test
Fastly customers have the ability to test and validate rules using the WAF simulator within the management console. Once a rule is created for a site, navigate to Rules -> Simulator, input a sample request and sample response, and then click Simulate. When the simulation completes the WAF response and signals will be displayed in the simulation output.
Here you can see us testing a site rule in the management console that matches and tags a request with a path in a sensitive account API endpoint list.
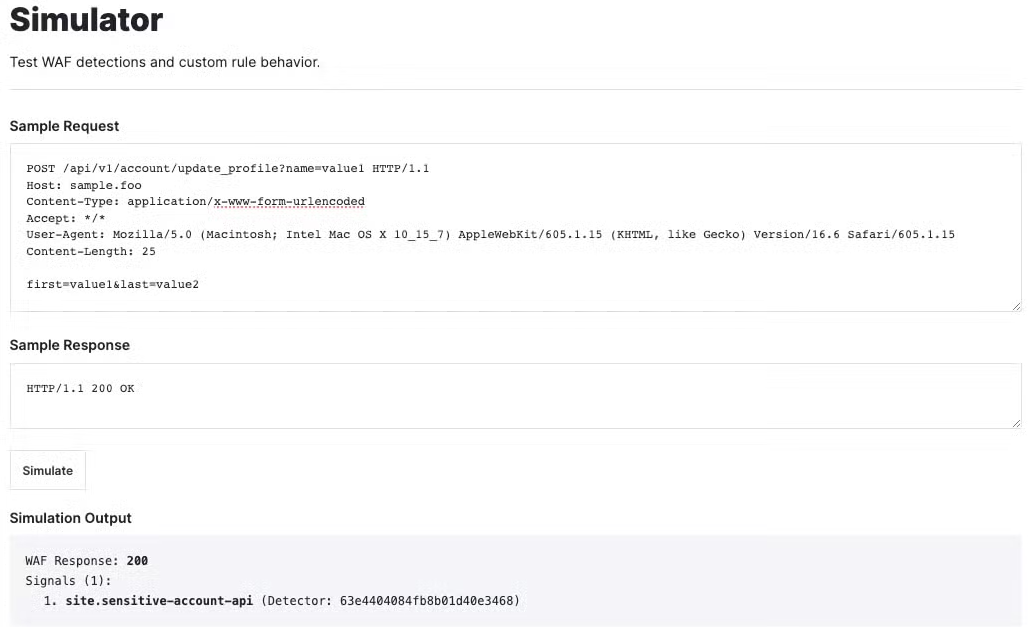
After confirming the rule is working as expected, the test configuration can be adapted for continuous testing purposes, stay tuned, we’ll get to that!
Benefits of continuous testing
Over time, WAF rules can become outdated or misconfigured, potentially leading to false positives (blocking legitimate traffic) or false negatives (allowing malicious traffic). Alongside this, when employees who are familiar with the WAF configuration leave, there’s a risk of losing critical knowledge about the configuration and rationale behind specific rules. Furthermore, many organizations are subject to compliance standards and regular testing can help make sure those standards are met. Adopting continuous testing, not only ensures rules are working as intended, but also facilitates knowledge transfer, helps address compliance standards, and fosters a proactive security culture.
Integrating the WAF simulator into your CI/CD pipeline
One way to establish continuous testing is through the use of a CI/CD pipeline. To demonstrate this, we’ve created an example repository that hosts Terraform code for two web applications using Fastly’s Next-Gen WAF (NGWAF), app1.example.com and app2.example.com. We have included tooling, written in Go, that is designed to facilitate automated testing using Fastly's WAF simulator. In particular, we’ve incorporated a CI/CD pipeline that uses Github action workflows to run tests on every code change in the main branch.
Test configurations
Tests are written in yaml format and located in the test/rules directory. The yaml files serve as a structured way to define and organize test cases. Each test file contains a list of tests and each test contains the following fields.
name: (required) A unique identifier name for the test case.
site: (required) Identifying name of the site in Fastly NGWAF to test against.
rule_id: (optional) ID of rule you are testing against
description: (optional) Details about what the test is designed to check
type: (optional) True positive, false negative, false positive, true negative.
request: (required) HTTP request that will be sent as part of the test
response: (required) The expected response for the test.
expect: (required) This section outlines the expected outcome of the test.
waf_response: The expected response code from the WAF
signals: A list of the signaled data to be returned by the test. Each signal contains several values and should be omitted if empty.
type: Signal ID (a.k.a signal type)
location: Location of signaled value (i.e. QUERYSTRING, USERAGENT)
name: The name assigned to the signal
value: The specific value that triggered the signal
detector: The identifier of the detector that generated the signal
redaction: A binary indicator (1 or 0) signifying whether the signal’s value has been redacted.
The following is an example of a test file:
tests: - name: sensitive account api test 001   site: app1.example.com   rule_id: 63d04576d3b2e101d4f1345d   description: tags request with site.sensitive-account-api   type: true positive   request: |     POST /api/v1/account/update_profile HTTP/1.1     Host: app1.example.com     Content-Type: application/x-www-form-urlencoded     Accept: */*     User-Agent: Mozilla/5.0 (Macintosh; Intel Mac OS X 10_10_4)     Content-Length: 8
     user=foo   response: |     HTTP/1.1 200 OK   expect:     waf_response: 200     signals:     - type: site.sensitive-account-api       detector: 63e4404084fb8b01d40e3468
Each test file is parsed and sent to the WAF Simulator. The script compares the simulated WAF response and signals with the expected ones defined in the test. If any test fails, it outputs the details and increments an error count.
Getting Started
Follow the steps below:
Clone the repository https://github.com/fastly/waf-simulator-automation
Create an NGWAF API key
Sign into the NGWAF management console at https://dashboard.signalsciences.net/login
On the My Profile tab, under API Access Tokens, select Add API access token.
Type in a name and select Create API access token.
Set your Fastly NGWAF credentials as environment variables.
export SIGSCI_EMAIL='your-email'export SIGSCI_TOKEN='your-token'export SIGSCI_CORP='your-corp-id'Install Terraform if not already installed with the steps described here.
From the project directory change into the terraform directory and run the following commands.
terraform initterraform plan -out ngwaf.planterraform apply ngwaf.planAfter running apply, take note of the output values of sensitive_account_api_rule_id and invalid_host_header_rule_id.
Open tests/rules/app1.example.com/sensitive-account-api.yaml and replace all occurrences of 65a190f3e3148001dc71a5ca with the sensitive_account_api_rule_id value from the terraform output.
Open tests/rules/app2.example.com/invalid-host-headers.yaml file and replace all occurrences of 65a190f40f6eb201dc0fdd81 with the invalid_host_header_rule_id value from the terraform output.
Once the test files have been updated you can run the WAF simulator tests to verify the WAF rules are working correctly.
Install Go if not already installed using the steps described here.
Change back to the project’s root directory and run the following command.
go run tests/main.goIf you didn’t receive any failures, the tests passed. If you see failures, use the logs to troubleshoot and resolve the issues.
Create a new repository on GitHub with steps described here.
Change the remote URL to your new repository.
In your terminal or command prompt, navigate to the cloned repository's directory.
Use the git remote command to change the remote URL to your new repository. This points your local repository to the new GitHub repository.
git remote set-url origin https://github.com/yourusername/new-repository.git
Add SIGSCI_EMAIL, SIGSCI_CORP, SIGSCI_TOKEN to GitHub secrets
In the workflow file .github/workflows/tests.yaml, change the branch name from main-branch to main.
Add and commit your changes.
git add .github/workflows/tests.yamlgit commit -m "update workflow"Now, push the code to your new repository using the git push command.
git push origin mainAfter pushing, check your repository on GitHub to ensure the test workflow is running.
In your repository, locate the Actions tab near the top of the page. This tab shows you a list of workflow runs associated with your repository. You'll see a list of recent workflow runs. Each run is associated with a commit or event that triggered it (like a push to the main branch).
If the workflow succeeded, your WAF rules are working as expected.
If there are failures, use the logs to troubleshoot and resolve issues. After making corrections, commit and push your changes again to trigger the workflow.
Building on this concept, you can configure a webhook integration to automatically trigger a test workflow anytime a rule has been modified. This can be useful for ensuring changes made to WAF rules through the management console do not adversely affect your detections.
Example scenario
Consider the invalid host header rule that we created for app2.example.com. This rule prevents HTTP Host header attacks, which are possible even under seemingly safe web server configurations. Values in the list below will be matched against the Host header exactly. If a Host header does not match any value in this list, the rule will block the request and apply the site.invalid-host-header signal.
www.app2.example.comapp2.example.comWe set up tests to ensure requests are getting blocked and tagged correctly when they contain an invalid host header.
Now, let’s imagine a situation where a team member adds a new subdomain, payments.app2.example.com, to the WAF. After this update, users start encountering 406 Not Acceptable responses when trying to access payments.app2.example.com. To quickly address this issue, a team member logs into the WAF's management console and makes a change to the rule, switching it from blocking requests to allowing them.
This change triggers a test workflow, which results in a failure because the tests were expecting the rule to block requests, but now permits them. Instead of allowing all requests, the team member should have added payments.app2.example.com to the allowed host list. However because the tests were in place, a failure notification was sent to the relevant team members and they were able to make the appropriate adjustments to the rule. Without this feedback loop, such a change could have gone unnoticed, leading to the false assumption that the WAF is still blocking requests with invalid host headers.
This example highlights the importance of using tests to identify changes made to WAF rules, especially in situations where there is shared ownership. Running continuous tests plays an important role in detecting changes that might otherwise go unnoticed.
Wrapping Up
To summarize, we have covered the following points:
How to test WAF rules using the WAF simulator.
The benefits of continuous testing.
Integrating the WAF simulator into a CI/CD pipeline.
An example of using tests to identify changes made to NGWAF.
Being able to test and validate rule behavior is critical to a maintainable WAF. The approach and practice of continuous testing not only ensures the sustained efficacy of WAF rules, but helps preserve the rationale behind rules, aids in meeting compliance requirements, and fosters a proactive security culture.


