
As Fastly’s Technical Account Management team, we guide our customers in using our Next-Gen WAF (powered by Signal Sciences) as effectively as possible. Every day, we work directly with customers across different verticals – answering questions and sharing guidance to ensure everything is running smoothly.
Today, we want to share that knowledge with you. Here’s a list of recommended practices for all Fastly customers, so everyone can get the most out of our Next-Gen WAF.
Next-Gen WAF Best Practices
1. Prevent Client IP Spoofing
This is a very basic step, but it often gets overlooked. We need to be able to capture the true client IP – otherwise, an attacker can end up bypassing our WAF simply by changing the necessary headers to avoid being blocked.
The Next-Gen WAF agent uses the X-Forwarded-For header to identify the client IP address-- for example, client-ip-header="Fastly-Client-IP". This header can be spoofed pretty easily by simply passing a different IP in the header.
In our customer documentation, we address this concern. The proposed solution is to pass a different header, and then configure the agent to use that header to determine the true client IP. It also recommends configuring the agent to read the X-Forwarded-For IP address from right to left, instead of the default left to right, by setting the local-networks="private" configuration.
For on-premise (module/agent) deployments, we want to be sure we are validating the real IP address before the NGWAF agent receives the header. For example, NGINX has the ngx_http_realip_module that will validate the client IP address.
Customers who are using Fastly CDN in front of NGWAF, will benefit from being able to pass the IP address using custom VCL, as documented here. This will pass the true client IP to the Fastly-Client-IP header.
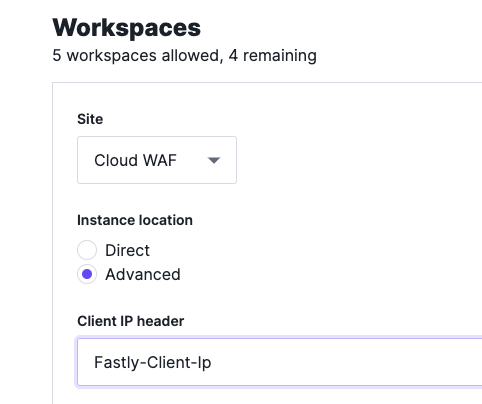
The configuration of the alternative headers can be performed in the UI. For non-Cloud WAF deployments, the steps are documented here.

For Cloud WAF deployments, we can set this up on the Cloud WAF instance by selecting Advanced under Instance location, to specify the appropriate header that should be used:
Now that we have identified which headers to use as your true client IP address, we can leverage thresholds to our advantage by keying off of IP and Signals.
2. Tune Attack Thresholds
We have the ability to see whether IPs are approaching thresholds, but not crossing them, by navigating to Observed Sources -> Suspicious IPs.
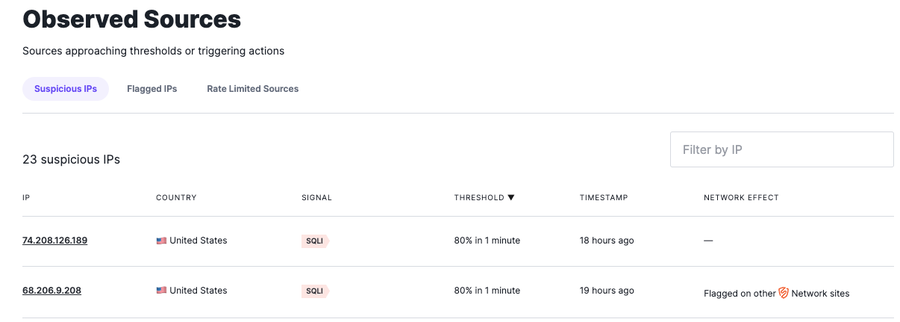
Thresholding is an important feature of our NGWAF because it allows us to prevent blocking legitimate traffic in the event of a false positive. When IPs are not hitting the current thresholds for Attack Signals, it means the NGWAF can be missing potential attacks.
The default threshold for all attack signals is 50 requests in one minute. But in the screenshot above, you can see that there are two IPs that are over the 75% threshold range. This means about 37 SQLi requests were allowed. In a lot of cases, reducing that threshold makes sense because we may not want to allow too many attacks. Testing and validation should be considered before modifying the threshold in order to ensure there is no production-impacting issue.
Using the SQLi attack from the above example, we would want to reduce the attack threshold for SQLi down to 25 in one minute.
Typically, you may want to lower this gradually – or, in some cases, you might want to block all Attack requests like SQLi outright. This can be done by creating a request rule to block that signal.
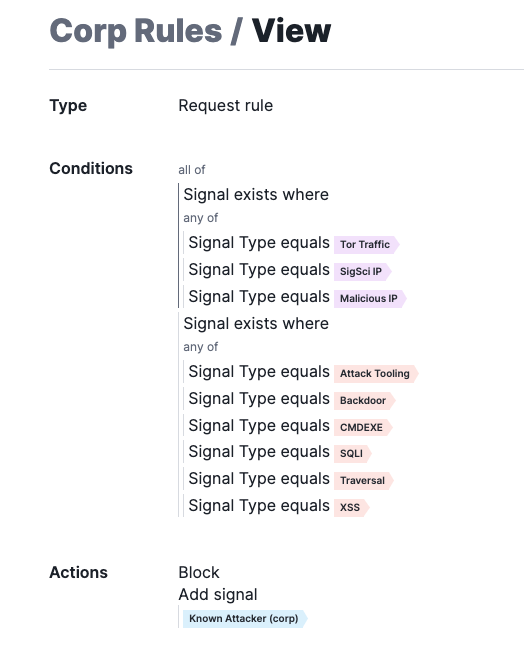
3. Block Attacks from Malicious IPs
This request rule allows you to use the Malicious IP signals and block attack requests immediately, without waiting for thresholds to kick in.
The NGWAF pulls in IP information from multiple sources. One source is the SANS Malicious IP list, which is regularly imported from the SANS Internet Storm Center. IPs are added to this list for a variety of reasons such as port scanning, being identified as bot sources, or ransomware sources. IPs on this list are tagged with the signal Malicious IP. The NGWAF also regularly imports a list of TOR exit nodes from The Tor Project. These IPs are tagged with the signal Tor Traffic. Lastly, we have IP reputation capabilities built within the NGWAF platform, where we observe attack behavior across all NGWAF customers and add them to our internal threat reputation list. These IPs are tagged with a signal SigSci IP.
These three signals may not guarantee the actor is behaving maliciously, which is why it is recommended to use these signals in coordination with the Attack system signals already defined in the NGWAF. As a result, the rule below will immediately block anyone trying to attack your application from a known threat reputation source.
4. Block Requests from Countries on the OFAC List
We can build a rule that will block any request from countries in the Office of Foreign Assets Control (OFAC) Countries list. The screenshot below shows a Site List used to identify the country codes on the list.
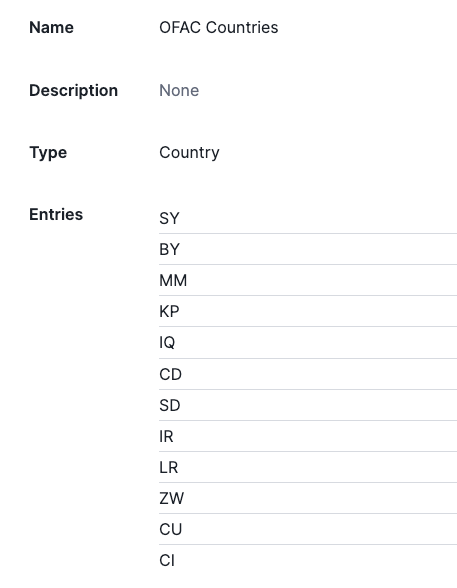
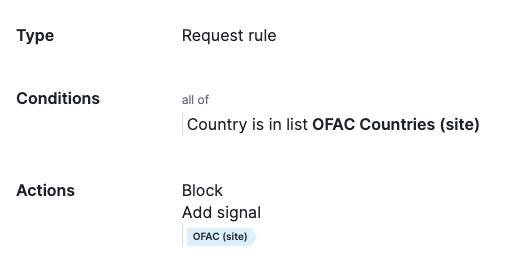
You’ll notice, we aren’t specifying any regions in this list. That’s because we need more than just the country code to determine the geo-location of a source IP.
One way to address this is to provision your Fastly CDN to pass the ASN information in a header. Use the ASN header to build a list of ASNs that shouldn’t be allowed to access your application by creating a similar list and request rule.
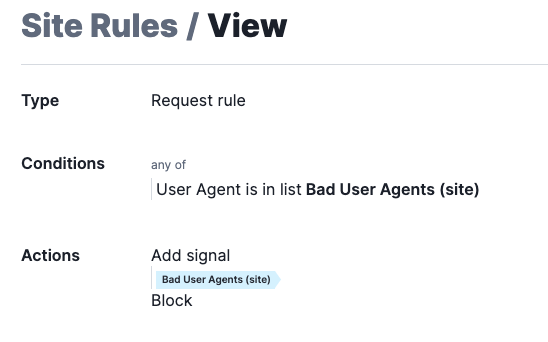
5. Block Requests from Known Bad User Agents
This is a straightforward action to take. We want to make sure a valid User Agent is being used to access the application. We can create a list of User Agents we don’t allow and block them immediately. Here is a list of User Agents I don’t expect to hit my application at all:
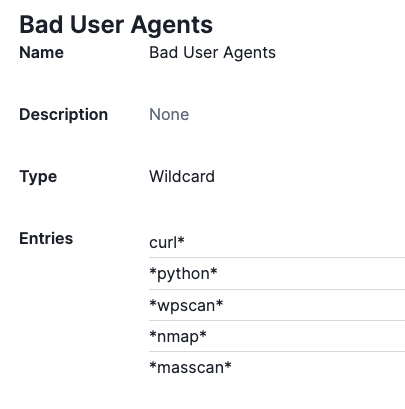
Note: This list is case sensitive, so you may want to consider using Wildcards to consider all possibilities.
I can use this list in a request rule to block immediately:
6. Block Requests with Invalid Host Header
This rule blocks anyone trying to access the application directly by IP address, or not even filling in the host header. We can create a list of valid domains that should be used to access the application, or you can list them out as seen below:
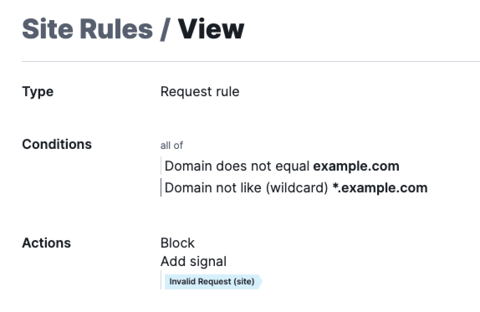
I’m using this rule to identify when the host header does not match the domain of my application and then add a signal tagging that request as Invalid Request, then adding a second action to Block.
Disclaimer: This rule should only be used when you are certain of the host header used to identify valid requests. Use the rule in logging mode first if in doubt.
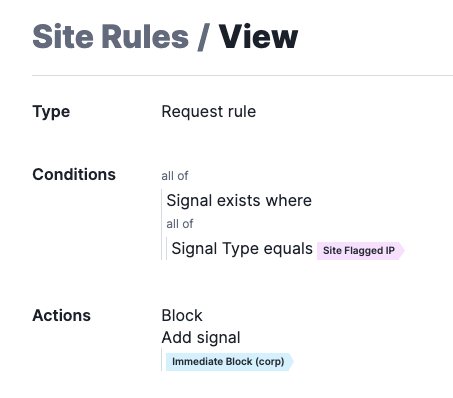
7. Blocking IP’s that have been flagged in site
Note: This signal is only included with the Premier license
The signal Site-Flagged-IP is a signal that indicates a request was received from an IP that was flagged for exceeding attack thresholds for a specific site. Please review the signal documentation for details: System Signals - Signal Sciences Help Center
We can use the rule below to block requests from IP addresses that have been flagged. This will address situations where an IP is acting maliciously, we can block all access to the application.
8. Rate Limiting Enumeration Attempts
Note: The Premier license is required to leverage this functionality.
Oftentimes attackers will try to enumerate the application or API by trying various techniques. For example, if an attacker tries to brute-force access files and directories or carry out credential stuffing attacks, they will likely generate a lot of 4XX and 5XX errors.
In order to prevent the enumeration attempt from getting too far, we can leverage rate limit rules to help protect the app or API. This rule will cover more broad use cases, but can be modified as needed depending on the situation.
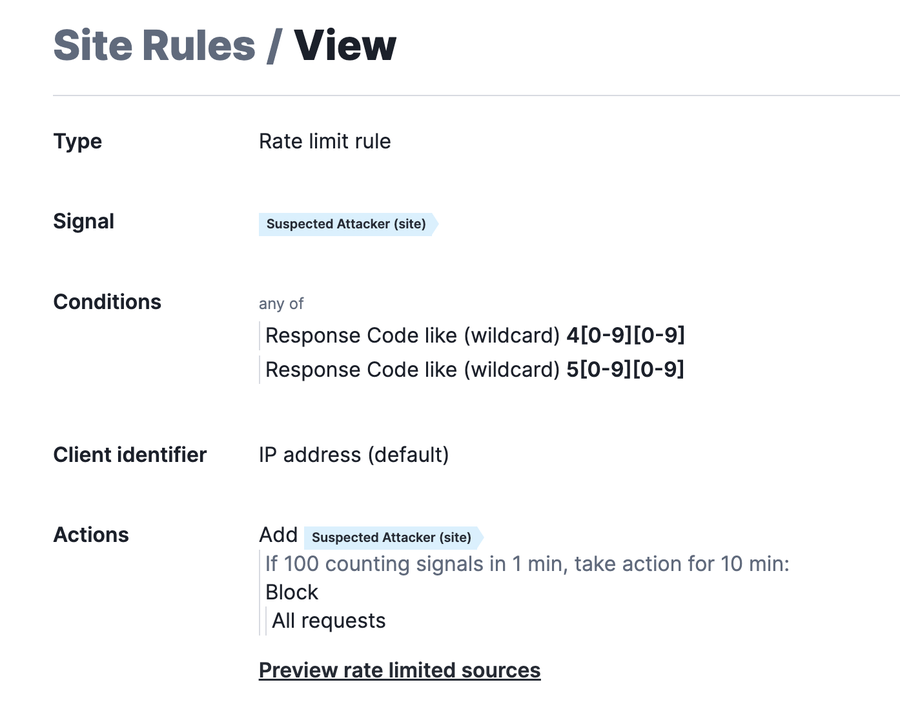
In this screenshot, we are looking for any requests that generate a 4XX or 5XX response. When we see that request, we are going to consider that to be an enumeration attempt. The counting signal (in this case, Suspected Attacker) will keep track of that attempt. The action that will take place when the threshold is met, will be to block all subsequent requests from the attacker.
9. Notifications for New Features and Releases
Enable notifications for New Feature Announcements and Releases. New Feature Announcements provide information on product enhancements for Agent releases only. This will typically include bug fixes or enhancements to the agent that have been applied to the agent release version.
Set up notifications by navigating to Corp Manage > Corp Integration with the following events selected:
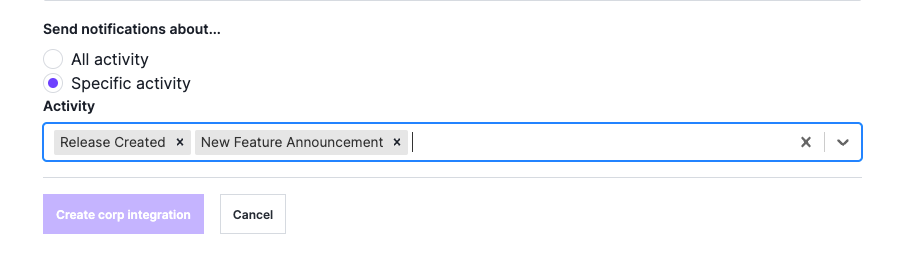
New Feature Announcements are posted here: Announcements - Signal Sciences Help Center.
Release Created events are for Agent releases only, which are posted here: Agent - Signal Sciences Help Center.
10. Logging with APIs or Syslog
Capturing log data is important, especially when it comes to the observability of your security product. This could include taking the log data from the Next-Gen WAF and exporting it to your SIEM. There are a number of ways we can accomplish this, but it depends on the scenario.
If you’re comfortable with capturing sample/redacted data, then using the API to extract the data from the NGWAF dashboard will be the best solution. Here is an example of a Python script you can use to extract the data using the API.
If you’re more comfortable with unsampled/unredacted data, then the next option would be to leverage Syslog and capture agent logs to forward to a Syslog server. To do this, we need to enable debug logging on the agent. Add the following configurations to the agent.conf:
debug-log-web-inputs = 1
debug-log-web-outputs = 1
log-out = “/var/log/sigsci.log”
For customers using Cloud WAF, the option to enable this debug logging option is not available today.
Protect Your Apps with the Next-Gen WAF
We hope these tips will help you use Fastly’s Next-Gen WAF to its full extent – protecting your applications, wherever they live, better than ever before. And if you ever need further guidance, the Fastly TAM team is here to help.
To learn more about our Next-Gen WAF, visit the product page.