
When I was applying to Fastly, I wanted to test out some of Fastly's features, but I didn’t have a site set up for it. After I came on board, I realized I wasn’t alone in wanting an easy way to test Fastly before adding it to my site. We needed an onboarding tool that would make it quicker and easier for customers and Fastly employees to try out Fastly (including critical features such as Instant Purge) first hand, without having to test in a live environment.
With that in mind, I built the Fastly Test Blog, an application for testing out Fastly. This is a simple Rails application that generates blog-like content using the Fastly Rails Plugin. If you’re new to Fastly, this test application is great for familiarizing yourself with some of our key features and checking out some of the ways in which Fastly is unique. It’s quick and easy to set Fastly up yourself (without having to engage support) and make instant content and configuration changes.
In this blog post, I’ll show you how to deploy your own test application and use Fastly’s UI to explore commonly used features, such as:
Changing the TTL of content
Passing on specific content
Purging content
Shielding
The Open Source community is important to us, and we wanted to make it easy for anyone to learn more about using Fastly, so we’ve open-sourced the test application on GitHub. As you’re using the test application, please feel free to send us pull requests or open issues on the GitHub repo.
Getting started
To deploy your own Fastly Test Blog, you’ll need to sign up for a Fastly, GitHub,and Heroku account. Deploy your own test application by using the “Deploy to Heroku” button. Once you’ve deployed to Heroku, add it to a new service in your Fastly account.
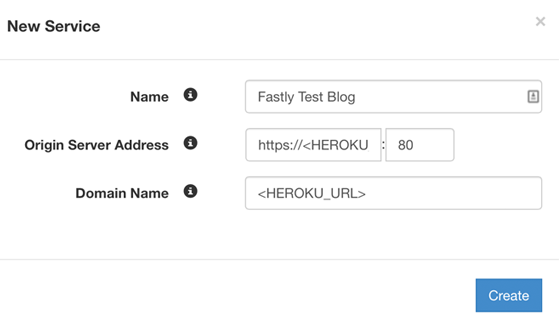
Name - Fastly Test Blog
Origin Server Address - https://<HEROKU_URL>:80
Domain Name - <HEROKU_URL>
After you’ve deployed your new Fastly service, you can test your application using your test URL and cURL. The format for your test URL is:
<HEROKU_URL>.herokuapp.com.global.prod.fastly.net

<HEROKU_URL>.herokuapp.com.global.prod.fastly.net/articles/42

curl -svo /dev/null http://<HEROKU_URL>.herokuapp.com.global.prod.fastly.net
Now that you’ve deployed your test application as a Fastly service and know how to test it, you can begin making configuration changes to explore some of our features.
Changing the TTL for the Article pages
Not all content should be cached for the same amount of time — admin pages, for example, should probably never be cached, whereas static assets can be cached for long periods of time. You can control how long your content is cached by changing the Time to Live (TTL) of the content. The default TTL set in this application is 86,400 seconds (one day), but using the Fastly UI, you can change this to a much shorter time, such as 120 seconds (two minutes).
To do this, create a new cache setting by navigating to your Configure tab --> Settings --> New Cache Setting.

Name: Article pages - 2 mins
TTL: 120 (seconds)
Stale TTL: 0 (seconds)
Action: Deliver
After you’ve created the cache setting, add a condition to ensure this two-minute cache setting is applied to the Article pages.
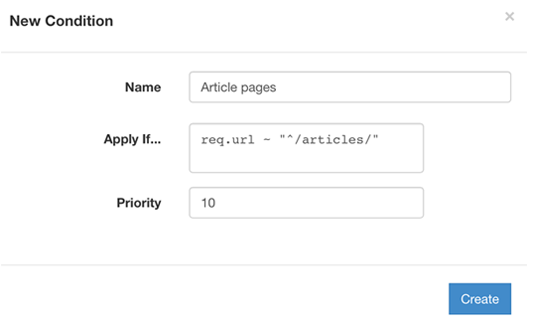
Name: Article pages
Apply if...: req.url ~ "^/articles/"
Priority: 10
Click the activate button to deploy these changes. You may have already cached some of your Fastly Test Blog pages, so next you’ll need to purge them in order to see your new cache setting in action.
Instant Purge
Fastly is unique in that you can instantly purge outdated content that you want to remove from the Fastly cache. Using the Fastly application UI, you can purge a single URL, specific content using a surrogate key (a way to tag related content, such as product information and images), or all content for the service. Our guide to purging covers this in more detail.
After creating your cache setting for the Article pages, you’ll need to purge any previously cached pages in order to see your new setting. You can use any of the three purging methods to remove the content. If you want to remove all cached content in one fell swoop, use the Purge All. Otherwise, you can purge individual URLs or use the surrogate key to purge the content. In this case, the surrogate key values for the test application are articles for the home page, and values of articles/:id for the individual article pages, e.g. articles/1 for the first article page.
Passing on the About page
You may have content that’s specific to individual users (such as personalized recommendations), or admin pages you don’t want cached at all. For content like this, create a cache setting to pass on that content, ensuring it’s never cached. While the test application doesn’t have any user-specific content, I’ll use the About page as an example for creating a pass setting. To do this, you’ll again navigate to your Configure tab --> Settings --> New Cache Setting

Name: Force Pass About page
TTL: 0 (seconds)
Stale TTL: 0 (seconds)
Action: Pass
After creating the above cache setting, set the condition to apply this to the About page.

Name: About page
Apply if...: req.url ~ "^/about"
Priority: 10
You’ll need to click the activate button to deploy these changes. If the About page has been cached, you’ll need to purge it to see your new cache setting.
Origin Shielding
Setting up Origin Shield on your test application will require all requests to your origin to go through a designated shield POP before they go to your origin. This will increase the chances of getting a HIT and decrease the load on your origin, ensuring a more consistent experience for your users. For example, Origin Shield helps Drupal.org achieve a 99% cache hit ratio, saving them “a ton” on infrastructure costs and helping them provide better experiences for their global user base.
To enable shielding on your service, navigate to your Configure tab --> Hosts. Then click on the Gear icon next to your backend, and select Edit. You will see a dropdown menu for Shielding, which has all available locations. Select a shield location, and click update. Activate the version and purge any content that may be cached.
With shielding enabled on your service, your headers will look slightly different when you cURL your test URL. You’ll see the headers for both the edge and shield POP, similar to this:
< X-Served-By: cache-jfk1034-JFK, cache-dfw1830-DFW

< X-Cache: HIT, MISS

< X-Cache-Hits: 1, 0
In the above example, cache-jfk1034 is the shield node and cache-dfw1830 is the edge node. This request was a MISS in DFW, so it requested the content from the shield node, JFK, which was a HIT.
Next steps:
Now you’ve set up some cache settings for different content, enabled Origin Shielding, and seen Instant Purge in action. You can continue to use the test application to further explore some of our other features, such as creating an error page and adding headers.
Once you’ve familiarized yourself with Fastly, check out these blog posts on migrating your traffic to Fastly and our cache recipe for success. If you have questions along the way, don’t hesitate to contact us.