
Compute empowers developers to build applications at the edge with infinite flexibility. Now, we're making it possible to get started on Compute using only your web browser, with Cloud Deploy: a wizard that deploys and customizes existing templates, and leaves you with an automated deployment workflow with best development practices.
Starter kits are the best way to get started with Compute, our edge compute platform, but it isn't always obvious what other resources (like backends, dictionaries, and logging endpoints) are needed to get it up and running. With the introduction of setup information in project manifests, it became possible to specify the Fastly resources that the code relies on.
This has been supported by the Fastly CLI for a little while now, to prompt you for the necessary additional configuration as part of your first deploy — but that assumes you have our tooling installed on your computer and you're happy to use a local deploy process.
What if you don't? We can use this extra data to create some really useful experiences outside of the terminal environment, too. The first of these is Cloud Deploy, which allows you to deploy any public Compute template (including all our official starter kits) to your Fastly account and create a working, edge-hosted application connected to a GitHub repository with automated continuous deployment, in a few clicks.
We drew inspiration from similar tools when creating Cloud Deploy. I remember using the Deploy to Heroku button in 2016 when I was learning how to build Ruby on Rails apps. It made it really easy for me to focus on creation, rather than deployment and ops, and that’s why I was really excited to build this tool for our customers.
Making apps deployable
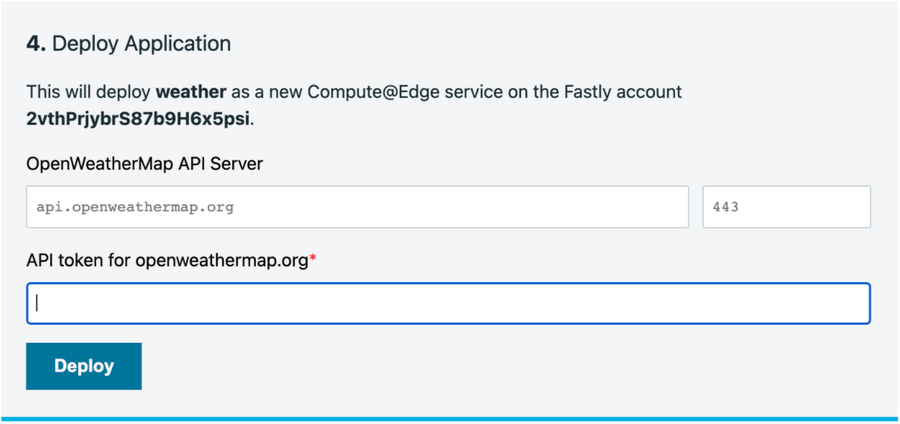
To make a Compute project automatically deployable, you need to define some setup information in your fastly.toml. Here’s an example configuration for the project in the screenshot above:
 [setup.backends]
   [setup.backends."api.openweathermap.org"]
     address = "api.openweathermap.org"
     description = "OpenWeatherMap API Server"
     port = 443
 [setup.dictionaries]
   [setup.dictionaries.weather_auth]
     [setup.dictionaries.weather_auth.items]
       [setup.dictionaries.weather_auth.items.key]
         description = "API token for openweathermap.org"
This defines one backend (“api.openweathermap.org”) and one dictionary with a single item (“key”). The backend here has a default address and port, but the user can override these when deploying. As the dictionary item has no default value, the user will be required to provide this.
You must also mark the repository as a template repository, so the app can generate new repositories from it. Then add the following snippet to your README.md to send users to the deploy app:
[](https://deploy.edgecompute.app/deploy)Building on our own platform
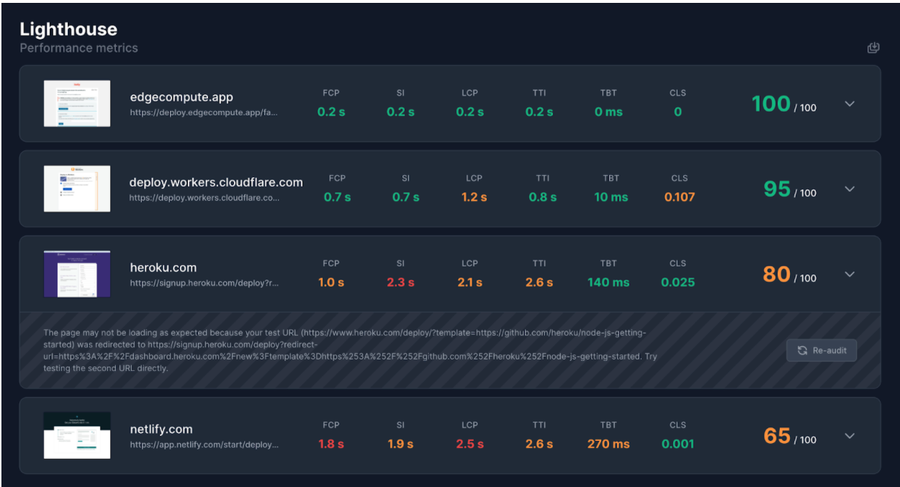
Not only is Cloud Deploy for Compute, it’s also built entirely on Compute. It’s a Rust application compiled to WebAssembly, and it is super fast. According to pagespeed.compare, our Cloud Deploy app served at the edge is the fastest one-button deploy experience, compared to similar tools:
Give it a try
If you want to see the power of Compute for yourself, why not try Cloud Deploy now? Make sure you have an account and an API token, then click the button below: