

This is the second part in a series on Lean Threat Intelligence. Check out Part 1 and Part 3.
In Lean Threat Intelligence, Part 1: The Plan, we discussed the general workflow the Threat Intelligence team at Fastly uses to plan for projects. In our example, we have a central Syslog Aggregator that pools together logs from all of our services. Now we can use this topology to move forward with the Systems Diagram and start performing the next step: technology selection.
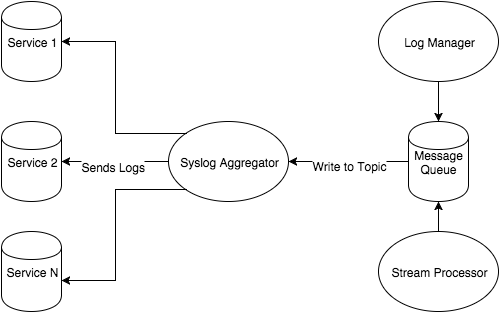
The previous post assumes that there was already a syslog aggregator server in this environment. In our case, it’s an rsyslog server and it has a collection of logs that exist on disk for further analysis. Further analysis should never mean grep A.B.C.D. foo.log; we should take full advantage of technologies that excel at making this amount of data intuitive for humans to sift through. This is where the log manager comes in.
“We Do Not Sow” - Introducing House Graylog
When selecting log management technologies, you have to make a few decisions about how you want to manage them from an infrastructure viewpoint. There are SaaS companies that will manage this infrastructure for you, and there are open source log managers that give users granular control over the infrastructure. It all comes down to resources, which include budget, people that manage the infrastructure, and policy. Will you spend the money for a SaaS provider? If not, an open source stack can cost more money in terms of people and infrastructure. Lastly, do you want to host sensitive log and audit data on infrastructure you do not own?
We went through similar motions at Fastly, and decided on Graylog as our log management technology. Here’s why:
We want to restrict access to sensitive logs and have ownership of their security to reduce the attack surface.
We have teams at Fastly that work closely with the security team to manage infrastructure like this in production.
Graylog uses the popular Elasticsearch technology stack which makes log indexing and searching straightforward.
Graylog also has a Kibana competitor with its Webserver frontend, with useful features such as account management and native alerting with emails/pagerduty.
Graylog makes use of streams, which can be used as an access control mechanism for multiple users viewing subsections of logs based on their team. This makes our system available to multiple teams as opposed to just security.
If we ship logs to Graylog, we solve user stories one and two from the previous post. This is a huge benefit for us as a team, especially because Graylog is a well-maintained and documented stack and is an attractive option based on our constraints.
Now that we’ve selected Graylog, we need to deploy it and ship syslog messages from the aggregator to Graylog. Here’s how we do it.
Manning the ships: deploying Graylog with Chef/Vagrant
Fortunately, Graylog server is almost all-inclusive, relying on only Elasticsearch and MongoDB as external dependencies. Elasticsearch is the lucene index where all the data indexed by Graylog will be stored; MongoDB provides a database for the Graylog configuration, which is more critical when running multiple Graylog servers with MongoDB replication.
Graylog web front end doesn’t have any external dependencies, and relies solely on the Graylog Server API.
For the sake of simplicity, we’ll be standing up a Graylog server using Vagrant and chef-solo, which allows us to leverage the chef-client feature set without relying on a Chef server. We will also be relying on publicly available Chef recipes in order to quickly bootstrap a working Graylog cluster.
We’ll be building the cluster from the bottom up, starting with Java, Elasticsearch, and MongoDB, before finishing with Graylog server and finally Graylog Web.
So, let’s install Elasticsearch.
Berksfile is a chef cookbook dependency manager, and tells Vagrant where to find recipes. In our case, since we aren’t defining anything specific for java, it will search supermarket.chef.io for the java cookbook.
Next, our Vagrantfile tells Vagrant, and subsequently Chef, how to deploy and provision the node. Our example will use chef.add_recipe to add Java and our Elasticsearch wrapper recipe to the Chef run. Additionally, we’ll specify some basic configuration for the recipes in our chef.json block. Our Java section specifies the version of Java we want to install (in this case Oracle 8) and accepts the download terms for us. Unfortunately, due to Vagrant setting the primary interface to a host-only network, we will need to configure Elasticsearch to listen on our second interface. Fortunately, this is a few additional lines in our Vagrantfile.
Berksfile
    source "https://supermarket.chef.io"

    cookbook 'java'
    cookbook 'elasticsearch', git: 'https://github.com/elastic/cookbook-elasticsearch.git'
    cookbook 'blog_elasticsearch', path: '~/cookbooks/blog_elasticsearch'
Here, we source https://supermarket.chef.io and tell Chef to retrieve cookbooks that it cannot find in the local path. Java is pulled from supermarket, elasticsearch is pulled from git, and blog_elasticsearch is pulled locally. Don’t worry about the path for blog_elasticsearch, we’ll make an example cookbook in the next steps.
Vagrantfile
    es_servers = { :elasticsearch1 => '192.168.33.30',
                      :elasticsearch2 => '192.168.33.31',
                      :elasticsearch3 => '192.168.33.32'
                    }

      es_servers.each do |es_server_name, es_server_ip|
        config.vm.define es_server_name do |es_config|

          es_config.vm.box = "ubuntu/trusty64"
          es_config.vm.network "private_network", ip: es_server_ip.to_s
          es_config.vm.provider "virtualbox" do |v|
            v.memory = 1024
            v.cpus = 2
          end
          es_config.vm.hostname = es_server_name.to_s
          es_config.vm.provision :chef_solo do |chef|
            chef.add_recipe "java"
            chef.add_recipe "blog_elasticsearch"
            chef.json = {
              :java => {
                :oracle => {
                  :accept_oracle_download_terms => true
                },
                :install_flavor => "oracle",
                :jdk_version => "8"
              },
              :elasticsearch => {
                :configuration => {
                  :network_host => es_server_ip.to_s,
                }
              }
            }
          end
        end
      end
Next, let’s create our Elasticsearch wrapper. Navigate to your cookbooks directory and run the following command:
This will create a skeleton cookbook for us to modify. We need to modify a few files to get our cookbook working: metadata.rb and recipes/default.rb
metadata.rb
    depends 'java'
    depends 'elasticsearch'
recipes/default.rb
    elasticsearch_user 'elasticsearch'

    elasticsearch_install 'my_es_installation' do
      type :package # type of install
      version '1.7.3'
      action :install # could be :remove as well
    end

    elasticsearch_configure 'elasticsearch' do
        configuration ({
          'cluster.name' => 'graylog2',
          'network.host' => node[:elasticsearch][:configuration][:network_host] || node['ipaddress'],
          'discovery.zen.ping.multicast.enabled' => true,
          'discovery.zen.minimum_master_nodes' => 1
        })
    end

    elasticsearch_service 'elasticsearch' do
      action :start
    end
This cookbook pulls java and elasticsearch recipes from upstream, and we create our own default recipe to set some basic configuration options. Graylog requires a clustername to connect to, so we name our cluster graylog2. We then set the elasticsearch network host to an IP address set by whoever is using this cookbook, or the node’s IP address if it was not provided. Lastly, In order for this cluster to be operational, we decide on only one master node.
Now that we have elasticsearch squared away, we can finally start installing Graylog. Let’s start with Graylog server. Add cookbook ‘graylog2' to your existing Berksfile.
Berksfile
    source "https://supermarket.chef.io"

    cookbook 'java'
    cookbook 'elasticsearch', git: 'https://github.com/elastic/cookbook-elasticsearch.git'
    cookbook 'blog_elasticsearch', path: '~/cookbooks/blog_elasticsearch'
    cookbook 'graylog2'
Then add the following code after your elasticsearch block.
Vagrantfile
      config.vm.define "graylog-server" do |graylogserver|
        graylogserver.vm.box = "ubuntu/trusty64"
        graylogserver.vm.network "private_network", ip: "192.168.33.20"
        graylogserver.vm.network "forwarded_port", guest: 1514, host: 1514, protocol: "tcp"
        graylogserver.vm.network "forwarded_port", guest: 1514, host: 1514, protocol: "udp"
        graylogserver.vm.provider "virtualbox" do |v|
          v.memory = 1024
          v.cpus = 2
        end
        graylogserver.vm.hostname = "graylog-server"
        graylogserver.vm.provision :chef_solo do |chef|
          chef.add_recipe "java"
          chef.add_recipe "blog_elasticsearch"
          chef.add_recipe "mongodb"
          chef.add_recipe "graylog2"
          chef.add_recipe "graylog2::server"
          chef.json = {
            :java => {
              :oracle => {
                :accept_oracle_download_terms => true
              },
              :install_flavor => "oracle",
              :jdk_version => "8",
            },
            :graylog2 => {
              :password_secret => "", # pwgen -s 96 1
              :root_password_sha2 => "", # echo -n yourpassword | shasum -a 256 | awk '{print $1}'
              :elasticsearch => {
                :discovery_zen_ping_unicast_hosts => '192.168.33.20:9300',
                :network_host => '192.168.33.20'
              },
              :rest => {
                :transport_uri => 'http://192.168.33.20:12900/',
                :listen_uri => 'http://192.168.33.20:12900/'
              },
              :server => {
                :java_opts => "-Djava.net.preferIPv4Stack=true"
              }
            },
            :elasticsearch => {
               :configuration => {
                 :network_host => "192.168.33.20",
               }
             }
          }
        end
      end
The Graylog portion of the Vagrantfile looks complex, but the graylog2-cookbook gives us more flexibility in defining variables. Since Graylog is dependant on Elasticsearch and Java, a large portion of our Vagrantfile looks the same. The remainder of the Graylog options bind Graylog to the correct interfaces, and allow communication to our Elasticsearch cluster. If you step through the chef.json block, you’ll see that we’re setting variables specific to this cluster: the two passwords in graylog2 have to be generated off the bat, but you can change these later. Next, you set up a unicast host for Graylog so it can discover ES nodes. Lastly, the REST API is configured so the webserver for Graylog can talk to it.
Finally, we can install Graylog web.
      config.vm.define "graylog-web" do |graylogweb|
        graylogweb.vm.box = "ubuntu/trusty64"
        graylogweb.vm.network :private_network, ip: "192.168.33.10"
        graylogweb.vm.network "forwarded_port", guest: 9000, host: 9000, proto: "tcp"
        graylogweb.vm.provider "virtualbox" do |v|
          v.memory = 1024
          v.cpus = 2
        end
        graylogweb.vm.hostname = "graylog-web"
        graylogweb.vm.provision :chef_solo do |chef|
          chef.add_recipe "java"
          chef.add_recipe "graylog2"
          chef.add_recipe "graylog2::web"
          chef.json = {
            :java => {
              :oracle => {
                "accept_oracle_download_terms" => true
              },
              :install_flavor => "oracle",
              :jdk_version => "8",
            },
            "graylog2": {
              "password_secret": "", # pwgen -s 96 1
              "root_password_sha2": "", # echo -n yourpassword | shasum -a 256 | awk '{print $1}'
              "web": {
                "secret": "",
                :server_backends => 'http://192.168.33.20:12900',
                :timezone => "Etc/UTC"
              }
            }
          }
        end
      end
This is the smallest of our sections in our Vagrantfile, since the Graylog web server is just an interface on top of the Graylog server API. We need to specify the secrets for our admin user and allow our web and server nodes to communicate.
Once you’ve created your Vagrantfile and wrapper cookbook, you can run vagrant up in your terminal and your cluster will spin up. This does take a few minutes, so be patient.
When your vagrant up is complete, you can navigate to your web interface on port 9000 (in our example this is http://192.168.33.10:9000) where you will be greeted with the following login screen.

Your username will be admin, and the password will be the password generated with the echo -n yourpassword | shasum -a 256 | awk '{print $1}' command.
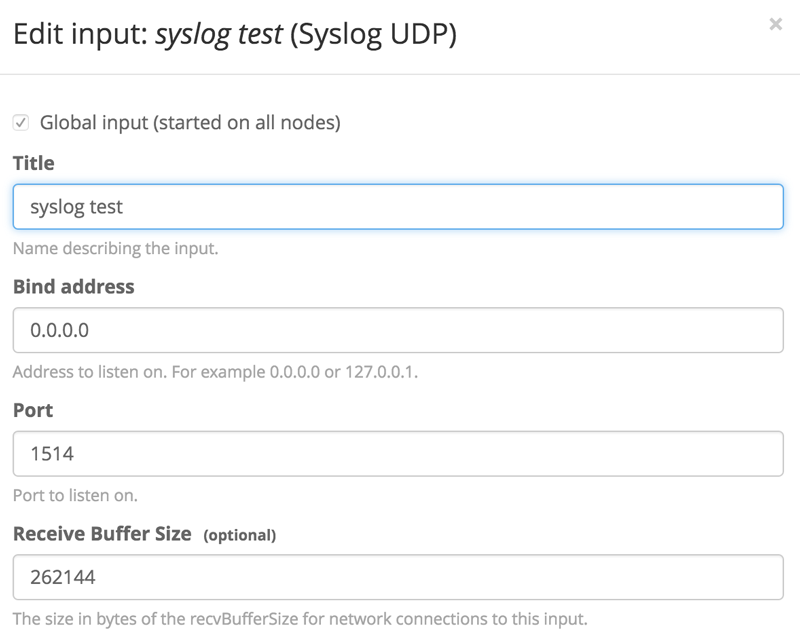
Once logged in, you need to create an input to listen for data. Navigate to System > Inputs and create a new Syslog UDP input. Since you only have a single node Graylog server, you’ll only have a single node to spawn on. Create a title for your input, and change the port to something > 1024, since Graylog is not running as a privileged user. Our input looks like this:
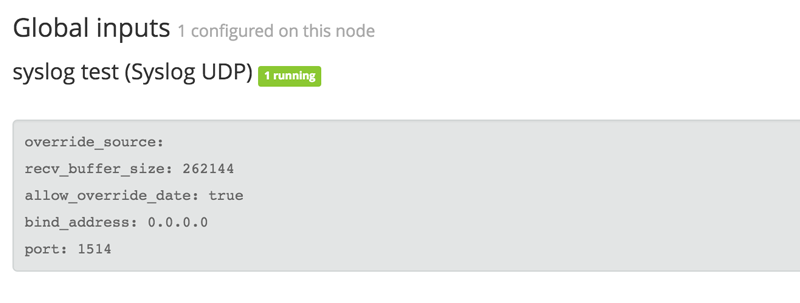
Click “launch” and ensure that the input starts up properly. You should see a green running status next to your input name.
Next, to test your deploy, you should generate some test data to send to Graylog. On your command line, you can execute the following command: nc -w0 -u 192.168.33.20 1514 <<< “Test Syslog Message”. Click “search” and you should see this data populated in your cluster.
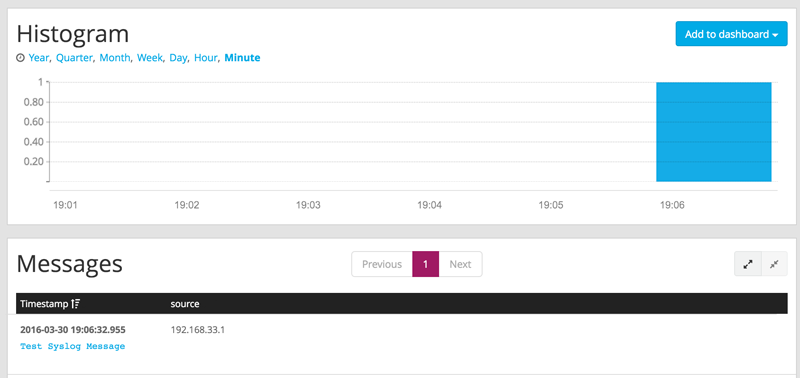
If you click on the message, you get a more information from Graylog.
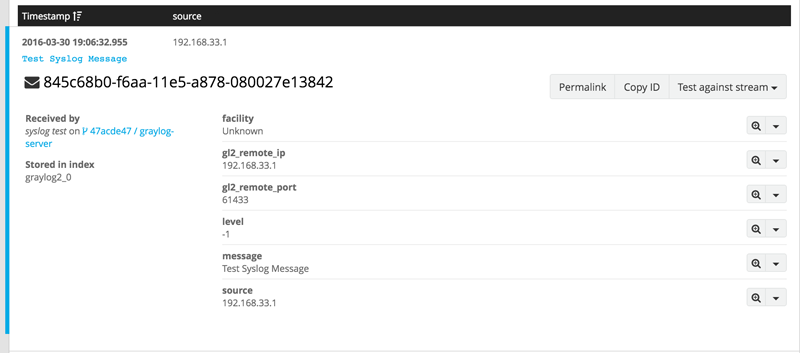
As you can see, Graylog indexes and parses the syslog message. It does this for most input and performs exceptionally well for Syslog. Our example syslog message did not contain a lot of information, but you can now point rsyslog to your Graylog virtualbox machine and try out some test messages and to take advantage of Graylog’s parsing features.
The Vagrantfile shows a setup via local Virtualbox which is not ideal for production deployments. Luckily, Vagrant has providers for cloud services like Google Compute Engine and EC2 as well as out-of-the-box support for Docker and Hyper-V.
For the full Vagrantfile, please see the end of this blog post.
Building on the foundation: the Message Queue
With this Vagrantfile and setup, you’ve completed the requirement for the Log Manager from the systems diagram. Instead of tailing and grepping through syslog messages, the syslog aggregator can be used to forward logs over to the Graylog deploy. You can then take advantage of alerting schemes in Graylog, or even hook into Elasticsearch and take advantage of the structured data format for offline analysis.
This log manager setup helps streamline processes that require log investigation, such as a post-mortem for a service outage or a security incident. It’s important for any Threat Intelligence program to remove as much manual process as possible without sacrificing visibility into your infrastructure or data. Dashboards, saved searches, and alerting, which are all native in Graylog, can move you closer to the goal of streamlining Threat Intelligence.
There are a few issues with this setup. First, there are no enrichment mechanisms along the way to help with searching. For example, you could be logging SSH login attempts and then doing reverse DNS and IP reputation lookups to help elevate failed login attempts to a higher status if it’s a malicious attempt. Second, syslog messages can generate too much noise and relevant signals get lost in the mayhem. Without something like a stream processor to help extract the signal, you could be losing vital information about the state of your telemetry.
Read Part 3 of the series to learn how we tackle the Message Queue portion of the systems diagram. The Message Queue will help this setup in a few ways:
Manage multiple streams of data on separate highways and flows, which bolsters Graylog’s capability to perform extraction or searching on these flows.
Serve as an intermediary to feed data into a stream processing architecture for enrichment or analysis.
Manage an alert stream: Graylog can be configured to alert immediately on data coming through that specific stream, which offloads complicated alert scenarios away from Graylog and into code.
Stay tuned!
Appendix
Berksfile
    source "https://supermarket.chef.io"

    cookbook 'elasticsearch', git: 'https://github.com/elastic/cookbook-elasticsearch.git'
    cookbook 'java'
    cookbook 'fst_elasticsearch', path: '~/cookbooks/fst_elasticsearch'
    cookbook 'graylog2'
Vagrantfile
    Vagrant.configure(2) do |config|
      config.vm.box = "ubuntu/trusty64"
      config.berkshelf.enabled = true

      if Vagrant.has_plugin?("vagrant-cachier")
        config.cache.scope = :box
      end

      es_servers = { :elasticsearch1 => '192.168.33.30',
                      :elasticsearch2 => '192.168.33.31',
                      :elasticsearch3 => '192.168.33.32'
                    }

      es_servers.each do |es_server_name, es_server_ip|
        config.vm.define es_server_name do |es_config|
          es_config.vm.box = "ubuntu/trusty64"
          es_config.vm.network "private_network", ip: es_server_ip.to_s
          es_config.vm.provider "virtualbox" do |v|
            v.memory = 1024
            v.cpus = 2
          end
          es_config.vm.hostname = es_server_name.to_s
          es_config.vm.provision :chef_solo do |chef|
            chef.add_recipe "java"
            chef.add_recipe "blog_elasticsearch"
            chef.json = {
              :java => {
                :oracle => {
                  :accept_oracle_download_terms => true
                },
                :install_flavor => "oracle",
                :jdk_version => "8"
              },
              :elasticsearch => {
                :configuration => {
                  :network_host => es_server_ip.to_s,
                }
              }
            }
          end
        end
      end

      config.vm.define "graylog-server" do |graylogserver|
        graylogserver.vm.box = "ubuntu/trusty64"
        graylogserver.vm.network "private_network", ip: "192.168.33.20"
        graylogserver.vm.network "forwarded_port", guest: 1514, host: 1514, protocol: "tcp"
        graylogserver.vm.network "forwarded_port", guest: 1514, host: 1514, protocol: "udp"
        graylogserver.vm.provider "virtualbox" do |v|
          v.memory = 1024
          v.cpus = 2
        end
        graylogserver.vm.hostname = "graylog-server"
        graylogserver.vm.provision :chef_solo do |chef|
          chef.add_recipe "java"
          chef.add_recipe "blog_elasticsearch"
          chef.add_recipe "mongodb"
          chef.add_recipe "graylog2"
          chef.add_recipe "graylog2::server"
          chef.json = {
            :java => {
              :oracle => {
                :accept_oracle_download_terms => true
              },
              :install_flavor => "oracle",
              :jdk_version => "8",
            },
            :graylog2 => {
              :password_secret => "", # pwgen -s 96 1
              :root_password_sha2 => "", # echo -n yourpassword | shasum -a 256 | awk '{print $1}'
              :elasticsearch => {
                :discovery_zen_ping_unicast_hosts => '192.168.33.20:9300',
                :network_host => '192.168.33.20'
              },
              :rest => {
                :transport_uri => 'http://192.168.33.20:12900/',
                :listen_uri => 'http://192.168.33.20:12900/'
              },
              :server => {
                :java_opts => "-Djava.net.preferIPv4Stack=true"
              }
            },
            :elasticsearch => {
               :configuration => {
                 :network_host => "192.168.33.20",
               }
             }
          }
        end
      end

      config.vm.define "graylog-web" do |graylogweb|
        graylogweb.vm.box = "ubuntu/trusty64"
        graylogweb.vm.network :private_network, ip: "192.168.33.10"
        graylogweb.vm.network "forwarded_port", guest: 9000, host: 9000, proto: "tcp"
        graylogweb.vm.provider "virtualbox" do |v|
          v.memory = 1024
          v.cpus = 2
        end
        graylogweb.vm.hostname = "graylog-web"
        graylogweb.vm.provision :chef_solo do |chef|
          chef.add_recipe "java"
          chef.add_recipe "graylog2"
          chef.add_recipe "graylog2::web"
          chef.json = {
            :java => {
              :oracle => {
                "accept_oracle_download_terms" => true
              },
              :install_flavor => "oracle",
              :jdk_version => "8",
            },
            "graylog2": {
              "password_secret": "", # pwgen -s 96 1
              "root_password_sha2": "", # echo -n yourpassword | shasum -a 256 | awk '{print $1}'
              "web": {
                "secret": "",
                :server_backends => 'http://192.168.33.20:12900',
                :timezone => "Etc/UTC"
              }
            }
          }
        end
      end
    end