
Customers often use static object stores, like Google's Cloud Storage, as backends for Fastly services. Things don't change in the storage bucket very often, so in general, Fastly can cache for a long time. This is great for performance, but when things do change, how do you make sure that change is visible to end users quickly?
This is a general problem with any kind of content that doesn't change regularly. Often, the solution is to set a very short cache TTL at the CDN or to purge the entire CDN cache manually. However, that means that if you make a change to your website, users may be seeing old content for hours or even days before the CDN cache is updated with the latest content.
Fortunately, Fastly offers Instant Purge™ — of your whole cache, of individual files, and even of groups of files identified by common tags (which we call surrogate keys). Google's Cloud Storage offers events that can trigger Cloud Functions, another GCP product that runs stateless logic on demand. When you hook these features together, Fastly’s edge cloud platform can be purged instantly and selectively to ensure that content updates are seen by users immediately, even when objects have very long cache lifetimes.
In this post I'm going to show you how to connect the two and help you configure your own GCS backend to purge Fastly when you change your content.
Please be aware that following the steps outlined in this post may cause you to incur charges from Google.
How it works
This is what we're aiming for:
A user requests a resource from your website. Fastly fetches it from your GCS backend and caches it for a long time at the edge (a year is common).
You update the resource by uploading a new version to GCS.
A GCS event is triggered, which executes a cloud function.
The function sends a request to the Fastly API, instructing Fastly to invalidate the object.
Another end user makes the same request. Fastly ignores the object in cache and re-fetches it from GCS.
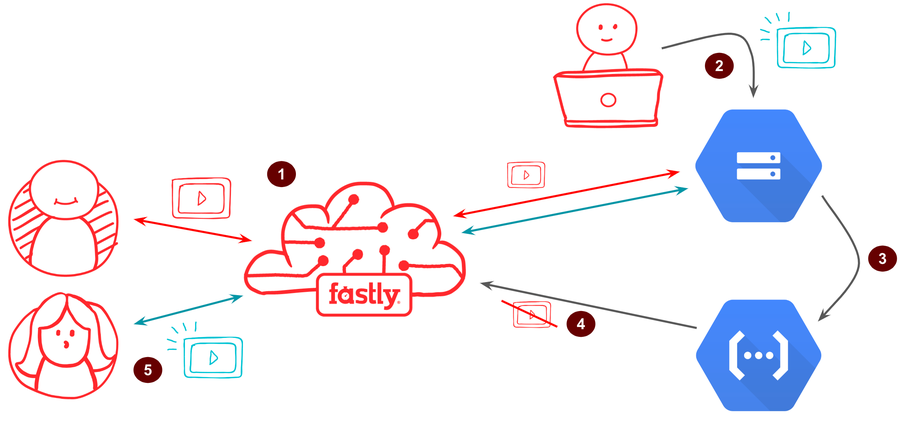
It's worth mentioning at this point that the purge request shown above in Step 4 doesn’t normally delete the resource from Fastly's caches, but instead marks it as stale. This is useful since you might want to use stale-while-revalidate or stale-if-error cache directives. But if you don't, marking an object as stale is the equivalent of deleting it.
Getting started
I'm going to assume you already have a Fastly service and a Google cloud account with a project that contains a GCS bucket with your files in it, and the bucket is:
Publicly accessible; and
Set up as the backend for your Fastly service.
To glue these together, you're going to also need to enable the Cloud Functions API. You may want to install the Cloud SDK on your system and make sure it's up to date in order to run the gsutil CLI commands, but you can also click buttons in the GCP console if you prefer.
One important prerequisite is that you disable the built-in caching that comes with GCS. To do this, set object metadata when you upload the object to the bucket:
gsutil -m \
       -h "Cache-Control: public, max-age=0" \
       cp -r ~/[PATH_TO_CONTENT]/* gs://[BUCKET_NAME]
You can also use the setmeta command to update object metadata on objects you have already uploaded.
If you're setting up the bucket for this tutorial, you could pause at this point to test that you can access the sample file over HTTP:
curl -i "https://[BUCKET_NAME].storage.googleapis.com/[FILE_PATH]"You should see the HTTP headers of the response along with the contents of the file you uploaded. Take note of content-type and cache-control in particular, and if they're not correct, fix them using object metadata as described above. If you get a 403 Forbidden response, check that your bucket is accessible publicly.
Setting a constant TTL for Fastly
Since all objects cached by Fastly will be invalidated when they change, the cache lifetime of all objects can be the same and can be set to a very long duration. If you don't already have your Fastly service configured to do this, you can set a constant TTL with the following steps:
In the Configuration section of the Fastly console, click Clone to create an editable version of your service.
In the sidebar, choose Settings.
Click Create your first cache setting.
In Name, enter an appropriate name such as "Set TTL to a year".
Set TTL (seconds) to 31536000 (this is equivalent to one year in seconds).
Click Create.
Click Activate to deploy the updated configuration to the Fastly service.
Create the cloud function
Now we’ll configure the cloud function. You can code this on your local machine and deploy using Google's cloud SDK, but we'll just use the UI for the moment. Start on the cloud functions console and click create function.
Choose a name (such as "fastly-purge"), set the trigger to be "Cloud Storage" and the event as "Finalize/create" (you'll need to browse and select the GCS bucket that holds your files).
Using the inline editor, enter the following code:
const fetch = require('node-fetch');
const FASTLY_PUBLIC_BASEURL = "https://www.example.com";

exports.fastlyPurge = async (obj, context) => {
  const baseUrl = FASTLY_PUBLIC_BASEURL.replace(/\/+$/, '');
  const fileName = obj.name.replace(/^\/+/, '');
  const completeObjectUrl = `${baseUrl}/${fileName}`;

  const resp = await fetch(completeObjectUrl, { method: 'PURGE'})
  if (!resp.ok) throw new Error('Unexpected status ' + resp.status);

  const data = await resp.json();
  console.log(`Job complete for ${fileName}, purge ID ${data.id}`);
};
The only dependency we're using here is the node-fetch module to make it slightly easier and more familiar to make HTTP requests. Switch to the package.json tab and add it as a dependency:
"dependencies": {
  "@google-cloud/storage": "^1.6.0",
  "node-fetch": "^2.6.0"
}
Finally, set the function to invoke to fastlyPurge, and save.
It will take a minute or so for GCP to load and activate your function. And you're done! Whenever you change any files in your GCS bucket, GCP will notify Fastly to delete any cached copies of those files from our servers. This takes 150ms, on average, to complete (as of Dec. 31, 2019), for the entire edge cloud.
Testing
First, prove that the object is being cached by Fastly by running the following request repeatedly:
curl -is "https://your.fastly.domain/file/path" 2>&1 | grep -i "x-cache:"This will show you the X-Cache header from the HTTP response, which should consistently show HIT or HIT-CLUSTER (with perhaps a MISS at the beginning):
x-cache: MISS
x-cache: HIT
x-cache: HIT
x-cache: HIT
Now make a change to the file and re-upload to your bucket. Using gsutil, you could do this (but you can also use the bucket explorer UI if you wish):
gsutil -m -h "Content-Type:text/css" -h "Cache-Control:public, max-age=0" cp -r ~/path-to-content/* gs://[BUCKET_NAME]Re-run the cURL command to again request the object from Fastly. The first time you do this, you should see a slightly longer response time and an x-cache of MISS or MISS-CLUSTER.
More importantly, the file has changed and reflects the change you uploaded to your bucket (remove the | grep portion of the cURL command to see the content of the response).
Understanding the code
The function is invoked with arguments obj and context. The former is a Cloud Storage object, and the latter provides metadata about the event. The only property we are interested in from the arguments is the obj.name property, which will contain the name of the object that has been created, updated, or deleted in the GCS bucket. We also need to know the domain on which you are serving the object in your Fastly service, so that we can construct a complete URL to the object that makes sense to Fastly:
const baseUrl = FASTLY_PUBLIC_BASEURL.replace(/\/+$/, '');
const fileName = obj.name.replace(/^\/+/, '');
const completeObjectUrl = `${baseUrl}/${fileName}`;
Purges for single URLs are a special case in the Fastly API, in that the request is sent to the URL you want to purge and not to an api.fastly.com endpoint. We use the node-fetch library to send the request, using the HTTP PURGE method and report the purge ID returned from Fastly. If you need any help from Fastly support, citing this ID will help.
const resp = await fetch(completeObjectUrl, { method: 'PURGE'})
const data = await resp.json();
console.log(`Job complete for ${fileName}, purge ID ${data.id}`);
Troubleshooting
If the file served by Fastly does not change after you edit it and upload it to GCS, here are a few troubleshooting steps:
Did it upload successfully?
Request the object directly from the bucket, bypassing Fastly, to see if it has changed on GCS:
curl -i "https://[BUCKET_NAME].storage.googleapis.com/[PATH]"If it hasn’t, the problem could be related to pushing the updated file to the bucket or with caching built in to GCS. If it has changed, the problem may be with your cloud function.
Did the cloud function run?
Review your Stackdriver logs, to find out if the function was triggered correctly:
Navigate to the Google Cloud Functions console.
Click the name of the function you created.
At the top of the page, click View logs.
Check the timestamp on the most recent log entry and compare it to the time you uploaded your change to the bucket.
Did the API request work?
If the logs show that there was activity from the function when you updated the file in the bucket, take a look at the content of the logs to confirm that Fastly acknowledged the purge request. Ideally you should see:
Function execution started
Job complete for sample.css, purge ID 17953-1516801745-2111226
Function execution took 683 ms, finished with status: 'ok'
If you don’t see this output, there may be an error logged instead. If you need help, you can always reach out to us in our community forum or email support@fastly.com.
Next steps
Congratulations, you got a basic GCS bucket serving through Fastly with instant invalidation on change! Where do you go from here?
Serve a whole static website, not just individual assets. What you have works great for assets, but for a full website you’re going to need a default directory index filename (eg. ‘index.html’) to serve for directory requests, as well as a file to serve for 404 not found errors. You can do this in Google Cloud Platform by assigning a custom domain to your GCS bucket, or in Fastly by writing some additional Fastly VCL code.
Authenticate access to GCS. Instead of allowing public-read access to your bucket, create an IAM user, assign it to the role of Storage Object Viewer, and follow our instructions for generating per-request tokens for GCS.
Remove all the x-goog- headers. Google adds a lot of headers to the HTTP response that you get from Cloud Platform. To remove them, you can either assign a custom domain to your bucket, which activates static website hosting in GCS, or configure your Fastly service to remove them for you.
Authenticate purges. Right now, anyone can send an HTTP request to your public Fastly domain to purge an item from the cache. If you’re concerned about this and want to authenticate your cloud function so that only it can send purge signals, generate a Fastly API token with purge ability for your service, enable authenticated purging, and modify your cloud function code to send a
Fastly-Keyheader with the value set to the API token you generated.Express the orchestration in code. Consider using Hashicorp’s Terraform tool to capture the Google Cloud Platform and Fastly configuration in a file that you can save to version control.
We've gone into a fair bit of detail here, but in essence, making Fastly aware of changes to your GCS buckets boils down to a single line in a very simple cloud function. This kind of elegant integration can make all the difference to the performance and efficiency of your website, reducing both the time to render for your end users and your data bill from Google too!