
Last month, we announced local testing for Compute, which is used to build, test, and deploy code in our serverless compute environment. Local testing gives you the flexibility to run your work-in-progress applications locally on your laptops, servers, or CI systems, in an environment similar to production — but without the deployment time and process. Because there's no deployment step involved when local testing, you can use the tool as part of your existing automated testing processes, including for unit tests and integration tests in CI, giving you control of your testing setup.
Compute local testing allows you to run a complete application using our SDKs locally, so you can develop and test a program that talks to origin servers (real or simulated) without having to deploy to our network. This speeds up development by facilitating quicker iteration and allows for easy visibility and troubleshooting at the network level (tools like Wireshark can be used to trace your program’s network traffic, for example). Plus, testing and debugging tools that work with Compute, such as log tailing and real-time logging endpoints, work with local testing too.
In this blog post, I'll tell you how local testing works and show you an example.
Fastly SDK built in
One of the advantages of Compute is that we provide our SDKs for multiple languages that provide helper functions and structures to develop serverless applications. The SDK provides shortcuts — such as pre-defining a main entry point for your app or connections to send and receive from backends — and provides structures to create and manipulate HTTP requests and responses. Prior to Compute local testing, you could create and build Wasm apps locally, but there was no way to include the Fastly SDK. While you could do some unit testing, your test application would differ greatly from the one that gets deployed.
One of my favorite features of Compute local testing is that it provides an offline development environment. Some might disagree with the idea of bringing technology into the wilderness, but some of my best ideas actually come when I’m far away from the distractions of the city and office. For this reason, I usually take a small laptop with me when I’m camping or otherwise off the grid.
Previously when I had a great idea, my only options were to take notes and maybe stub out some code. With Compute local testing though, I can actually write, build, and test whenever and wherever I get a brilliant idea for the next big thing.
Compute app workflow
So we’ve talked about why this is all great. Now let’s look at how it works. The normal workflow for a Compute application is:
Initialize application
Build application
Modify code
Deploy application
Rinse and repeat
This is all done using the Fastly CLI with these commands:
$ fastly compute init
$ fastly compute build
$ fastly compute deploy
Compute local testing is also integrated into the Fastly CLI. This command will build the app and start a local test environment:
$ fastly compute serveOnce the local test server has started, you can just point a browser at localhost:<port number> to execute the Compute application and see the response. When you’re ready to deploy the application to the network, you run fastly compute deploy, and you’re done.
A real use case
Recently, a company approached us about wanting to replace their legacy image processing system. After talking about their requirements, it turned out that our Image Optimizer would be perfect for the job except for one thing — the company has dozens of different client applications deployed, so they can’t change the way these apps request an image. In order to use Image Optimizer, they would need to add the appropriate query parameters for an image request.
This is a perfect use case for Compute. We could write a Compute app that handles the client requests, then calls the company’s CMS API to get information about the image, including the URL to the actual image. It turns out that this is a pretty convenient architecture — the only code that needed to be written was the Compute processing application. The company had a very tight timeline and wanted to see something working the next week, but I was about to leave on a five-day rafting trip. Solution: Compute local testing.
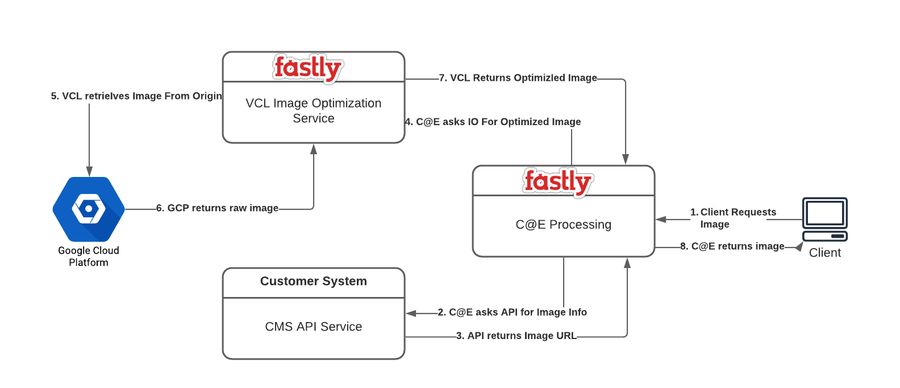
Above is a high-level design of the customers requirements.
I mentioned I take a small laptop with me when I go into the wilderness, right? I knew I would have plenty of down time during my trip where I could go off on my own and work on this project. I was able to stub out the VCL image processing service — that part requires a connection to the cloud — but Image Optimizer is a mature product, so I was not too worried about stubbing it. I simulated the customer CMS API and Google Storage using a Django server running on my local machine. This allowed me to write, build, and test the Compute processing app on a completely localized system with no connection to the internet. This would not have been possible before Compute local testing.
The code snippet below shows two backend calls, one to the CMS API to get information about the image and the other to get the actual image after processing some information.
let api_response = Request::get(image_obj.api_url).send(IMAGE_API_BACKEND);
match api_response {
Ok(response) => {
let body_str = response.into_body_str();
println!("body_str: {}", body_str);
if image_obj.image_type == "album" || image_obj.image_type == "artist" {
let image_info: ImageInfo = serde_json::from_str(&body_str).unwrap();
let dims = image_obj.dimensions.unwrap();
let io_url = format!(
"https://{}/{}?height={}&width={}",
CUSTOMER_GCP_HOSTNAME, image_info.url, dims.height, dims.width
);
req.set_url(io_url);
req.set_header(header::HOST, CUSTOMER_GCP_HOSTNAME);
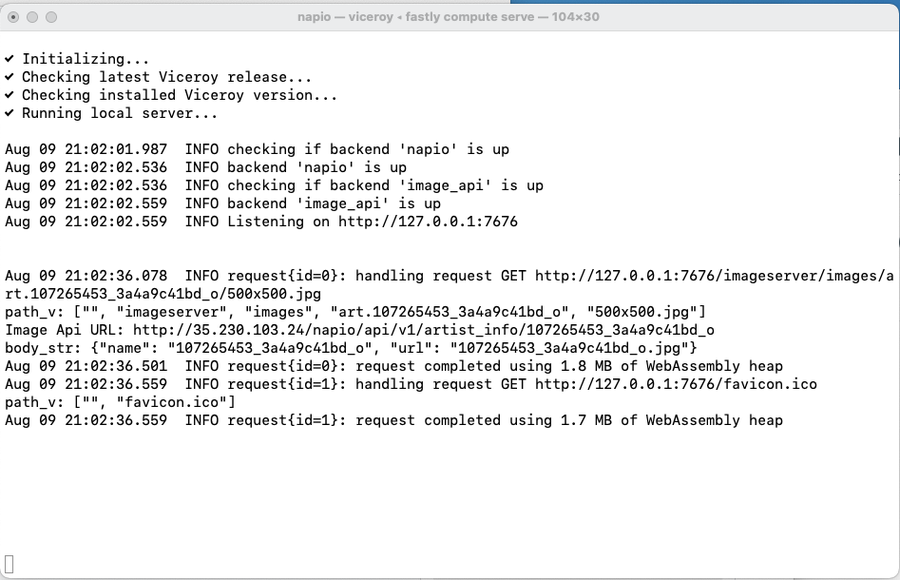
Ok(req.send(CUSTOMER_GCP_BACKEND)?)Below, you see the terminal window with the test server running on local port 7676. Note that the println in my code is output here for ease of debugging.
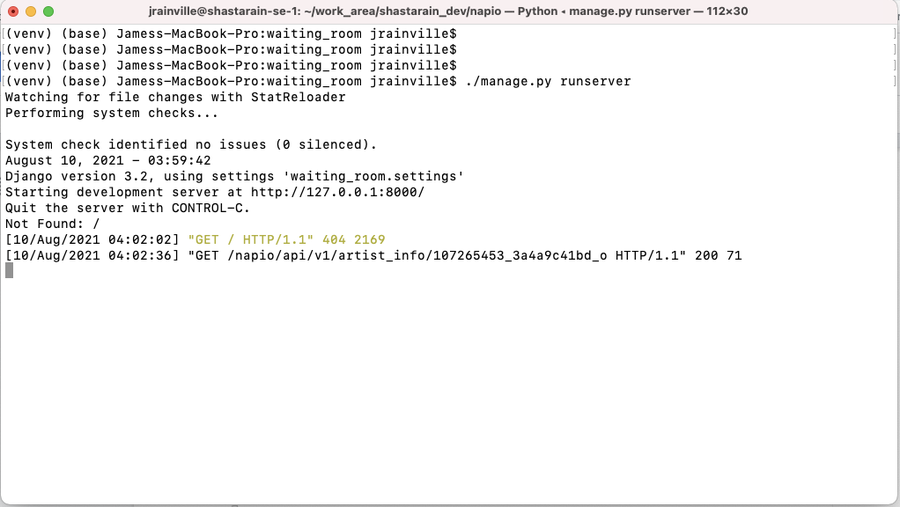
And here is the terminal window showing the Django backend running on local port 8000.
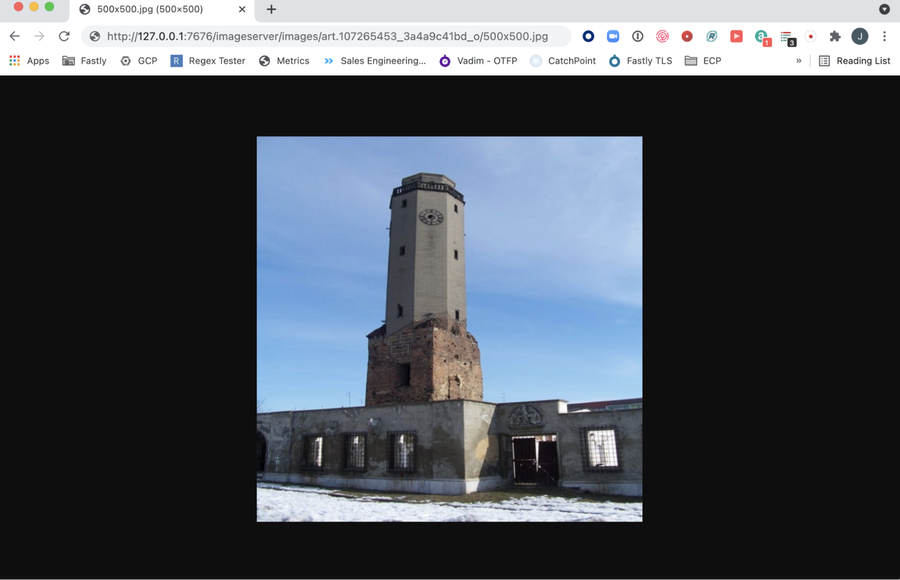
Here's an image of a browser requesting a specific image from 127.0.0.1:7676.
When I got back to civilization, I was able to configure the backends to point to the real VCL service, Google Storage, and the company’s CMS and still continue testing and debugging locally. When I was satisfied with the app, I deployed it to the network and everything worked. I was able to deliver on my commitment and still enjoy my vacation — a win/win all around!
Try it for yourself
Find out more about local testing for Compute on our Developer Hub. And if you're not yet using Compute, sign up now and experience the power of serverless.