
This post was written with version 0.30.0 of the Fastly Terraform provider. This is no longer the latest release so please refer to the documentation.
While configuring Fastly services can be done as an occasional process via the web interface, command line interface, or API, it's often important to ensure that your configuration is captured and tracked alongside the evolution of your application code. As you start to build more at the edge, it becomes ever more important to deploy edge logic in the same way you deploy changes to your own applications and infrastructure. With cloud services blurring the boundaries between infrastructure and software, you increasingly need a way to deploy your code and configuration changes to multiple vendors' services in a single versioned deployment. Using this principle to describe Fastly services is called infrastructure as code (IaC).
We’ve previously shared how you can build a continuous deployment pipeline using the popular Terraform tool and have continued to iteratively improve the available features to include support for our versionless resources, WAF, third-party logging endpoints, TLS, and Compute@Edge. Now, let’s take a step back and look holistically at how to configure, manage, and deploy Fastly services using Terraform. I’ll walk you through how this can be done in a best-practice way.
You’ll start by creating a simple VCL service using Terraform. The service will initially be a transparent proxy in front of the popular https://httpbin.org request/response testing website (i.e. the service initially won’t make any modifications to the request object before it’s proxied to httpbin). After, you’ll make some modifications that demonstrate how to run programmatic logic at the edge.
So, to get to it, here are the steps we'll cover:
Register: create a Fastly account and generate an API key.
Write: define your requirements using Terraform code.
Execute: "plan" and "apply" your requirements using Terraform’s CLI.
Validate: open a web browser and confirm the service is running correctly.
Modify: make changes to the defined resources, generate a new plan and reapply.
To help conceptualize these steps, consider the following diagram as a way to mentally model the overall setup:
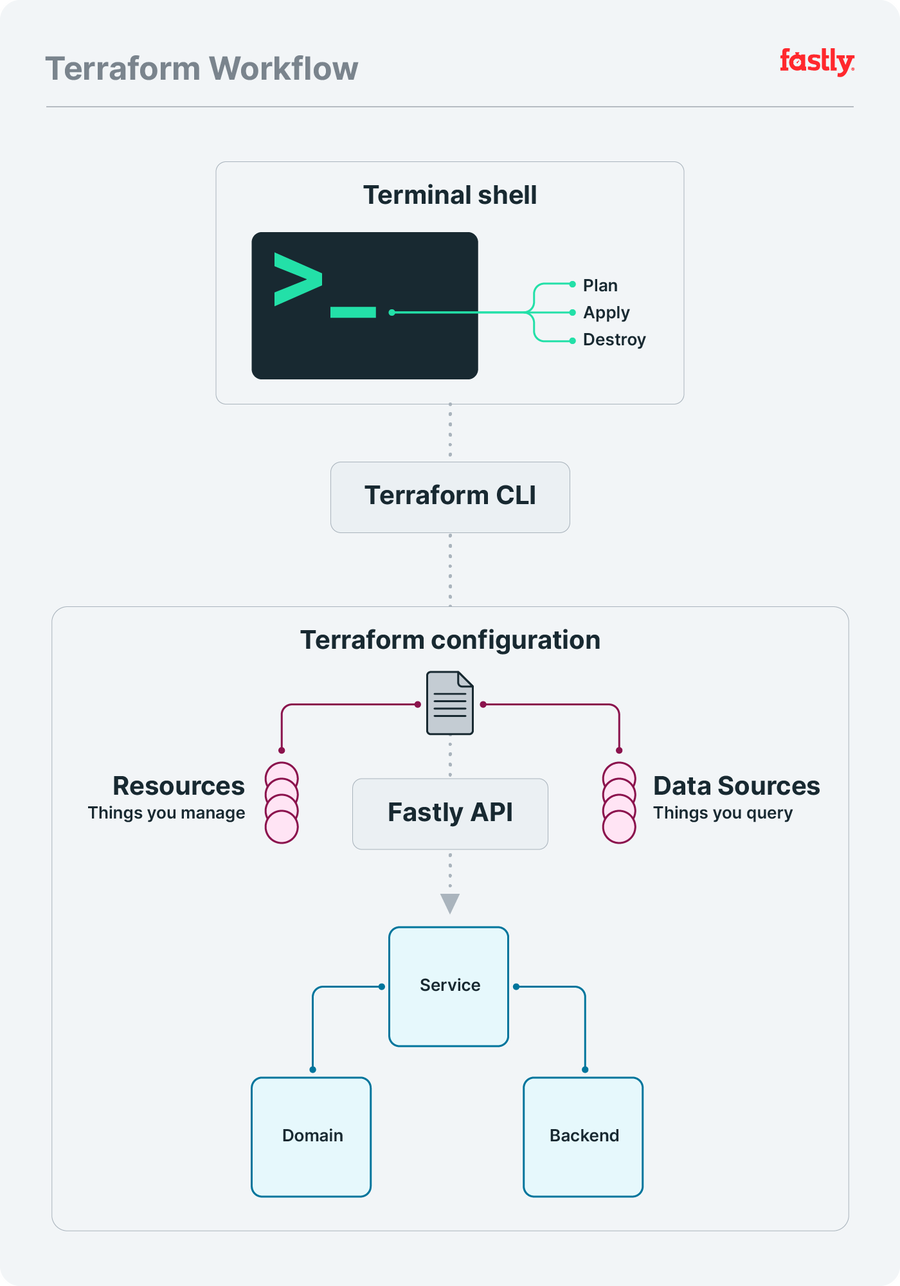
Set up a Fastly account
The first step is to sign up for a Fastly account. There's no obligation, and you can test up to $50 of traffic for free. Once you’ve registered and signed in, create a Fastly API token. This is a unique authentication credential associated with you as an individual user. Our Terraform provider requires you to provide this token, so it can interact with the Fastly API on your behalf.
Write Terraform configuration
Next, make a new Terraform file in your favorite code editor by creating a file called main.tf and adding the following code to it:
terraform {
  required_providers {
    fastly = {
      source  = "fastly/fastly"
      version = "~> 0.30"
    }
  }
}

resource "fastly_service_v1" "test_service" {
 name = "An Example Service"

  domain {
    name = "<name>.global.ssl.fastly.net"
  }

  backend {
    address = "httpbin.org"
    name     = "My Test Backend"
  }

  force_destroy = true
}

output "active" {
  value = fastly_service_v1.test_service.active_version
}
For the purposes of getting up and running quickly, you’ll start with a single file, but as the project grows, you'd probably want to split up the code into separate files to make it easier to maintain.
The above code is HCL, HashiCorp Configuration Language, which lets you define various blocks and containers, denoted by name { ... }, to organize content. In the above example, you can see three top-level blocks:
1. terraform
2. resource
3. output
The terraform block defines a list of Terraform providers to use. In this case the Fastly Terraform provider is the one we need.
HINT: Refer to the Terraform documentation for more information on using Version Constraints.
A resource block describes one or more infrastructure objects. The above configuration defines a fastly_service_v1 resource (labelled "test_service"), which is a specific type of resource provided by our Terraform provider and is required to be able to create a new VCL service. Within this resource are two nested blocks domain and backend, which are required blocks that determine what domain name the VCL service should handle requests for, and which backend service should ultimately process those requests. These are the two minimal bits of configuration every Fastly service needs, regardless of whether you are using Terraform or not.
For the purposes of this example, change the <name> section of the domain value to something unique to you. Otherwise, you might see an error suggesting the domain has already been taken by another service.
The output block sets out what you want Terraform to tell you once it's done deploying the infrastructure the way you want it. This is often something that changes as a result of the deployment, like a version number.
The fastly_service_v1 resource will generate an active_version attribute, and the value will only be known once the service has been created and activated successfully. In the Terraform code, there’s an output block labelled active whose assigned value is a HCL programmatic expression which lets us access the active version.
The syntax for referencing attribute values within a resource is:
<resource_type>.<resource_label>.<resource_attribute>You can find all attributes for a particular Fastly resource in the Fastly Terraform provider documentation for the resource.
Execute Terraform to generate a plan
Now that you have a Terraform configuration, install the Terraform CLI. Once installed you can view all the available commands by running this in your terminal:
$ terraform -helpOne of those available commands is init, which initializes a Terraform project in the current working directory. So, in the same directory in which you created the main.tf file, run:
$ terraform initThe initialization step will prompt Terraform to download all the providers you specified within the required_providers block. If you need to add a new provider later, update your main.tf to reference the new provider and then re-run terraform init.
Terraform uses your main.tf configuration to generate an "execution plan" indicating the various operations needed to reach the desired state. Terraform then executes the plan to build the described infrastructure.At this point you'll also need to expose the Fastly API token you made earlier to Terraform, so that Terraform can interact with the Fastly API as you. Export the API token in your shell as an environment variable, and then generate an execution plan to see what Terraform intends to do for you:
$ export FASTLY_API_KEY="====PUT YOUR TOKEN HERE===="
$ terraform plan
Terraform knows it hasn't yet deployed this configuration to a Fastly service, so the output should reflect this by indicating the need to create the various resources:
An execution plan has been generated and is shown below.
Resource actions are indicated with the following symbols:

  + create

Terraform will perform the following actions:

  # fastly_service_v1.test_service will be created
  + resource "fastly_service_v1" "test_service" {
      + activate              = true
      + active_version        = (known after apply)
      + cloned_version        = (known after apply)
      + comment               = "Managed by Terraform"
      + default_host          = (known after apply)
      + default_ttl           = 3600
      + force_destroy         = true
      + id                    = (known after apply)
      + name                  = "An Example Service"

      + backend {
          + address                = "httpbin.org"
          + auto_loadbalance       = true
          + between_bytes_timeout  = 10000
          + connect_timeout        = 1000
          + error_threshold        = 0
          + first_byte_timeout     = 15000
          + max_conn               = 200
          + name                   = "My Test Backend"
          + port                   = 80
          + ssl_check_cert         = true
          + use_ssl                = false
          + weight                 = 100
        }

      + domain {
          + name = "<name>.global.ssl.fastly.net"
        }
    }

Plan: 1 to add, 0 to change, 0 to destroy.

Changes to Outputs:
  + active = (known after apply)
You can see in the last few lines of the output that there is one resource to be added and nothing to be changed or deleted.
The provider will create a service, a domain, and a backend (reflecting the nested blocks in your configuration). Although you’ve defined multiple blocks within the fastly_service_v1 resource, from Terraform’s perspective, there’s still only a single resource to be created.
Once you’ve reviewed the plan and are happy with it, apply it:
$ terraform apply

An execution plan has been generated and is shown below.
Resource actions are indicated with the following symbols:
  + create

Terraform will perform the following actions:

...<snip>...

Do you want to perform these actions?
  Terraform will perform the actions described above.
  Only 'yes' will be accepted to approve.

  Enter a value:
You should see the same output as before, followed this time by an interactive prompt requesting you confirm you’re happy for the plan to be applied. Type "yes" and press enter. The remaining output will provide status updates:
  Enter a value: yes

fastly_service_v1.test_service: Creating...
fastly_service_v1.test_service: Still creating... [10s elapsed]
fastly_service_v1.test_service: Still creating... [20s elapsed]
fastly_service_v1.test_service: Creation complete after 29s
[id=2Z2KJsHtnsNGkGpafGVdbx]

Apply complete! Resources: 1 added, 0 changed, 0 destroyed.

Outputs:

active = 1
Notice the “Outputs:” section at the bottom, which displays the active output variable that you defined in main.tf. The value is the number 1, which shows that the service just created is now at version 1.
HINT: You can skip manually entering "yes" when prompted (for example when using Terraform within an automated environment, such as a CI system) by passing the
-auto-approveflag to theapplysubcommand.
Validate the configuration
As you experiment with service configurations, you can validate your changes using a special test URL that Fastly generates based on the domain you defined for your service:
https://<name>.global.ssl.fastly.netAs an example, if the original Terraform code (with the domain’s <name> set to example) was successfully applied, then the test URL would be:
https://example.global.ssl.fastly.netIt may take up to 60 seconds for new configuration settings to take effect. Once ready, visiting the test URL displays the same content as https://httpbin.org/ because that domain was configured as a backend, and while the service resource in the Terraform code has no custom VCL code defined, Fastly’s default VCL will be used. The default VCL provides sensible and safe default behaviors, which means it knows to proxy any incoming requests to the specified backend (and automatically handle caching of responses).
Modify the configuration
Now you’ll modify the Terraform code to add a new block. This new block will be added within the fastly_service_v1 resource and will represent a custom VCL file. This is where you can get creative — write a custom VCL file for whatever logic you want to execute at the edge. For this demo though, we’ll use a simple file.
Start by creating a vcl directory in the same directory as your main.tf and within that new directory add a main.vcl file:
$ mkdir vcl && touch vcl/main.vclNext add the following VCL code to the main.vcl file:
sub vcl_recv {
  #FASTLY recv

  if (req.url.path == "/anything/here") {
    set req.http.X-CustomHeader = "example";
  }

  if (req.url.path == "/anything/not/found") {
    error 600;
  }

  return(lookup);
}

sub vcl_error {
  #FASTLY error
  if (obj.status == 600) {
    set obj.status = 404;
    set obj.http.Content-Type = "text/html";
    synthetic {"<h1>Not Found</h1>"};
    return(deliver);
  }
}
This custom VCL is basic but demonstrates that VCL updates can also be managed using Terraform. There are two distinct pieces of logic in this VCL code:
If a request for
/anything/hereis received, then add a custom HTTP header to the request (httpbin.org will return a200 OKfor paths that start with/anything/along with a JSON response that includes the details of the request made).If a request for
/anything/not/foundis received, then return a404 Not Foundsynthetic response instead of the usual200 OKresponse that httpbin would serve.
HINT: To help you write and test custom VCL, try using Fastly Fiddle or learn more about using VCL in our Developer Hub.
Next, you’ll update the Terraform code so the fastly_service_v1 resource includes a vcl block:
resource "fastly_service_v1" "test_service" {
  ...<snip>...

  vcl {
    content = file("vcl/main.vcl")
    main      = true
    name     = "custom_vcl"
  }

  ...<snip>...
}
With these modifications in place, you can re-run the plan and apply commands:
$ terraform planThe output will reflect the addition of the vcl block:
fastly_service_v1.test_service: Refreshing state...[id=2Z2KJsHtnsNGkGpafGVdbx]

An execution plan has been generated and is shown below.

Resource actions are indicated with the following symbols:
  ~ update in-place

Terraform will perform the following actions:

  # fastly_service_v1.test_service will be updated in-place
  ~ resource "fastly_service_v1" "test_service" {
        id             = "2Z2KJsHtnsNGkGpafGVdbx"
        name           = "An Example Service"
        # (5 unchanged attributes hidden)

      + vcl {
          + content = <<-EOT
                sub vcl_recv {
                  #FASTLY recv

                  if (req.url.path == "/anything/here")
                    set req.http.X-CustomHeader = "example";
                  }

                  if (req.url.path == "/anything/not/found")
                    error 600;
                  }
                  return(lookup);
                }

                sub vcl_error {
                  #FASTLY error

                  if (obj.status == 600) {
                    set obj.status = 404;
                    set obj.http.Content-Type = "text/html";
                    synthetic {"<h1>Not Found</h1>"};
                    return(deliver);
                  }
                }
            EOT
          + main    = true
          + name    = "custom_vcl"
        }
        # (2 unchanged blocks hidden)
    }

Plan: 0 to add, 1 to change, 0 to destroy.
The first thing to notice is "Refreshing state...". Terraform state is a cache of your infrastructure and configuration. This state is used to compare the requirements defined in your Terraform configuration against the real world environment. By refreshing the state, Terraform is able to calculate an execution plan that uses the most up-to-date view of the resources.
Now notice that the last line indicates there is one change to be made. Terraform is telling you that the fastly_service_v1 resource will be updated in-place (it uses a tilde ~ character to visually represent this state change).
The diff output also shows that some of the existing nested blocks are unchanged and uses a + character to indicate what lines are new additions. The Terraform configuration used the file function to access the VCL file in the project directory, but when it came to Terraform calculating the plan, it inlined the contents of the file and that’s what is being displayed in the diff output.
If you’re happy with the execution plan Terraform has presented, apply the changes (this time try using the --auto-approve flag to avoid having to manually type “yes”):
$ terraform apply --auto-approveOnce the changes have been applied, it takes around 20 seconds for the updated configuration to be deployed across our network, and for the endpoints defined within the VCL to start reacting based on the new rules.
For the first path (/anything/here), the custom header "X-Customheader": "example" will be visible in the JSON response sent from httpbin.org, while the second path (/anything/not/found) will now return a synthetic 404 Not Found generated by the VCL code. This demonstrates that the service configuration and the VCL code are all working as intended.
And you’re done! To recap: you defined custom requirements for a Fastly service using Terraform configuration, produced an execution plan, and applied the plan to trigger the creation of real Fastly resources. You then managed a typical update life cycle with full visibility of, and control over, the changes to your service resources.
Next steps
Managing VCL is just one way to take advantage of Terraform and Fastly together. You can also manage Compute@Edge services, which leverage the power of WebAssembly to run secure custom binaries compiled from languages like Rust and AssemblyScript. To see how you can take Fastly further with Compute@Edge and Terraform, check out “Orchestration using Terraform and the Fastly Terraform Provider” and the Fastly Terraform documentation