
Working with request rules
Request rules allow you to define arbitrary conditions that requests must meet in order for the WAF to take action and the actions the WAF should take when the conditions are met. For example, you could make a rule to block all requests with specific headers, requests to certain paths, or requests originating from specific IP addresses.
HINT: Not sure if your rule logic will work? Use our Simulator to test it. The Simulator feature is only available in the Next-Gen WAF control panel.
Limitations and considerations
When working with request rules, keep in mind the following things in mind:
- Request rules are limited to 1000 per corp (also known as account) plus 1000 per site (also known as workspace) for Security Starter, Security Advantage, or Security Ultimate packaged security offering. Other packages may have different limits.
- Request rules are considered custom rules for purposes of packaged entitlement limitations.
Creating request rules
You can create request rules that apply to multiple sites (workspaces) or that only apply to a single site (workspace).
Creating rules that apply to multiple sites (workspaces)
To create a request rule that applies to more than one site (workspace), complete the following steps:
- Next-Gen WAF control panel
- Fastly control panel
- Log in to the Next-Gen WAF control panel.
From the Corp Rules menu, select Corp Rules.
Click Add corp rule.
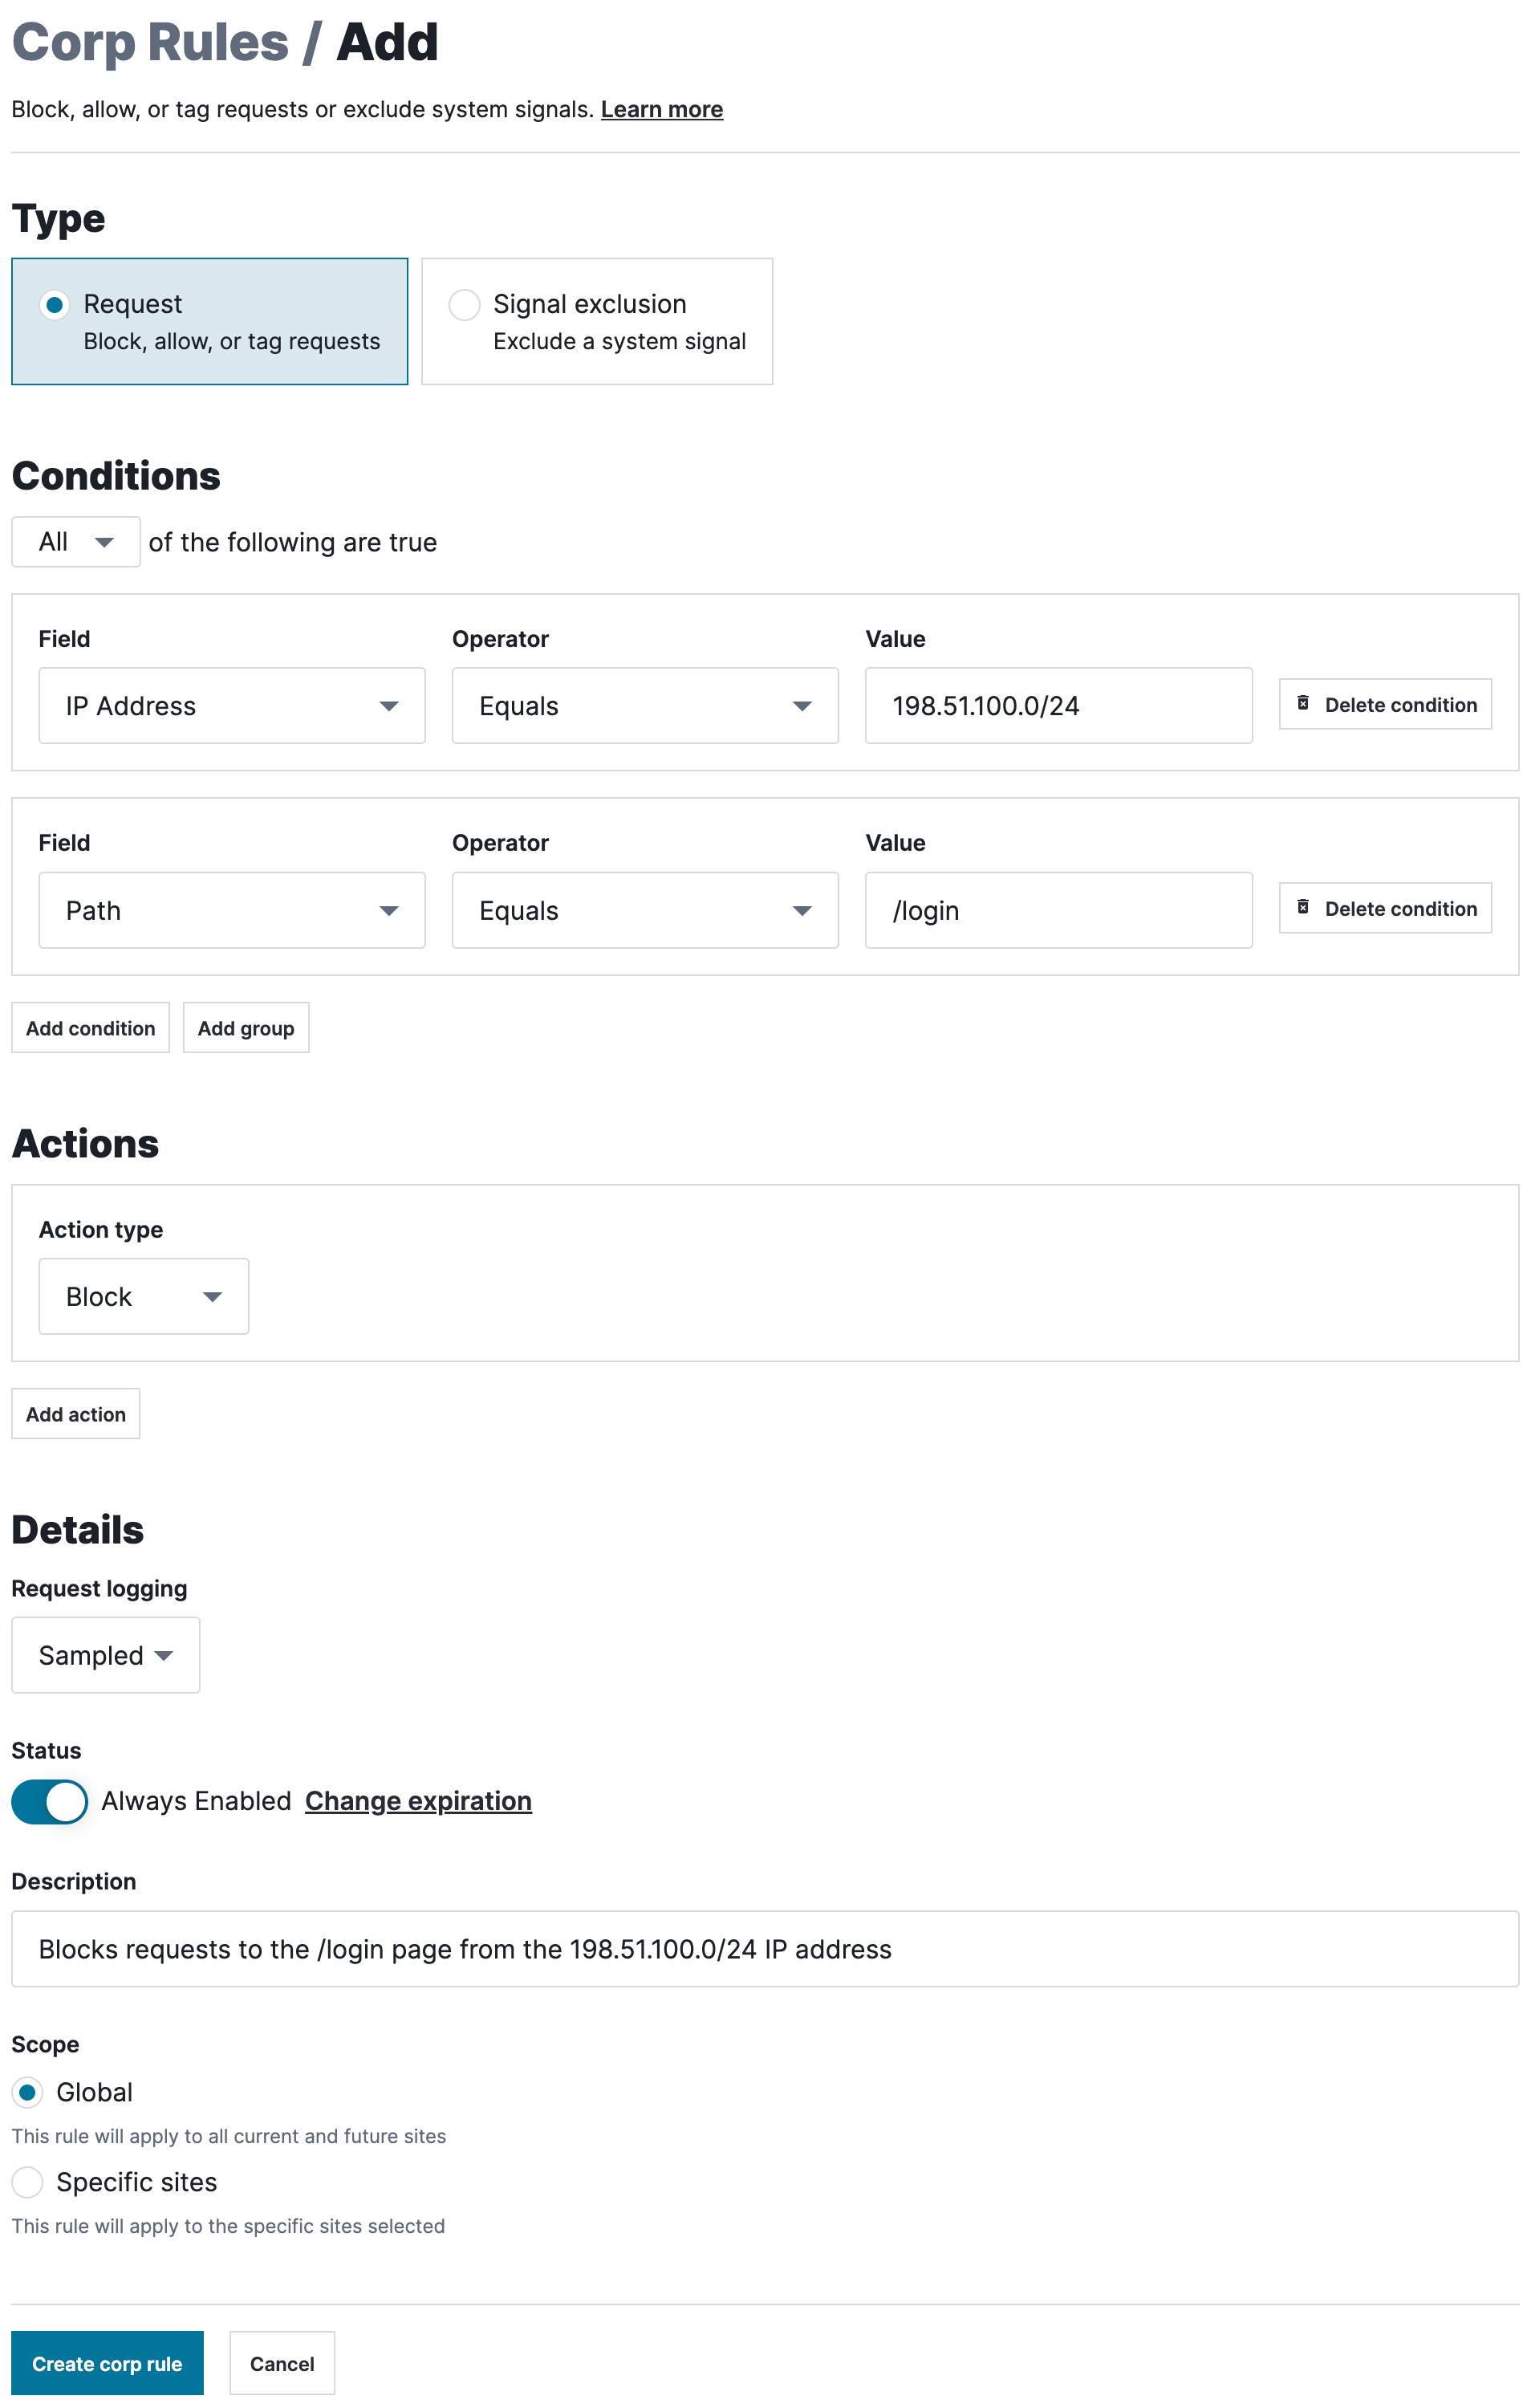
In the Type section, select Request.
Fill out the fields in the Conditions section as follows:
- From the Field menu, select the request field that the condition is based on.
- In the Value field, enter a value for the specified field.
- From the Operator menu, select an operator to specify how the selected field and value should be compared.
- (Optional) Click Add condition to add another condition or Add group to create a group of conditions.
- Select All to specify that a request must meet every condition or Any to specify that a request must meet only one condition.
Fill out the fields in the Actions section as follows:
- From the Action type menu, select the action that should be taken when a request meets the rule's conditions.
- (Optional) Click Add action to add another action.
Fill out the fields in the Details section as follows:
- From the Request logging menu, select Sampled to store the logs for requests that match the rule's criteria and None to not store the logs. When you select None, the time series graphs will still include data from requests that match the rule's criteria. Read our guide on request data storage for more information.
- Leave the Status switch enabled.
- Click Change expiration and select from the menu when the rule should be disabled.
- In the Description field, enter a description of the rule.
- From the Scope menu, leave Global selected for the rule to apply to all your sites. If you want the rule to apply to specific sites, select Specific sites and then select the sites the rule should apply to.
Click Create corp rule. The request rule is created and the Site Rules page appears.
Creating rules that apply to one site (workspace)
To create a request rule that applies to only one site (workspace), complete the following steps:
- Next-Gen WAF control panel
- Fastly control panel
- Log in to the Next-Gen WAF control panel.
- From the Sites menu, select a site if you have more than one site.
From the Rules menu, select Site Rules.
Click Add site rule.
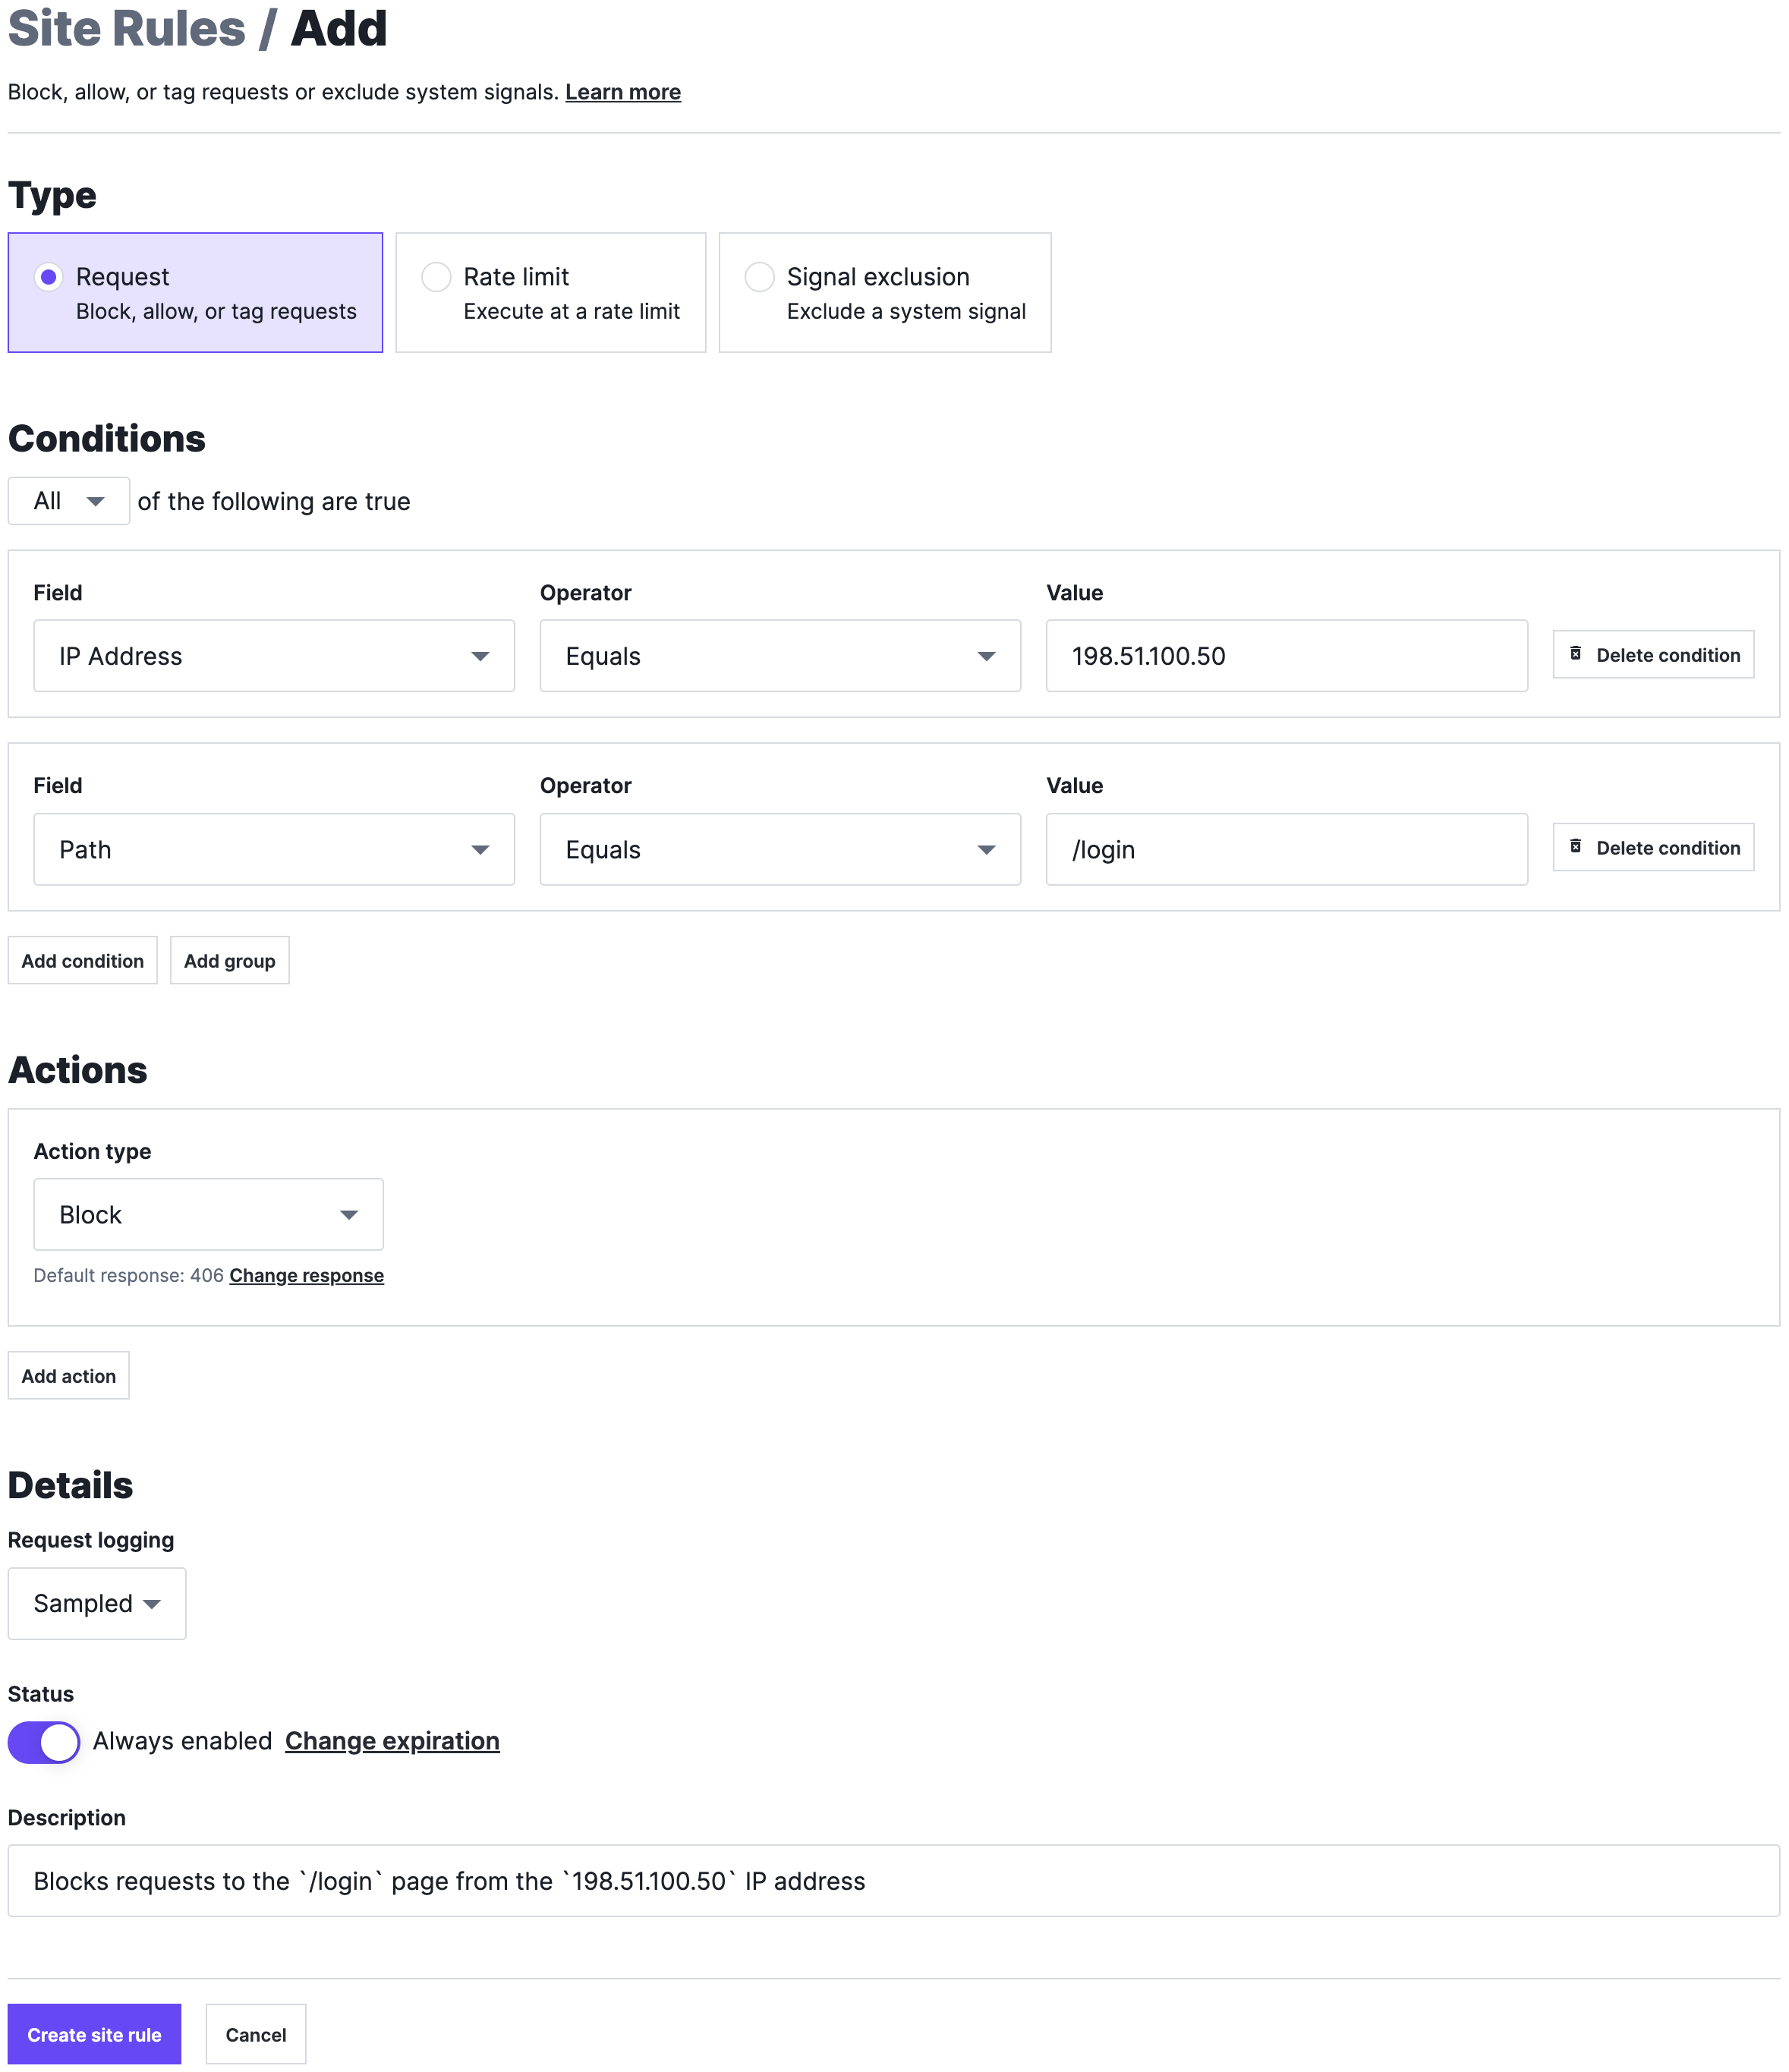
In the Type section, select Request.
Fill out the fields in the Conditions section as follows:
- From the Field menu, select the request field that the condition is based on.
- In the Value field, enter a value for the specified field.
- From the Operator menu, select an operator to specify how the selected field and value should be compared.
- (Optional) Click Add condition to add another condition or Add group to create a group of conditions.
- Select All to specify that a request must meet every condition or Any to specify that a request must meet only one condition.
Fill out the fields in the Actions section as follows:
- From the Action type menu, select the action that should be taken when a request meets the rule's conditions.
- (Optional) If you selected
Browser challengefrom the Action type menu, leave the Allow Interactive switch disabled to keep the challenge non-interactive or click the switch to require an interactive (CAPTCHA) challenge. - (Optional) If you selected
Blockfrom the Action type menu, click Change response to specify the custom response code to return when the rule blocks a request. Supported custom response codes are301,302, and400-599. - (Optional) If you entered
301or302in the Response code (optional) field then, in the Redirect URL (optional) field, enter the absolute or relative URL of the redirect location. For more information, check out our guide on using redirect custom response codes. - (Optional) Click Add action to add another action.
Fill out the fields in the Details section as follows:
- From the Request logging menu, select Sampled to store the logs for requests that match the rule's criteria and None to not store the logs. When you select None, the time series graphs will still include data from requests that match the rule's criteria. Read our guide on request data storage for more information.
- Leave the Status switch enabled.
- Click Change expiration and select from the menu when the rule should be disabled.
- In the Description field, enter a description of the rule.
Click Create site rule. The request rule is created and the Site Rules page appears.
Editing request rules
The steps to edit an existing rule depends on whether the rule applies to multiple sites (workspaces) or to a single site (workspace).
Editing rules that apply to multiple sites (workspaces)
To adjust a request rule that applies to more than one site (workspace), complete the following steps:
- Next-Gen WAF control panel
- Fastly control panel
- Log in to the Next-Gen WAF control panel.
From the Corp Rules menu, select Corp Rules.
Click Edit next to the rule that you want to edit.
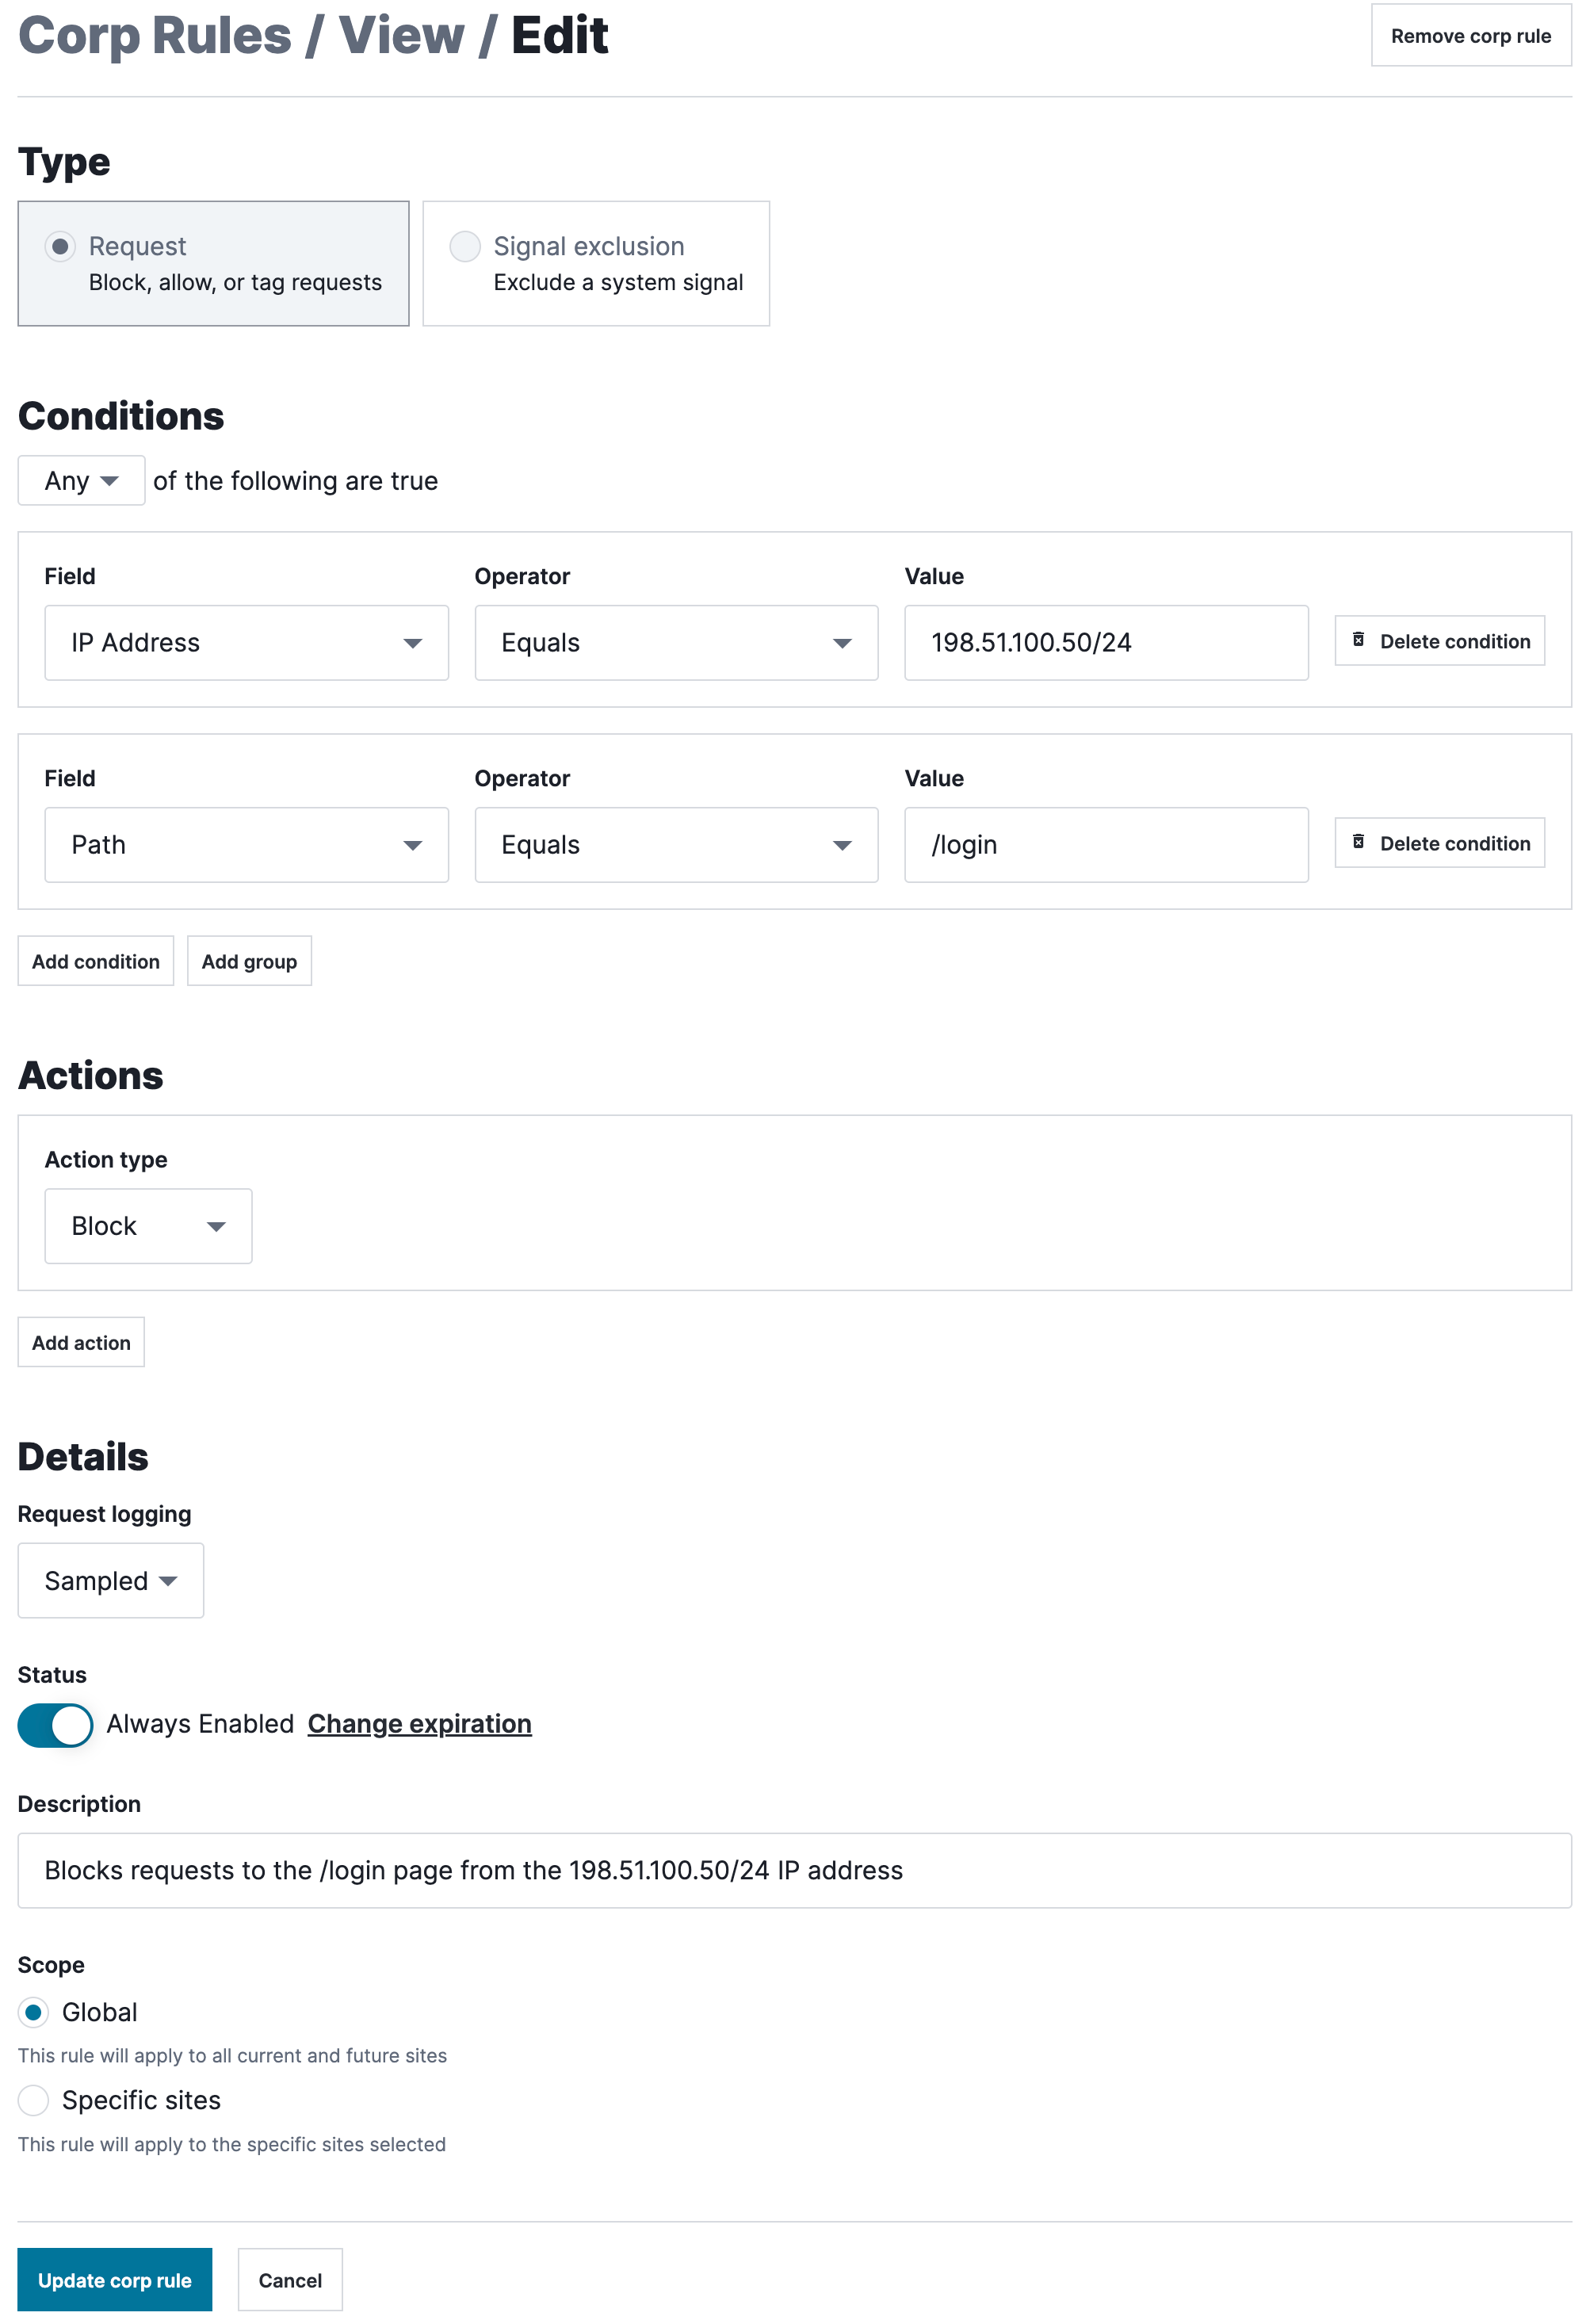
Fill out the fields in the Conditions section as follows:
- From the Field menu, select the request field that the condition is based on.
- In the Value field, enter a value for the specified field.
- From the Operator menu, select an operator to specify how the selected field and value should be compared.
- (Optional) Click Add condition to add another condition or Add group to create a group of conditions.
- Select All to specify that a request must meet every condition or Any to specify that a request must meet only one condition.
Fill out the fields in the Actions section as follows:
- From the Action type menu, select the action that should be taken when a request meets the rule's conditions.
- (Optional) Click Add action to add another action.
Fill out the fields in the Details section as follows:
- From the Request logging menu, select Sampled to store the logs for requests that match the rule's criteria and None to not store the logs. When you select None, the time series graphs will still include data from requests that match the rule's criteria. Read our guide on request data storage for more information.
- Leave the Status switch enabled.
- Click Change expiration and select from the menu when the rule should be disabled.
- In the Description field, enter a description of the rule.
- From the Scope menu, leave Global selected for the rule to apply to all your sites. If you want the rule to apply to specific sites, select Specific sites and then select the sites the rule should apply to.
Click Update corp rule. The request rule is created and the Site Rules page appears.
Editing rules that apply to a single site (workspace)
To adjust a request rule that applies to only one site (workspace), complete the following steps:
- Next-Gen WAF control panel
- Fastly control panel
- Log in to the Next-Gen WAF control panel.
- From the Sites menu, select a site if you have more than one site.
From the Rules menu, select Site Rules.
Click Edit next to the rule that you want to update.
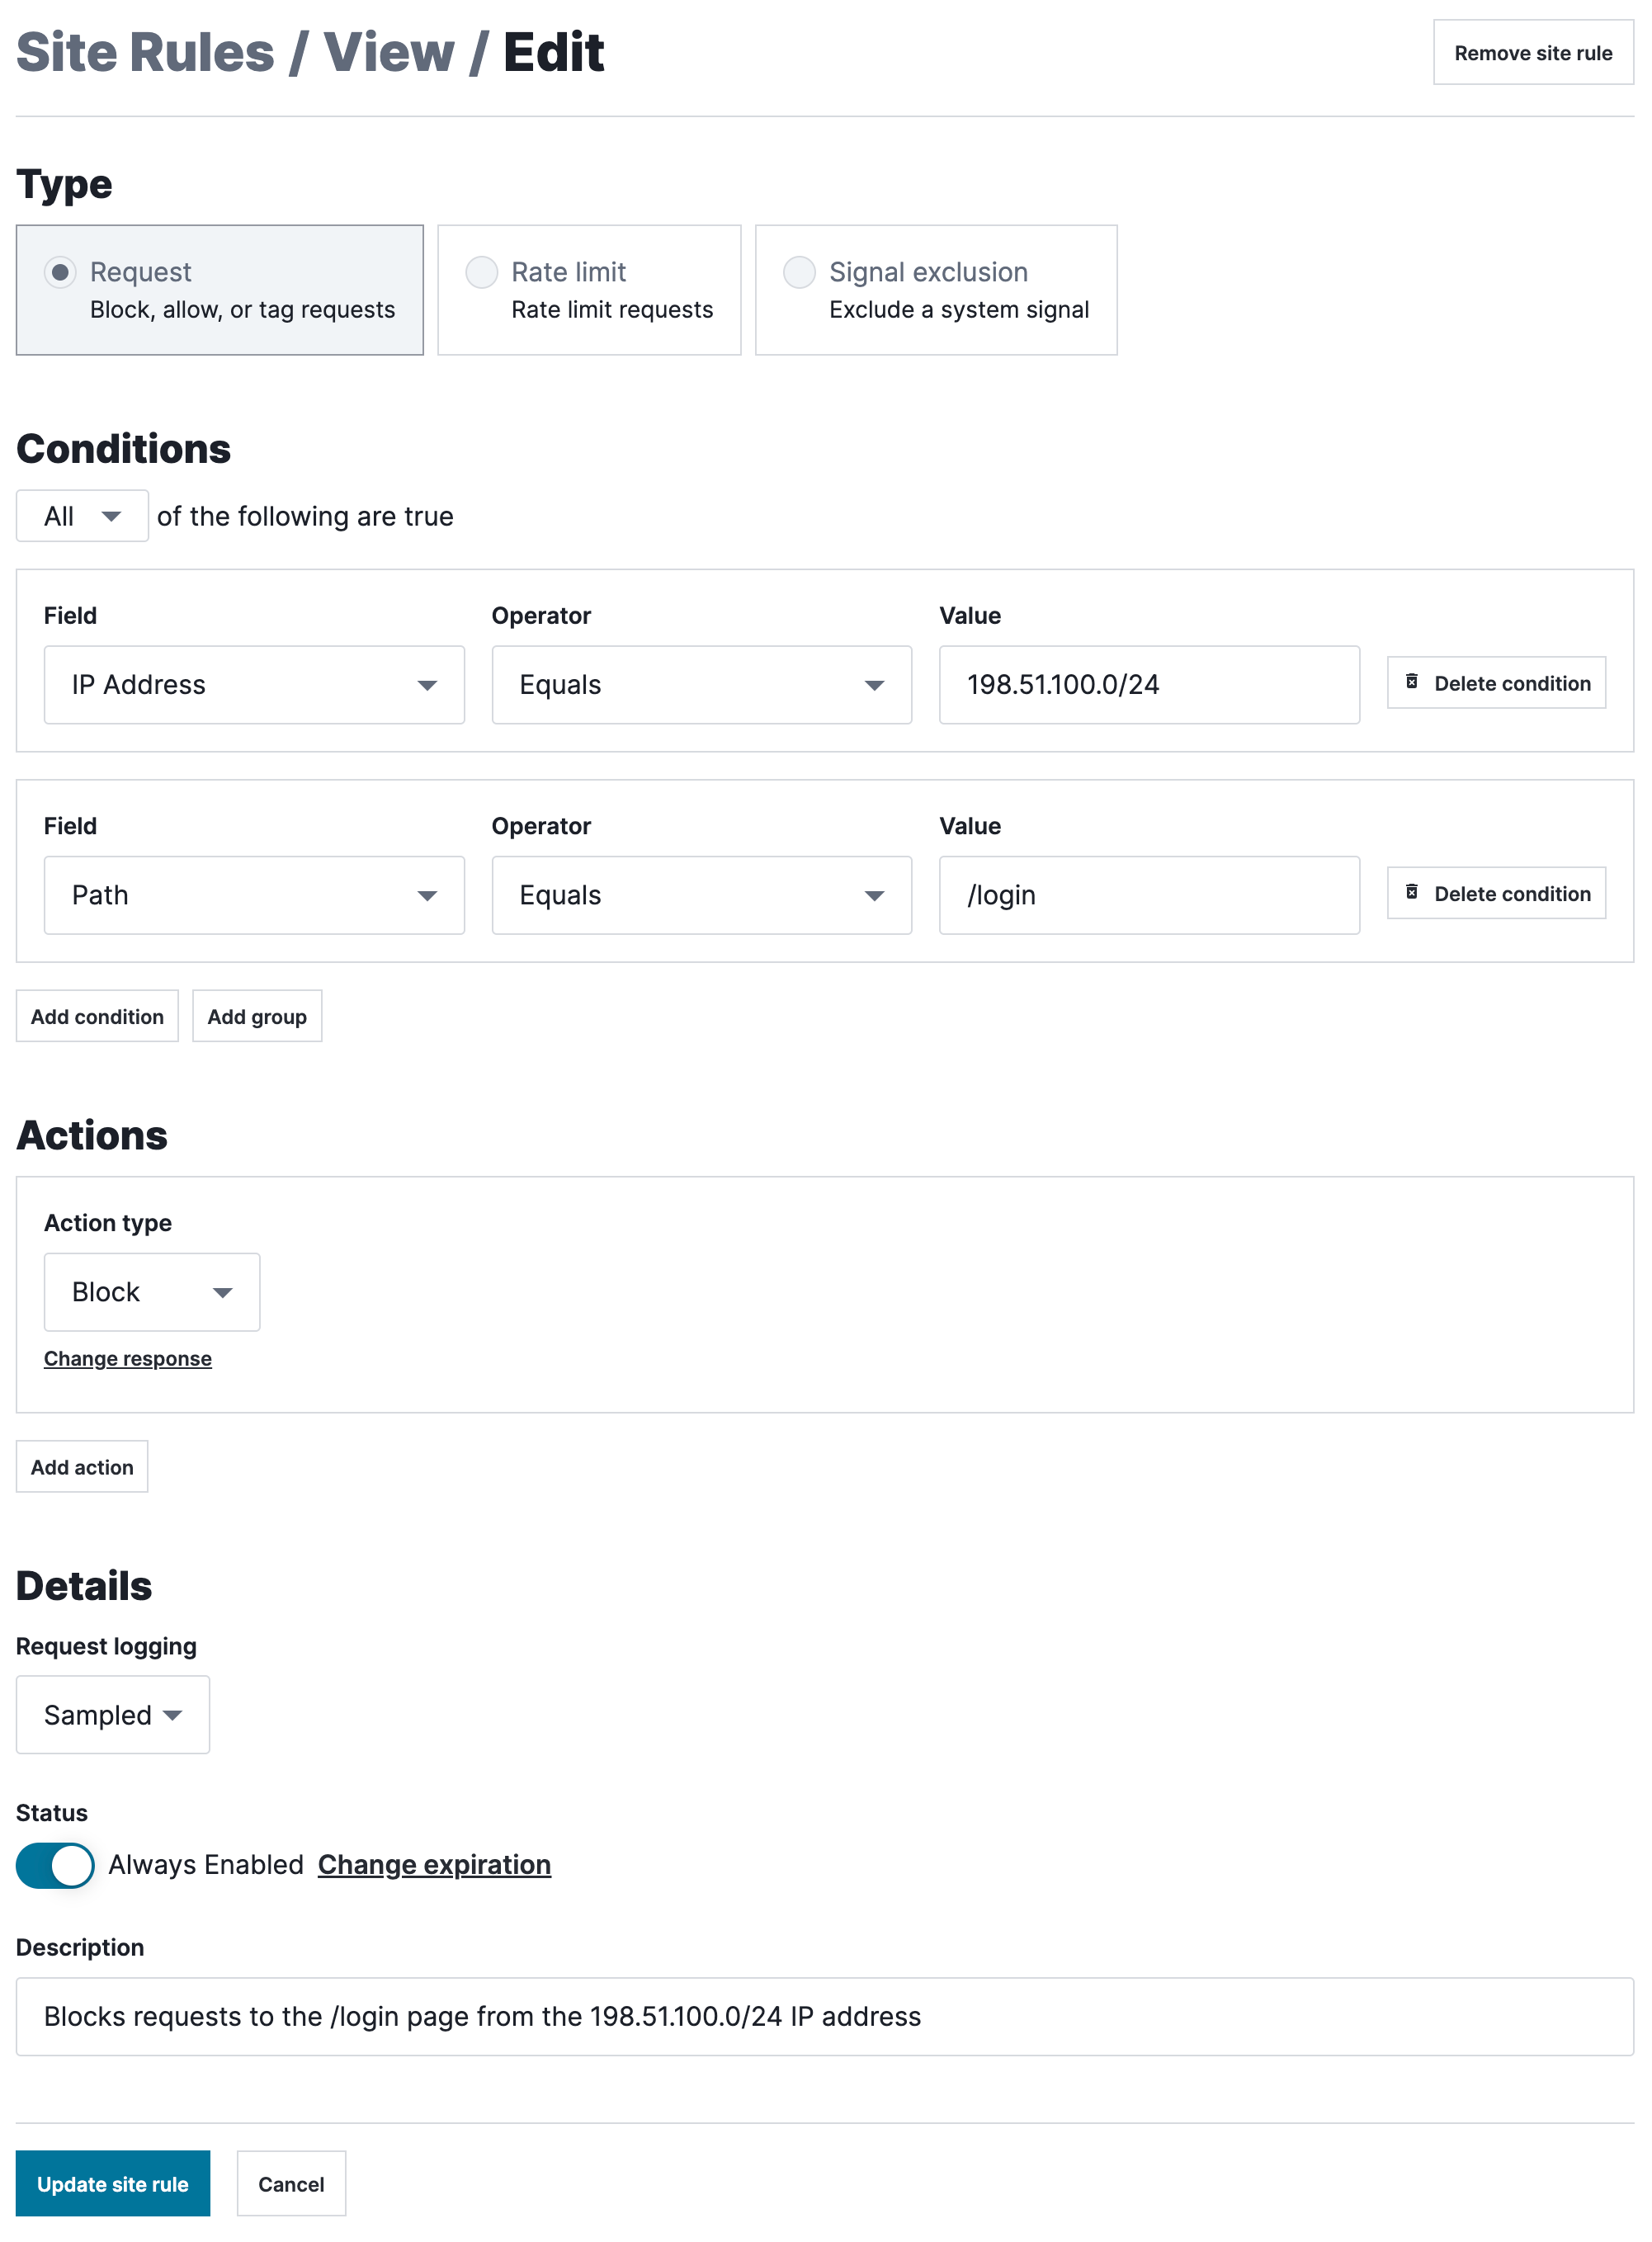
In the Type section, select Request.
Fill out the fields in the Conditions section as follows:
- From the Field menu, select the request field that the condition is based on.
- In the Value field, enter a value for the specified field.
- From the Operator menu, select an operator to specify how the selected field and value should be compared.
- (Optional) Click Add condition to add another condition or Add group to create a group of conditions.
- Select All to specify that a request must meet every condition or Any to specify that a request must meet only one condition.
Fill out the fields in the Actions section as follows:
- From the Action type menu, select the action that should be taken when a request meets the rule's conditions.
- (Optional) If you selected
Browser challengefrom the Action type menu, leave the Allow Interactive switch disabled to keep the challenge non-interactive or click the switch to require an interactive (CAPTCHA) challenge. - (Optional) If you selected
Blockfrom the Action type menu, click Change response to specify the custom response code to return when the rule blocks a request. Supported custom response codes are301,302, and400-599. - (Optional) If you entered
301or302in the Response code (optional) field then, in the Redirect URL (optional) field, enter the absolute or relative URL of the redirect location. For more information, check out our guide on using redirect custom response codes. - (Optional) Click Add action to add another action.
Fill out the fields in the Details section as follows:
- From the Request logging menu, select Sampled to store the logs for requests that match the rule's criteria and None to not store the logs. When you select None, the time series graphs will still include data from requests that match the rule's criteria. Read our guide on request data storage for more information.
- Leave the Status switch enabled.
- Click Change expiration and select from the menu when the rule should be disabled.
- In the Description field, enter a description of the rule.
Click Update site rule. The request rule is updated and the Site Rules page appears.
Deleting request rules
To delete a rule, follow the steps described in the Deleting rules section.
Example request rules
The following examples demonstrate how to configure request rules for common use-cases. Be aware that values (e.g., paths and response codes) used in these examples may not be the same as those used by your particular web application.
Blocking attacks from malicious IP addresses
This example demonstrates a request rule that immediately blocks attacks from IP addresses that:
- were reported as malicious by the SANS Internet Storm Center.
- were identified as bad actors by Fastly's Network Learning Exchange (NLX).
- serve as TOR exit nodes.
To simplify creation of the rule, create a list with all of the attack signals. Then, create a request rule that:
- looks for requests tagged with an attack signal and tagged with the Malicious IP, SigSci IP, or Tor Traffic signal.
- blocks requests that meet the rule's condition set.
HINT: If you don't have access to the Lists feature, create a request rule for each individual attack signal.
- Next-Gen WAF control panel
- Fastly control panel

Blocking bad bots
This example demonstrates a request rule that immediately blocks requests made by suspected bad bots whose IP addresses:
- were reported as malicious by the SANS Internet Storm Center.
- were identified as bad actors by Fastly's Network Learning Exchange (NLX).
- function as TOR exit nodes.
The rule:
- looks for requests tagged with the Suspected Bad Bot signal and tagged with the Malicious IP, SigSci IP, or Tor Traffic signal.
- blocks requests that meet the rule's condition set.
- Next-Gen WAF control panel
- Fastly control panel

