
Working with signal exclusion rules
A signal exclusion rule prevents requests with a particular pattern from being tagged with a specific system signal. You can use signal exclusion rules to help avoid false positives. For example, you may have an internal website where you allow employees to POST raw HTML. These types of requests may look like a Cross-Site Scripting attack (XSS) and get tagged with the XSS system signal by the Next-Gen WAF. To prevent false positives, you can create a signal exclusion rule to prevent requests from your internal VPN on that website from being tagged with the xss attack signal. Similarly, a signal exclusion rule could prevent internal IP addresses that fail to access an admin page from being tagged with the FORCEFULBROWSING signal.
Limitations and considerations
When working with signal exclusion rules, keep the following in mind:
- Signal exclusion rules are not available for the Essential platform.
- Signal exclusion rules are limited to 1000 at the corp-level (also known as account-level) plus 1000 at the site-level (also known as workspace-level) and count against the total number of request rule limits for corps (accounts) and sites (workspaces).
Creating signal exclusion rules
You can create signal exclusion rules that apply to multiple sites (workspaces) or that only apply to a single site (workspace).
Creating signal exclusion rules that apply to multiple sites (workspaces)
To create a signal exclusion rule that applies to multiple sites (workspaces), complete the following steps:
- Next-Gen WAF control panel
- Fastly control panel
- Log in to the Next-Gen WAF control panel.
From the Corp Rules menu, select Corp Rules.
Click Add corp rule.
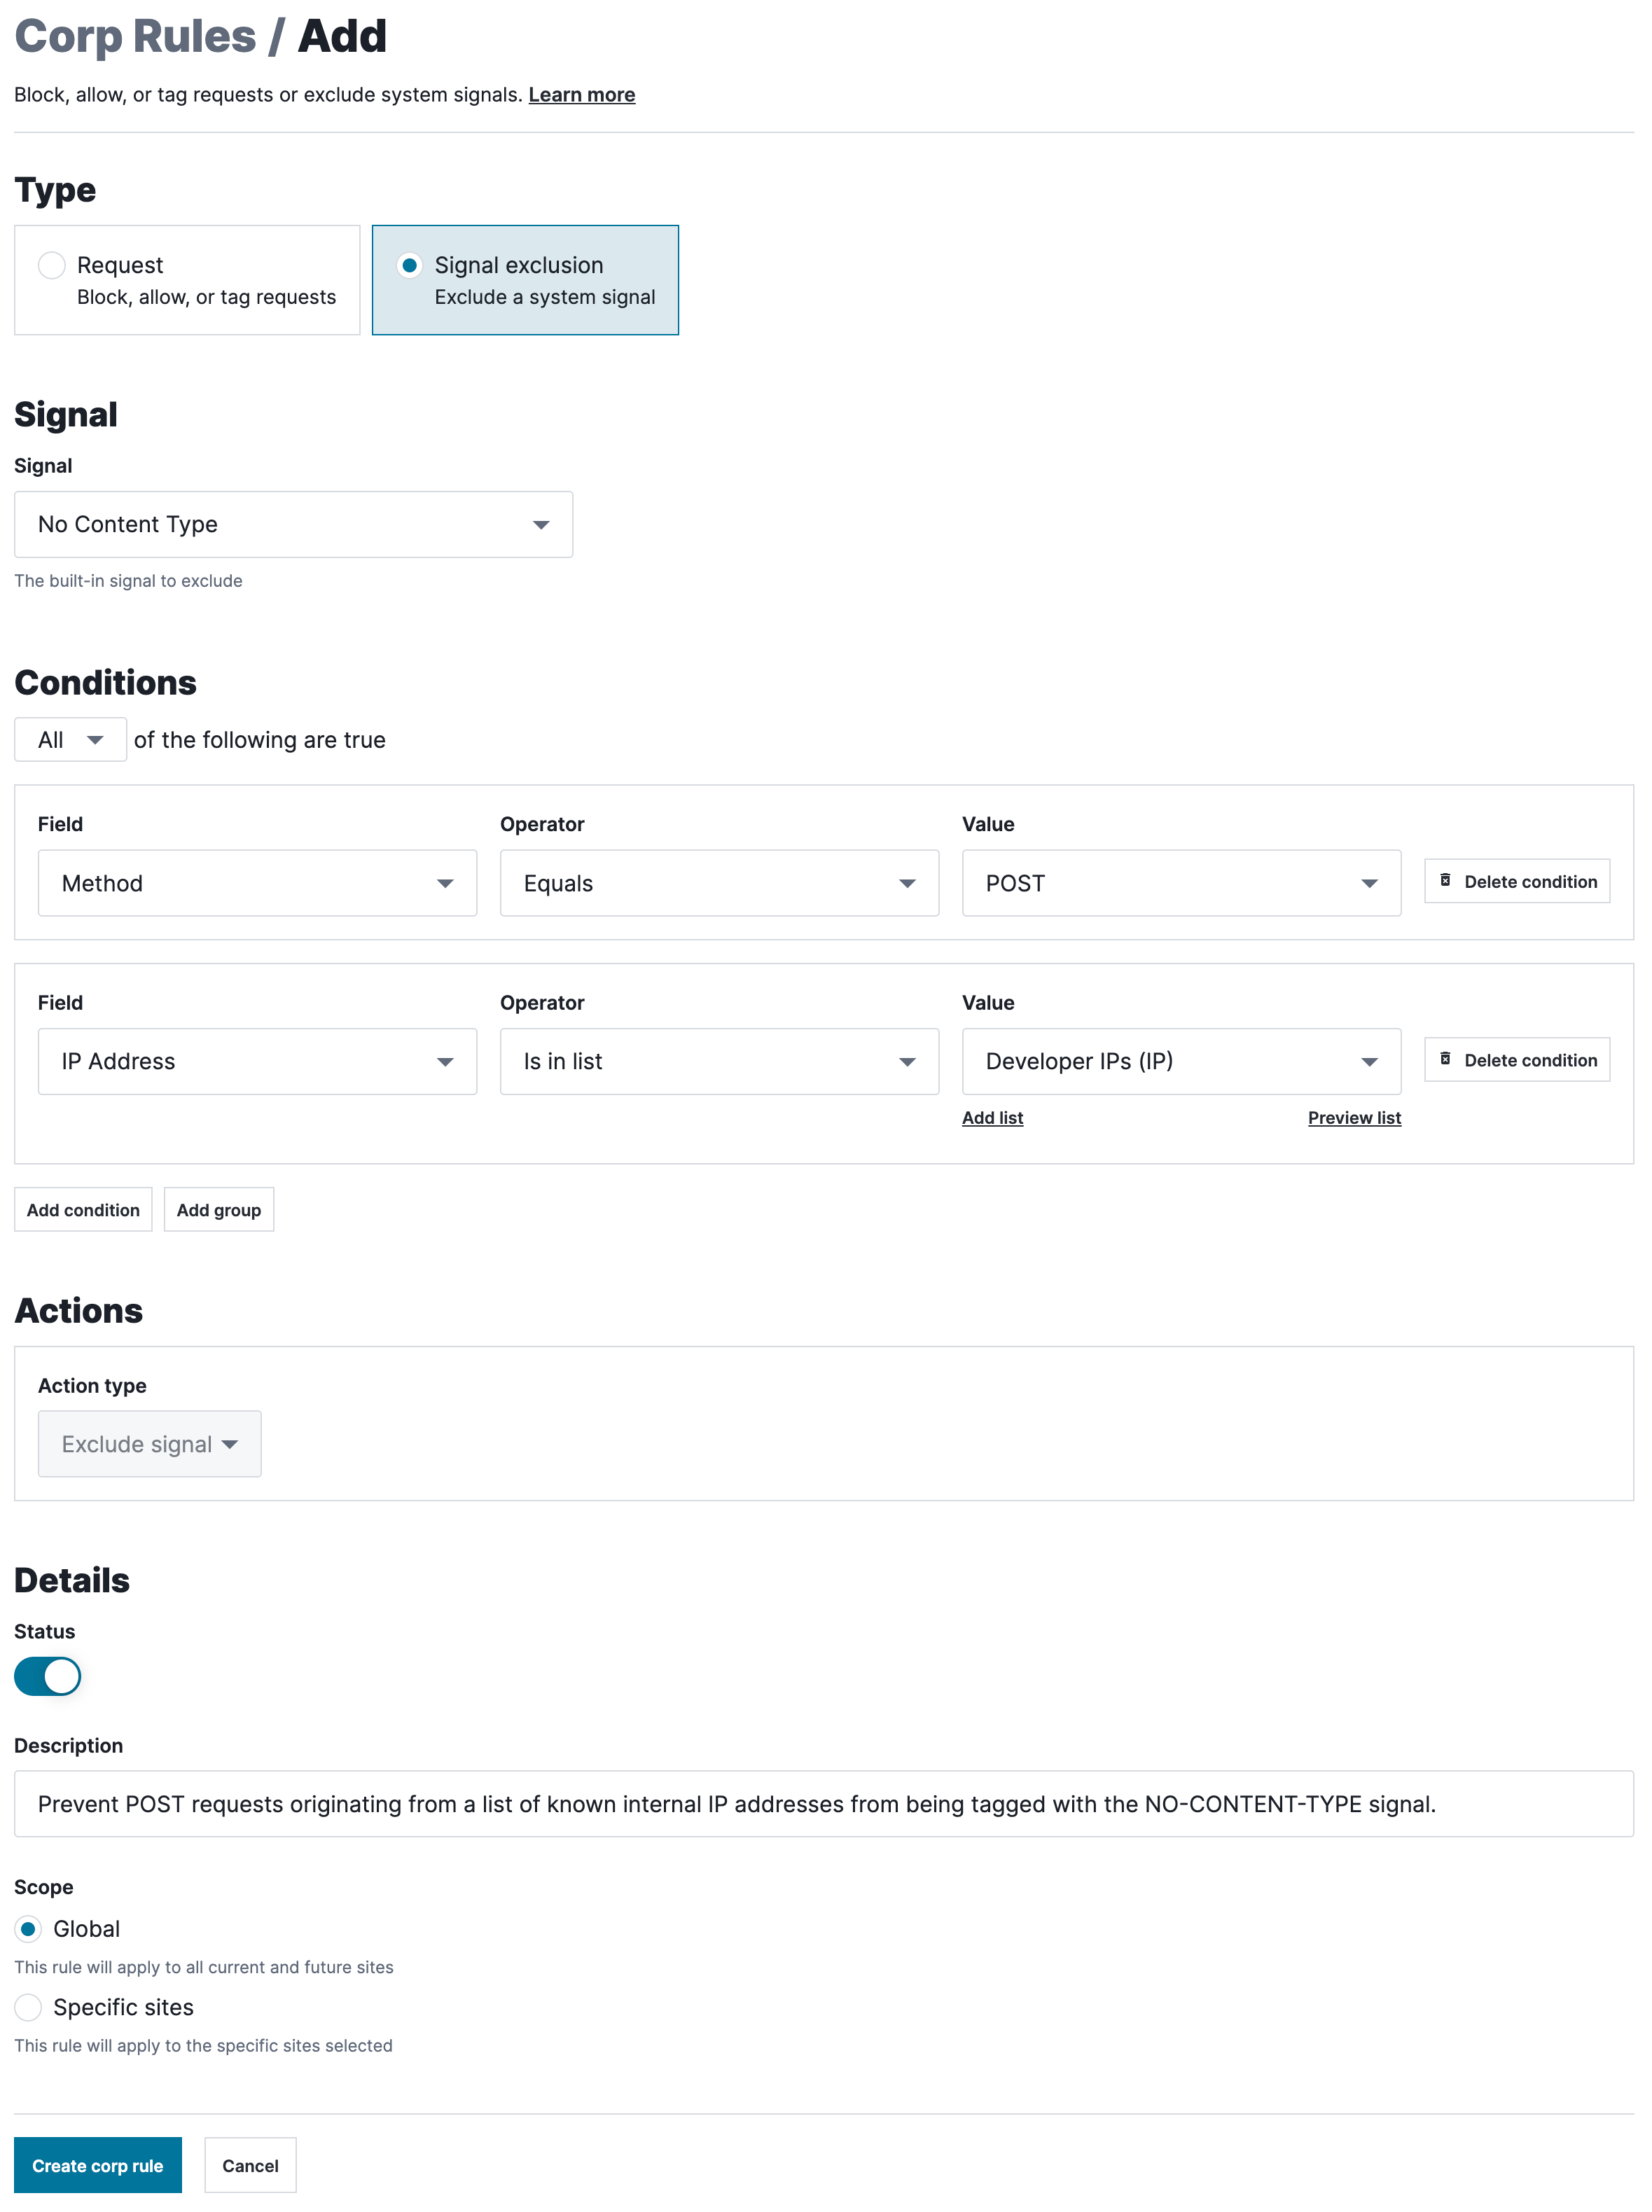
In the Type section, select Signal exclusion.
From the Signal menu, select the signal that you want to prevent from being assigned to requests that meet specific conditions.
Fill out the fields in the Conditions section as follows:
- From the Field menu, select the request field that the condition is based on.
- In the Value field, enter a value for the specified field.
- From the Operator menu, select an operator to specify how the selected field and value relate.
- (Optional) Click Add condition to add another condition, or click Add group to create a group of conditions.
- Select All to specify that a request must meet every condition to be excluded or Any to specify that a request must meet only one condition to be excluded.
Fill out the fields in the Details section as follows:
- Leave the Status switch enabled.
- In the Description field, enter a description of the rule.
- From the Scope menu, leave Global selected for the rule to apply to all your sites. If you want the rule to apply to specific sites, select Specific sites and then select the sites the rule should apply to.
Click Create corp rule. The rule is created, and the Corp Rules page appears.
Creating signal exclusion rules that apply to one site (workspace)
To create a signal exclusion rule that applies to only one site (workspace), complete the following steps:
- Next-Gen WAF control panel
- Fastly control panel
- Log in to the Next-Gen WAF control panel.
- From the Sites menu, select a site if you have more than one site.
From the Rules menu, select Site Rules.
Click Add site rule.
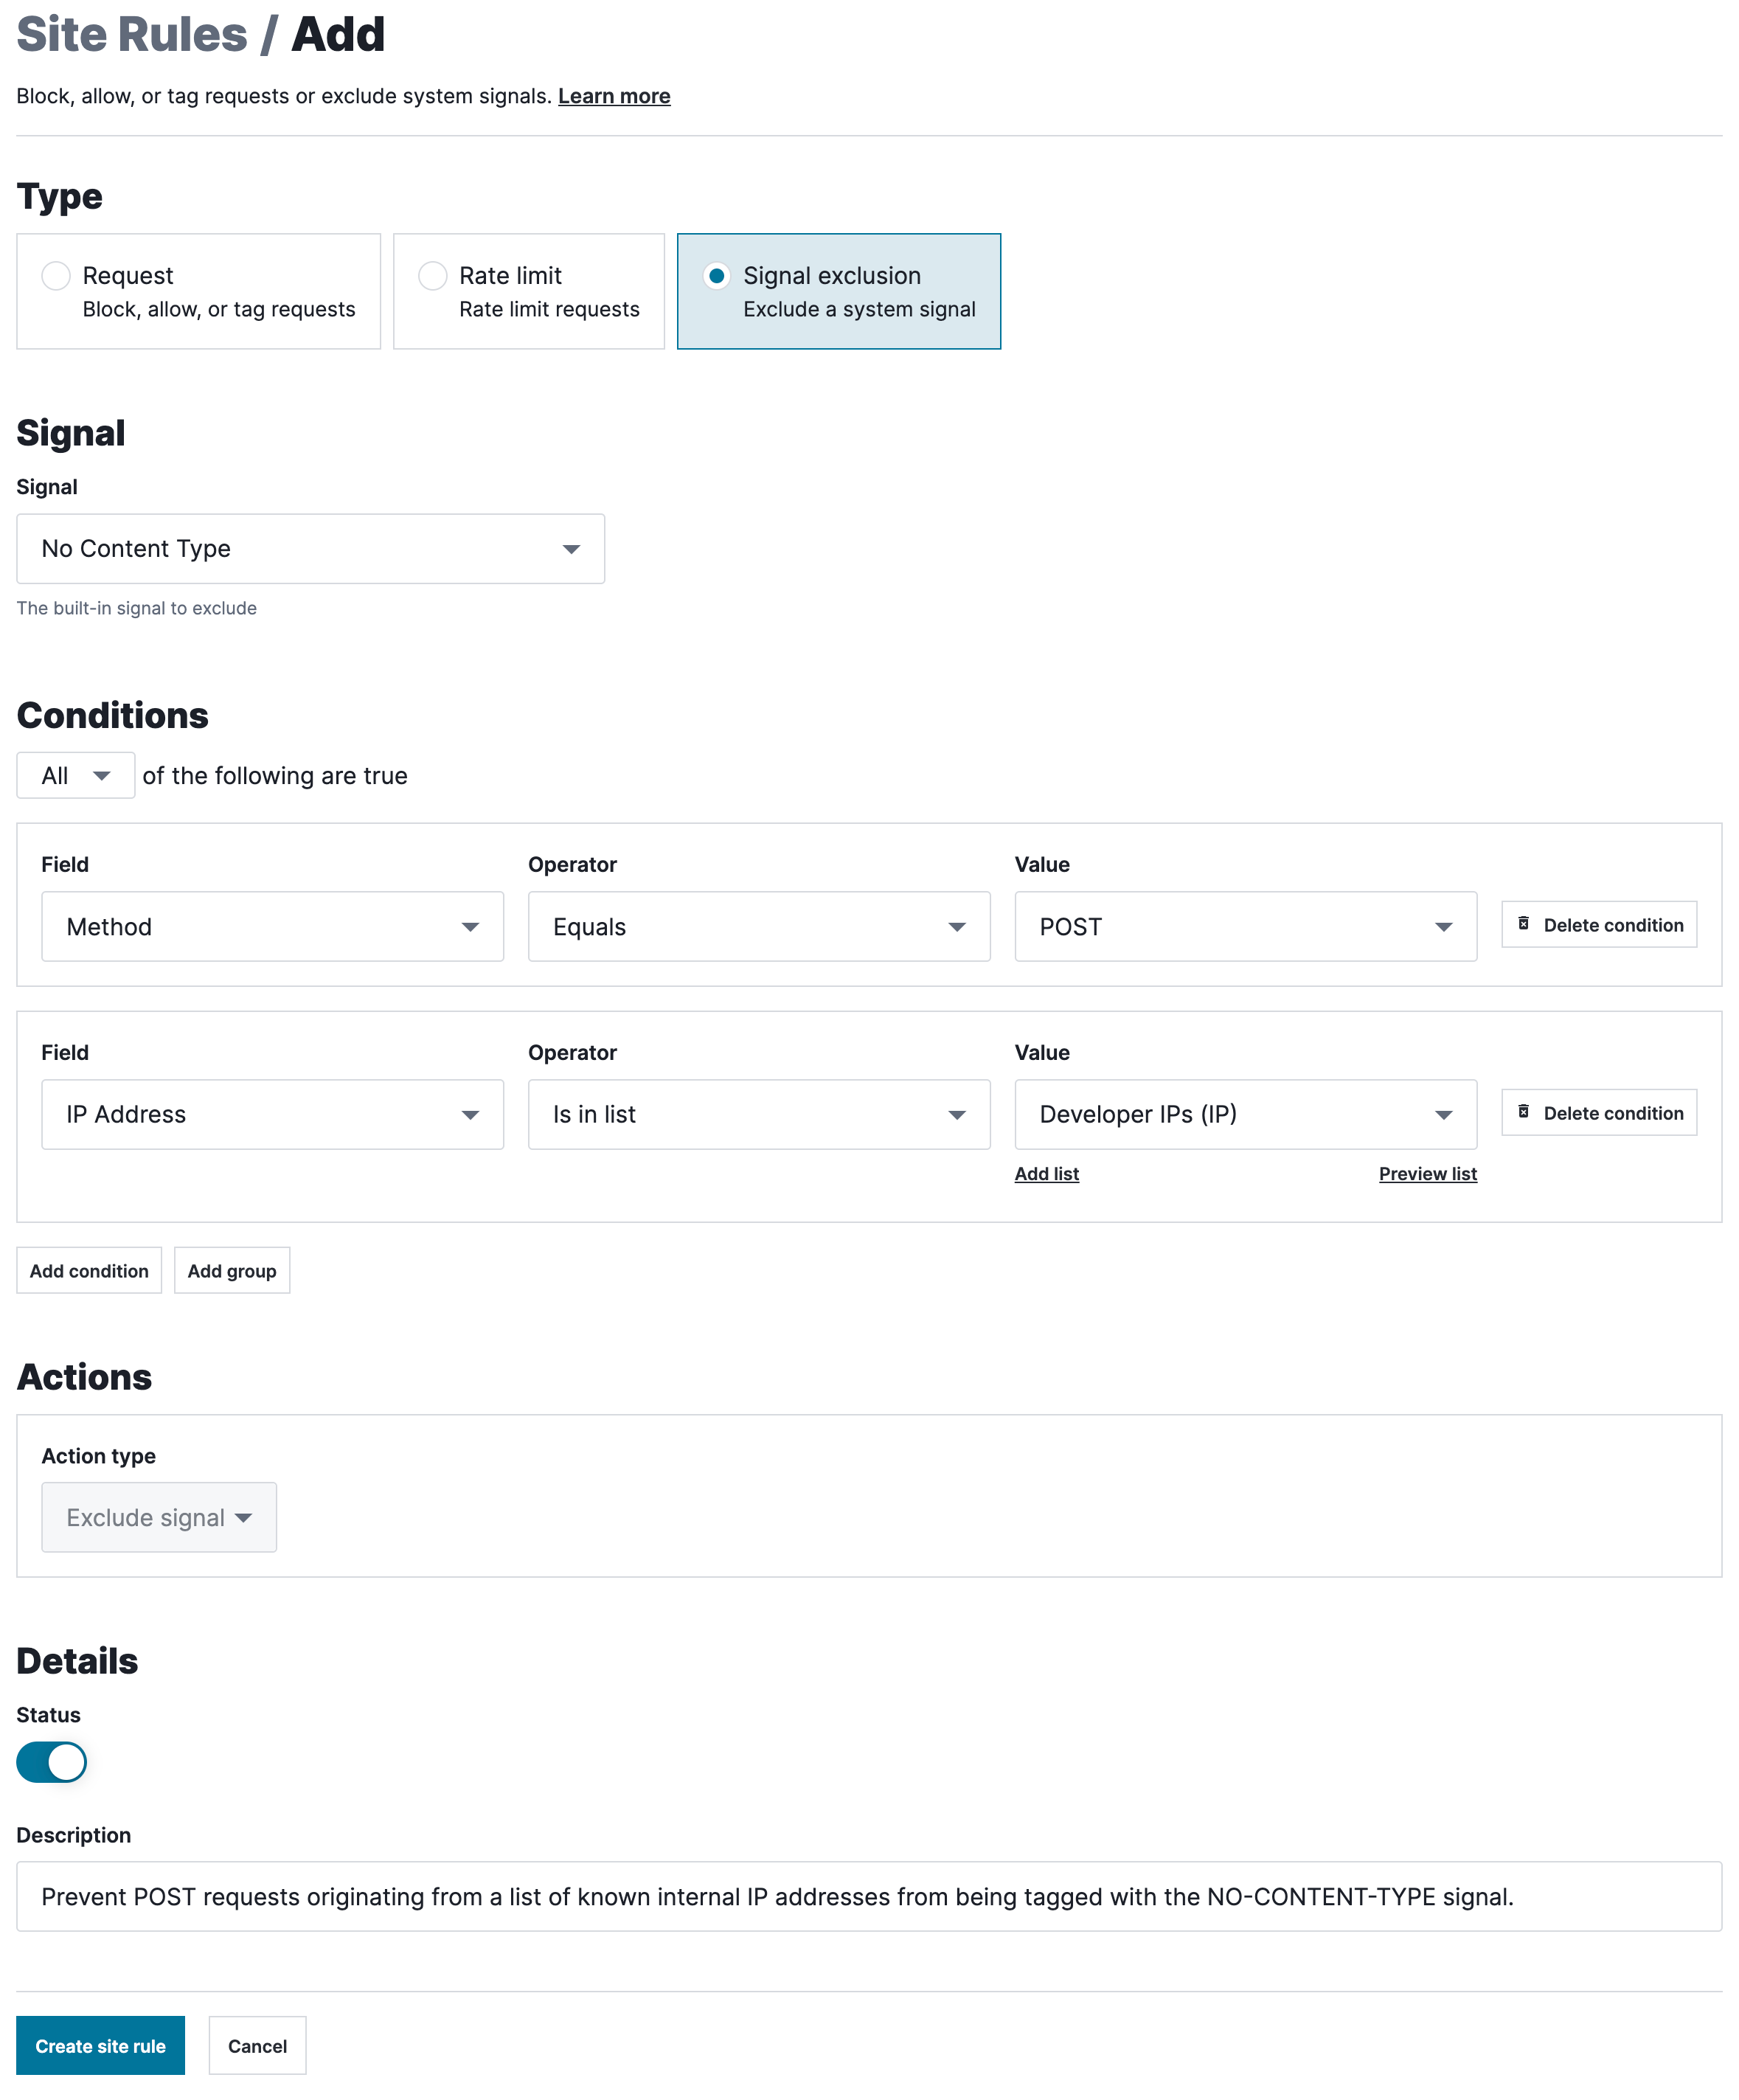
In the Type section, select Signal exclusion.
From the Signal menu, select the signal that you want to prevent from being assigned to requests that meet specific conditions.
Fill out the fields in the Conditions section as follows:
- From the Field menu, select the request field that the condition is based on.
- In the Value field, enter a value for the specified field.
- From the Operator menu, select an operator to specify how the selected field and value relate.
- (Optional) Click Add condition to add another condition, or click Add group to create a group of conditions.
- Leave All selected to specify that a request must meet every condition to be excluded or select Any to specify that a request must meet only one condition to be excluded.
Fill out the fields in the Details section as follows:
- Leave the Status switch enabled.
- In the Description field, enter a description of the rule.
Click Create site rule. The rule is created, and the Site Rules page appears.
Editing signal exclusion rules
The steps to edit an existing rule depends on whether the rule applies to multiple sites (workspaces) or to a single site (workspace).
HINT: Not sure if your rule logic will work? Use our Simulator to test it. The Simulator feature is only available in the Next-Gen WAF control panel.
Editing signal exclusion rules that apply to multiple sites (workspaces)
To adjust a signal exclusion rule that applies to more than one site (workspace), complete the following steps:
- Next-Gen WAF control panel
- Fastly control panel
- Log in to the Next-Gen WAF control panel.
From the Corp Rules menu, select Corp Rules.
Click Edit to the right of the rule that you want to delete.
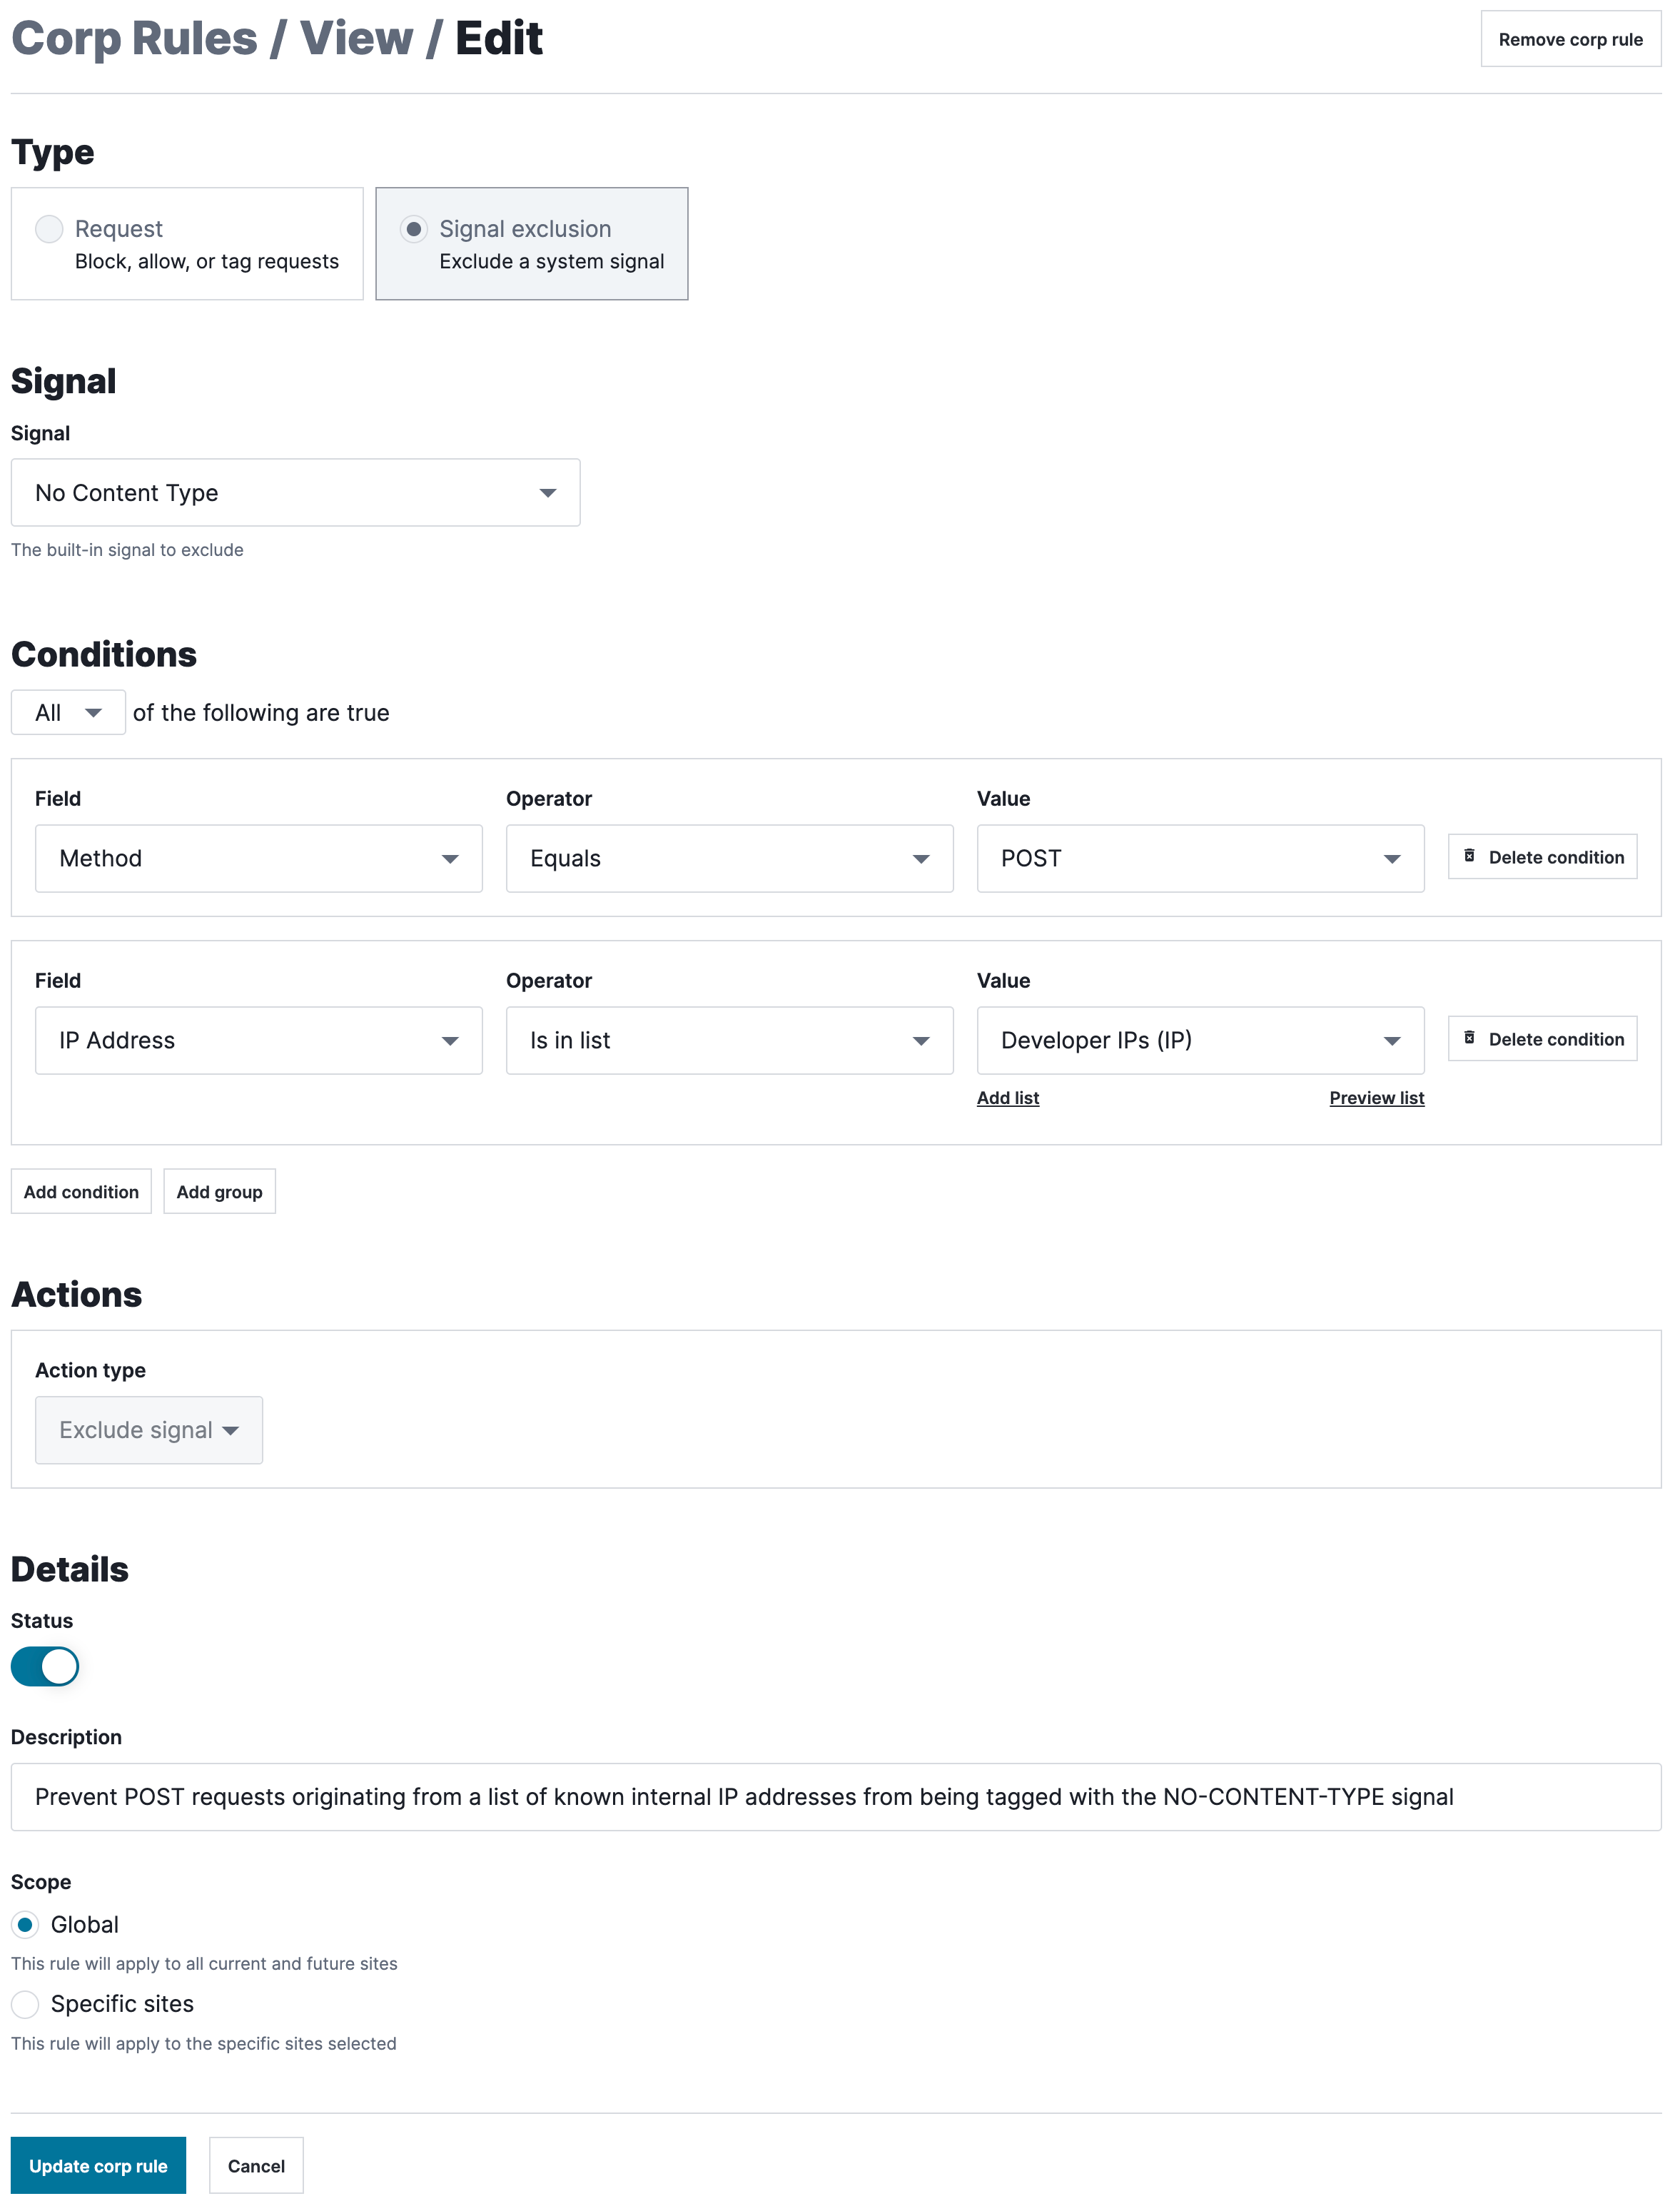
From the Signal menu, select the signal that you want to prevent from being assigned to requests that meet specific conditions.
Fill out the fields in the Conditions section as follows:
- From the Field menu, select the request field that the condition is based on.
- In the Value field, enter a value for the specified field.
- From the Operator menu, select an operator to specify how the selected field and value relate.
- (Optional) Click Add condition to add another condition, or click Add group to create a group of conditions.
- Select All to specify that a request must meet every condition to be excluded or Any to specify that a request must meet only one condition to be excluded.
Fill out the fields in the Details section as follows:
- Leave the Status switch enabled.
- In the Description field, enter a description of the rule.
- From the Scope menu, leave Global selected for the rule to apply to all your sites. If you want the rule to apply to specific sites, select Specific sites and then select the sites the rule should apply to.
Click Update corp rule. The rule is updated, and the Corp Rules page appears.
Editing signal exclusion rules that apply to one site (workspace)
To adjust a signal exclusion rule that applies to only one site (workspace), complete the following steps:
- Next-Gen WAF control panel
- Fastly control panel
- Log in to the Next-Gen WAF control panel.
- From the Sites menu, select a site if you have more than one site.
From the Rules menu, select Site Rules.
Click Edit to the right of the rule that you want to modify.
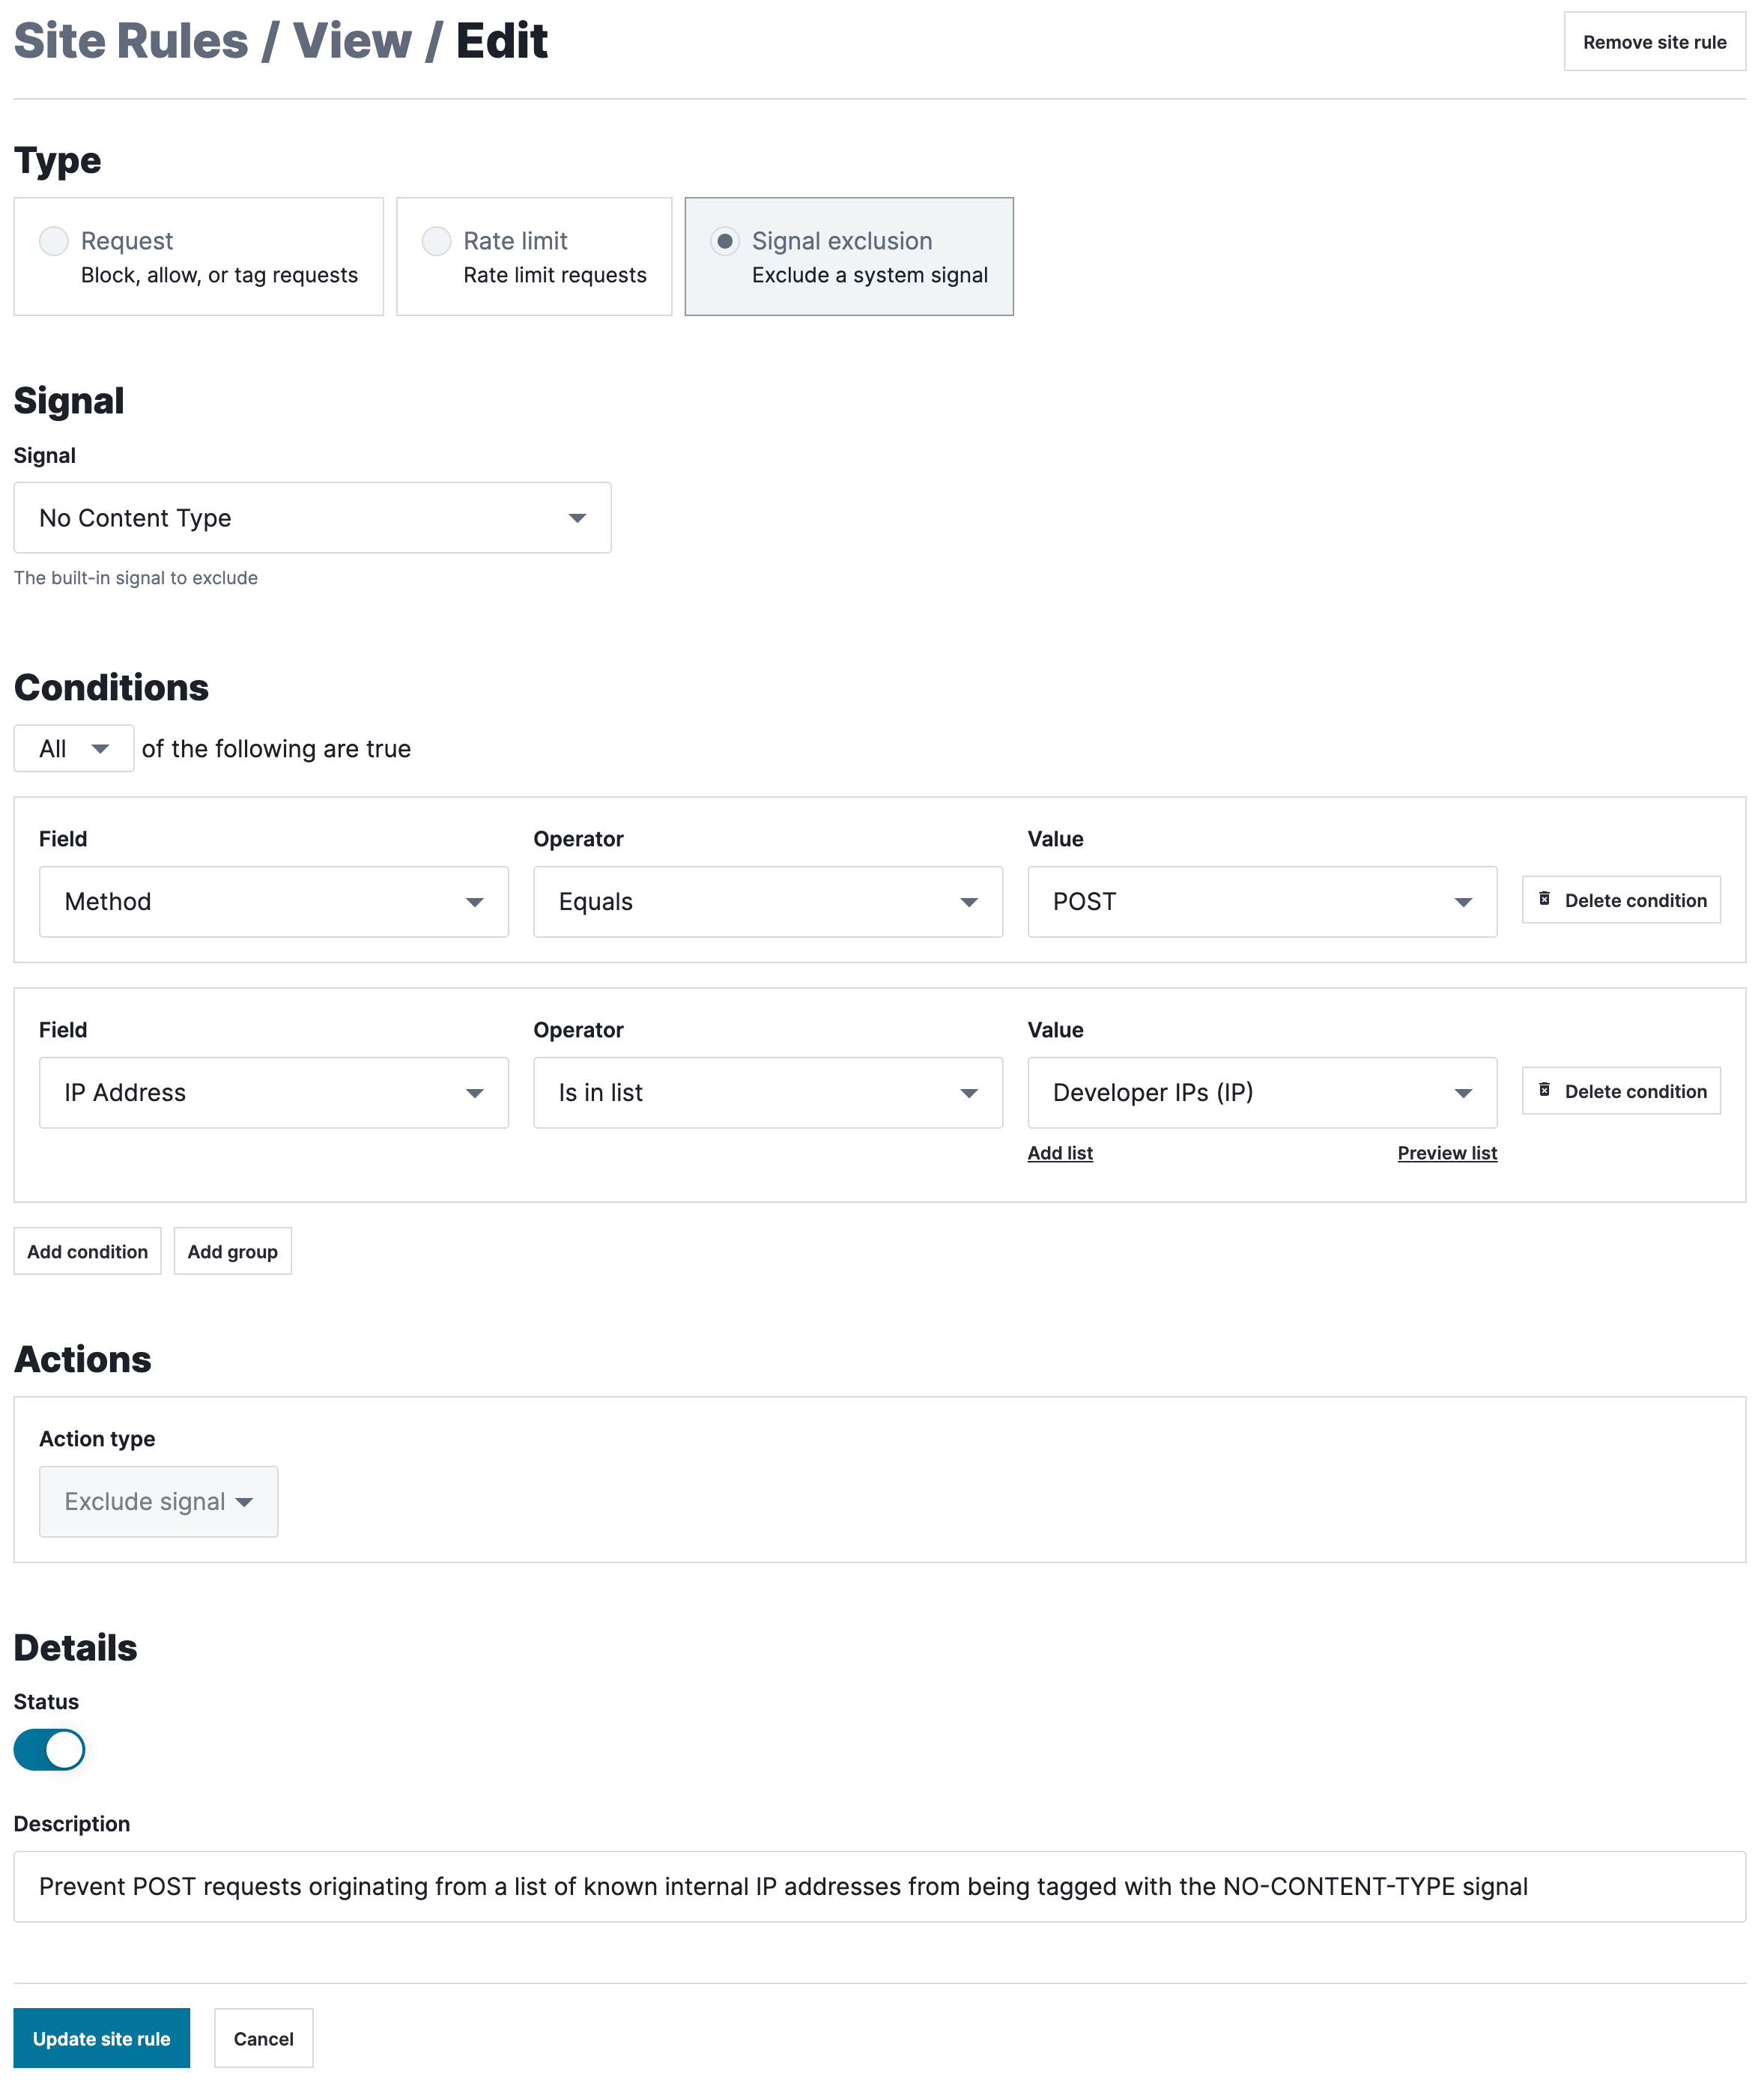
From the Signal menu, select the signal that you want to prevent from being assigned to requests that meet specific conditions.
Fill out the fields in the Conditions section as follows:
- From the Field menu, select the request field that the condition is based on.
- In the Value field, enter a value for the specified field.
- From the Operator menu, select an operator to specify how the selected field and value relate.
- (Optional) Click Add condition to add another condition, or click Add group to create a group of conditions.
- Select All to specify that a request must meet every condition to be excluded or Any to specify that a request must meet only one condition to be excluded.
Fill out the fields in the Details section as follows:
- Leave the Status switch enabled.
- In the Description field, enter a description of the rule.
Click Update site rule. The rule is updated, and the Site Rules page appears.
Deleting signal exclusion rules
To delete a signal exclusion rule, follow the steps described in the Deleting rules section.
